![]()
 > Multi-part beam from sketch.
 . Alternatively, you can also select this function from the context menu for grating steps. (SP1)
![]()
 .
.  function allows a multiple fitting of the selected connection / Design Variant, without having to re-identify the original variant several times.
![]()
are pre-defined.
To change these default configurations, activate the 3-D Standard tab and select Standard Parts > New bolting  .
.
The definition of screw/bolt types below the block Schrauben Typ [Screw type] in the file ..\Kataloge\Stahlbau\ElementProfil.dat is no longer used! (SP2)
are pre-defined.
To change these default configurations, activate the 3-D Standard tab and select Standard Parts > New bolting  . The definition of screw/bolt types below the block Schraube [Screw] in the file ..\Kataloge\Stahlbau\ElementProfil.dat is no longer used! (SP2)
![]()
For each view group creation, whether for a part or an assembly, the assigned type of use will be evaluated.
 > Change Settings, Active view group
  function enables a subsequent specification of the views to be created.
The dimensioning rules 8 and 10 dimension sheet metal sub-parts even if the sheet surface runs parallel to the view and the part contains bores.
The length of a mitre is no longer dimensioned via the rules 21 or 23. If desired, you can dimension the length of mitres via the rules 64 or 65. By default, these rules have been entered in the configuration management, but have been deactivated for all views.
Examples:
As for beams and profiles, the configuration management now also provides dimensioning rules for attached sheets and plates per side. One distinguishes between "Web, front" (BEFORE_WEB) and "Web, back" (BEHIND_WEB) as the side for the attachment. (SP2)
Furthermore, it is now possible to switch off the automatic rearranging of views in PDM-managed drawings. You specify this setting via the Configuration Editor. Select GENERAL > DRAWINGS > CREATE > REARRANGE VIEWS WHEN UPDATING DRAWINGS MANAGED VIA PDM. The default setting is 1 (rearrange). (SP1)
The Create missing sectional views checkbox has been replaced with the AutoSync sectional views checkbox. This checkbox enables you to specify how to proceed with sectional views that are still missing or have become superfluous. (SP2)
If you activate the checkbox, the following will happen:
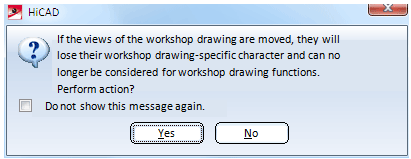
If you move a view from one sheet of the workshop drawing to another (via Drag & Drop), HiCAD will issue the following message:

After performing the action, the corresponding views will no longer be considered for the updating of the workshop drawing.
![]()
Bei der geometrischen Gleichteilerkennung alle Teile berücksichtigen [Consider all parts for geometrical identical part search] (0=no; 1=yes)
is now 1, i.e. all parts will be considered.
![]()
![]()
 . This enables you to hide the grid part
  while retaining the grid annotations.
![]()
 function has changed. The dialogue enables you to load and save configurations for glass panes, taking also the type of coating into account. (SP2)
![]()
During dimensioning of parts, the annotations will be placed in such a way that they do not overlap the processings. (SP2)
Related Topics
HiCAD 2011 - New in Steel Engineering
Version 1702 - HiCAD Steel Engineering | Date: 9/2012 | © Copyright 2012, ISD Software und Systeme GmbH