Use the following tabs to set the parameters for stair railings:
Once you have made all required parameter specifications, exit the window with OK. Identify one of the stringer sections of the staircase to fit the railing.
For stairs with railings on both sides you create a main part called RAILING, with two sub-parts, RAILING RIGHT and RAILING LEFT, for stairs with railings on only one side you create a main part with one sub-part RAILING LEFT or RAILING RIGHT, respectively.

![]()
In this tab you set the parameters for handrail and posts of the railing.
The railing can either be created on the external side of the staircase or on both sides, depending on the selected symbol  .
.
|
Handrail |
|
|
Posts |
|
|
Start/End |
Select the handrail type at the beginning and the end by clicking the appropriate icon. Depending on the type, you can then select the design of the pipe bend. The values DXA and DXE determine the excess length of the handrail at the beginning and the end. |
![]()
![]()
This tab allows you to define the parameters for booms,rods and knee rails of the railing. Which of the input fields are active depends on the selected railing type. The following options are available:
You select the desired type by activating the appropriate icons  .
.
After selecting the railing type the preview image is updated accordingly, and the default values for the railing data are shown in the input fields.
|
Boom |
|
|
Rod |
|
|
Knee rail |
|
Proceed likewise to specify the data for the skirting.
![]()
![]()
|
Top/Lateral |
Activate the corresponding checkbox to define whether you want the railing to be top-mounted on the upper edge of the stringer (top) or front-mounted on the side of the stringer (lateral). For stringers that do not have a flange (e.g. wide flat steels), only a lateral mounting will be possible. Therefore the selection options are deactivated in such cases. |
|
With base plate |
Activate the With base plate checkbox if you want the railing to be fitted with a base plate. Which of the input fields are active depends on the selected base plate type. The parameter specifications will be displayed in the preview graphic |
|
Base plate |
If you have activated the With base plate checkbox, specify the data for the base plate. Which input fields are active depends on the selected base plate form. The meaning of the parameters can be seen by a corresponding preview graphic.
|
|
Distance plate |
If you have activated the With base plate and selected the lateral mounting type, you can additionally insert a distance plate. Activate the corresponding checkbox and specify the data for the plate. |
|
Bolting |
If you have activated the With base plate checkbox, you can specify the bolting here. The boltings that are available for the railings care defined in the file Railing Screw Joint.ini (in the HiCAD subdirectory KATALOGE\SYS\CONFIGS). Predefined are configurations for
To change these default configurations, activate the 3-D Standard tab and select Standard Parts > New bolting In the selection box, all valid bolting configurations from the file Railing Screw Joint.ini are displayed. Valid are configurations with a common nominal diameter for all bolting elements (bolt, washer, nut, bore), and a washer /wedge disc on the nut's side with the inclination of the flange of the stair stringer. A further selection box for the last chosen valid configuration will be initialised, with all valid nominal diameters. Valid are all nominal diameters which apply to all elements of the configuration. If the configuration file does not exist, cannot be read, or does not contain a valid configuration, the Bolting selection box will be inactive, and the text Without bolting will be displayed. When you close the dialogue with OK, the message No valid bolting exists! will be shown, and the query Create railing without boltings? appears. If you answer Yes, the dialogue will be closed and the railing will be created without boltings. If you select No, the dialogue will not be closed. You can then either change the settings or end the dialogue with Cancel. |
![]()
Related Topics
Stairs and Railings (3-D SE) • Railing on Industrial Staircase (3-D SE) • Steel Engineering Functions
Version 1702 - HiCAD Steel Engineering | Date: 9/2012 | © Copyright 2012, ISD Software und Systeme GmbH
 Example
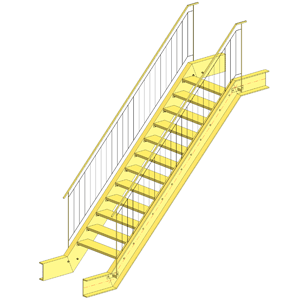
 .
.