"Civil Engineering functions" docking window > Steel Engineering > Connections > Individual beam/profile > Base plate + Anchor plate (1101) 
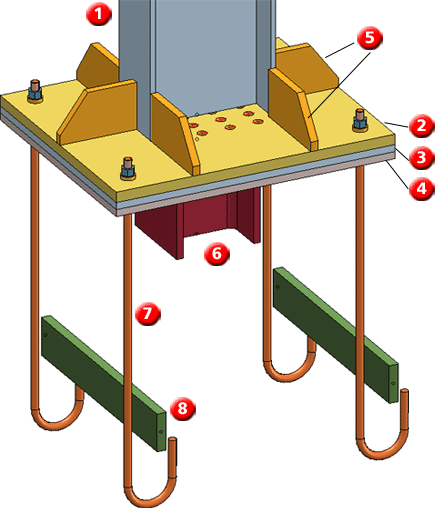
Use this function to fit base plates and anchor plates for columns (vertical beams). If required, the fitting can be applied with pre-drilled welded plate and anchor plate, shear connectors, head studs, dowels or anchors with inserts. The fitting of additional stiffeners at flanges or webs is also possible .

(1) Column, (2) Base plate, (3) Welded plate, (4) Anchor plate, (5) Stiffeners on flange/web, (6) Shear connector, (7) Anchors, (8) Inserts
Identify the beam. The Base plate+Anchor plate (1101) dialogue window will be displayed.
Configurations for Base plates+Anchor plates can be saved, which enables you to access your individual configurations at any time afterwards.
The configuration of the base plate/anchor plate takes place via the following tabs of the dialogue window:
This tab provides information about the identified beam, such as type, material, dimensions of the beam etc. Changes are not possible here.
On this tab you specify the type and size of plates, their alignment relative to the beam, as well as the type of the bores and the bore grids.
Determine which plates are to be inserted and specify the plate size. Available are base plates, anchor plates and welded plates.
Activate or deactivate the corresponding Insert checkbox and specify the length and width of the plates you want to insert. The plates can consist of sheet metal or of flat steel. Click the  icon to select plate type and material directly from the corresponding standard part catalogues.
If you want to shorten the beam by the thickness of the plate that is to be connected to the beam, activate the Shorten beam by plate thickness checkbox.
If you want to directly apply the bores to the sheets, activate the Bores checkbox. The bore diameter can be specified separately for each plate.
The bore grid determines the arrangement of the bores on the plates.
Here you determine the profile for the shear connector, its length and its material. Click the  icon to select the beam and material directly from the corresponding standard part catalogues.
On this tab you determine whether you want the base plate/anchor plate to be inserted with anchors, head studs or dowels. Activate the corresponding Insert checkbox. The corresponding input fields will then be activated.
Click the  icon to select the anchors directly from the from the corresponding standard part catalogues.
To select the inserts, click the  icon and select the desired part from the catalogue. Then specify the number of inserts and their length. If you want to rotate the part 90 degrees, activate the corresponding checkbox.
To determine the desired bolting set, click the  icon and select the desired bolting set from the dialogue window. The composition of the bolting takes place in the same way as for 3-D boltings.
Click the  to select the head studs directly from the corresponding standard part catalogues.
In the Grid X/Y areas you determine the arrangement of the anchors, head studs and dowels.
Use this tab to insert ribs, i.e. additional stiffeners on flange and web.
For each of the possible stiffeners (2 and 5 to web, 1, 3, 4 and 6 to flange) the following parameter settings are available:
Insert
By activating/deactivating this checkbox you determine whether the corresponding stiffener will be inserted.
AutoCalculate length
If this checkbox is active, the length of the stiffeners will be calculated automatically. If you do not want this, deactivate the checkbox and enter the length manually.
Height, Chamfer X, Chamfer Y
Here you specify the height of the stiffener and the chamfer length in X- and Y-direction.
Process corner
Use this listbox to select the type of processing for the inner corner of the stiffener. The following options are available:
Depending on the selected option, you can then enter the chamfer length or the fillet radius.
Click the  icon to apply the settings of the current area to all other stiffeners of the same direction. If you are currently editing, for example, area 1, i.e. in flange direction and click on the icon, the settings will automatically be taken over for the areas 3, 4 and 6.
![]() Please note:
Please note:
The components for base plates and anchor plates will be loaded from the HiCAD Standard Part catalogues. If you want to use your own beams, profiles, plates or bolts, you need to expand the corresponding tables accordingly using the Catalogue Editor:
Related Topics
Connections + Variants (3-D SE) • The Dialogue Window for Connections (3-D SE) • The Catalogue System for Connections + Variants (3-D SE)
Version 1702 - HiCAD Steel Engineering | Date: 9/2012 | © Copyright 2012, ISD Software und Systeme GmbH