Boltings and Rivetings
3-D Standard > Standard
Parts > New bolting/riveting 
Use this functions to compose and insert complete boltings or rivetings.
Proceed as follows:
- Activate the New bolting/riveting
 function.
 - The Settings dialogue window will be displayed (if you have not activated the Suppress window checkbox in the settings). Make the settings you want and choose OK to exit the window.
- Define the processing plane, if required.
- The Boltings dialogue window is displayed. Construct your bolting/riveting here and choose any further options.
- Click OK to exit the dialogue window in order to insert the bolting/riveting.
Boltings and Rivetings can also be inserted repeatedly. After calling assen sich wiederholt einbauen. This means that the New bolting/riveting function will not be ended automatically after insertion, but remains active, allowing you to insert further boltings or rivetings with the same settings (processing plane, bolting assignment, clamping length etc.). What can be modified, though, is the grid used for insertion. If you have activated the Prompt for processing plane beneath Fitting mode, the prompt will appear upon each insertion.
Click  to open a menu with further functions for boltings and rivetings:
| Process Boltings | |

|
|

|
|
| Boltings, Part assignment | |

|
|

|
|

|
|
| Change Boltings | |

|
|

|
|

|
|

|
|

|
|
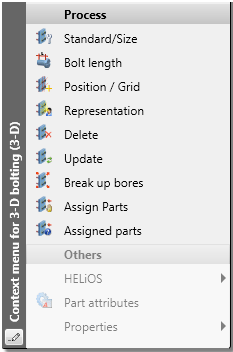
 Alternatively, you can also access these functions via the context menu for boltings.
Here, the following additional functions are available:
|
|
Bolt length |
|
|
Break up bores |
|
|
Mark assigned parts |
 You have the following options to invert a bolting, i.e. reverse its direction:
- Change the direction via the Reference entry in the feature log, or
- Select the Position/Grid function, right-click to open another context menu and select Invert. Please note that you can only invert boltings with identical bores at their start and end.
 Please note:
- You can perform a mountability check for boltings with the Design Checker
 . It will be checked whether the bolts can be loosened and pulled out without causing collisions, and whether the tool for the tightening of bolts and nuts will have enough space. The mounting will be considered possible if the tool can be moved collision-free when tightening either the bolt or the nut. The Design Checker can be found in the 3-D, Further function group of the Information Ribbon tab.
 - During insertion of bolts or boltings into automatically generated Steel/Metal Engineering assemblies, the dimensions of the assembles will be determined by the production type selected in the settings dialogue for bolts and boltings. If you select Site assembly, the part dimensions will not be changed by the boltings, i.e. the dimensions will then correspond to the shipped dimensions.

Standard Parts, Boltings, Rivetings, Weld Seams (3-D) • Settings for Boltings (3-D)


