Dimensioning Rules Editor
Drawing > Itemisation/Detailing > Dim.
Dimensioning rules for workshop drawings are managed via the Configuration Editor (ISDConfigEditor.exe). For an easy and convenient editing of dimensioning rules, HiCAD offers an integrated Editor for dimensioning rules.
Before using the Editor, please read the information given in the Settings and Usage-Dependent Configurations topic.
 Changes to configurations require maximum care and should only be applied by an Administrator.
After selection of the function Edit dimensioning rules dialogue window will be displayed.
Proceed as follows
- Load the usage-dependent rules set for the dimensioning that you want to edit.
- Edit the rules et by adding, changing or deleting rules. The editing always applies to the currently active view.
- Save the rules set.
Operating elements and dialogue window display
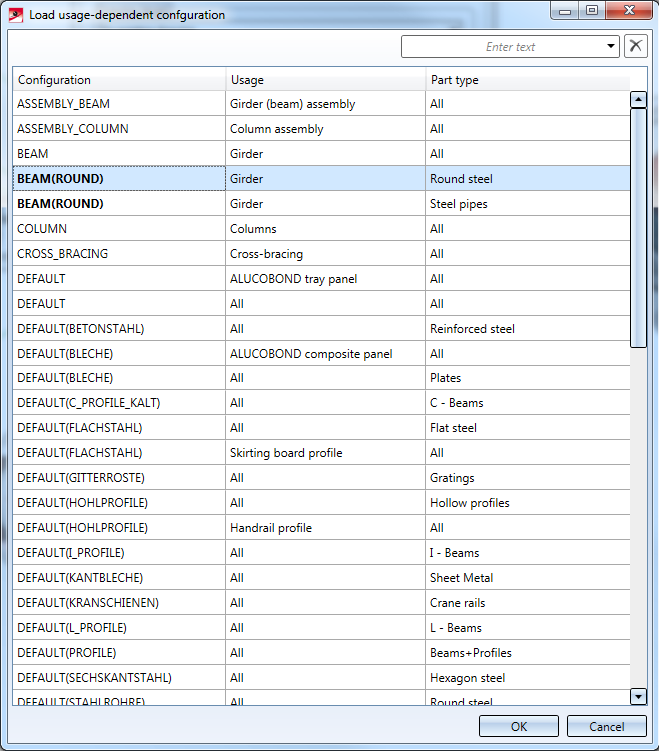
(1) Load/save usage-dependent configuration

|
Use this function to load the rules set of a usage.
The sorting of the displayed list can be changed by clicking on the column header. The selection can be filtered using the search field at the top right of the dialogue window. Filtering can be cancelled by clicking on the delete icon. If the current settings have not been saved yet, a corresponding security prompt will be displayed before loading. After loading of a rules set, the rules that have been defined there will be listed, arranged by views. To list the rules of a different view, you need to click the corresponding button at the bottom of the dialogue window.The button of the active view is highlighted in blue. |

|
Use this function to save the current dimensioning rules set. Select the configuration to which you want to save the rules set. |
(2) Use
Here the name of the current usage will be displayed.
(3) Add/delete rules
Use these functions to it add new rules, or delete existing ones. The current rule will be highlighted in blue. The editing takes place by views.
|
|
Copies the current rule and places it at the end of the list. Then you can edit the copy and move it, if desired, with the |
|
|
Deletes the current rule. |
|
|
Copies the current rule to the clipboard. |
|
|
Pastes the rule from the clipboard at the end of the list. |

 and
and  buttons.


Use the Copy/Paste functions to copy rules from one view to other views, as well as into the rules set of other usages.
(4) Expand/collapse structure
|
|
The dimensioning rules items are by default listed in collapsed form. When you select an item, it will be expanded automatically. Click this icon to expand all dimensioning rule items in one step. |
|
|
Click this button to collapse all dimensioning rule items. |


(5) Edit rules settings
To edit a dimensioning rule, select it in the required view with a mouse click. The active rule will be highlighted in blue and the item will be expanded.
Displayed will be the ID, the Type of dimension, the Position of dimension chain, the Dimension chain reference, the Direction of dimension chain, and , if available, an example graphic.

If you move the cursor over the preview graphic, it will be enlarged. Use the  and
and  symbols to switch between expanded and collapsed representation of the rule. In the collapsed representation, you can show the preview graphic by moving the cursor over the
  symbol.
To change the active rule, select the desired settings from the corresponding list box. For a clearer selection the rules are displayed in groups.
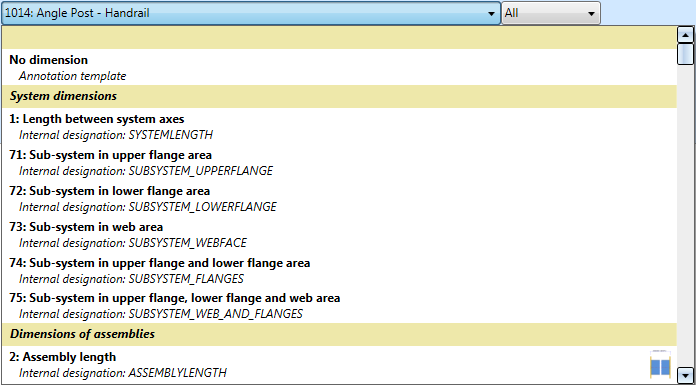
If not all groups are to be shown it is also possible to modify the display by selecting one group in the list box on the side.
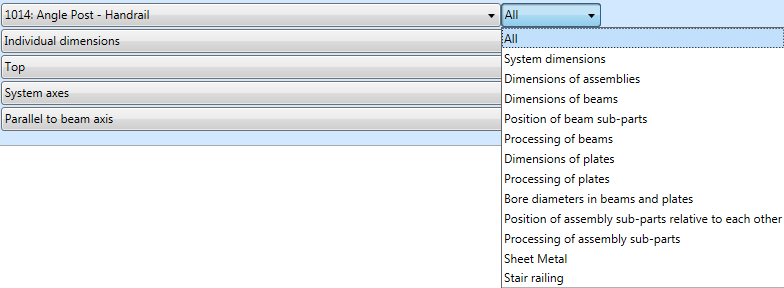
You can find out which rule belongs to which group in the dimensioning rules overview.
The Dimensioning Rules Editor has an integrated consistency check. If the entered data are incorrect this will be visualised with the  symbol. If you move the cursor over the symbol you will receive further information, e.g.
Correct the settings accordingly.
(6) Change order of rules
|
|
Use these symbols to move the current rule up or down, thus changing the order of rules within the current rules set. The order of rules in the rules set determines the order in which the dimensions in derived drawings will be created. The higher the position of a rule in a rules set, the earlier the dimension will be created in the derived drawing, and the nearer to the part it will be placed. |
|
|
(7) Selection of view
Rules are edited by views. At the bottom of the dialogue window you can activate the desired views by clicking the corresponding button. The number following the name of the view indicated how many rules have been defined for this view. After selection of a view (button will be highlighted in blue) the rules defined for this view will be displayed.
(8) Search
Here you can search for already used rule IDs. Select the ID that you are looking for from the list box.
|
|
Click this button to start the search for the selected rule. The rule will be searched in all views. Found IDs will be displayed in a result list:
If you click on an item in the result list the corresponding view will be activated. |
|
|
Click this button to delete the result list. |


(9) Activate setup help
If this checkbox has been activated, the rule IDs and usages will be written as auxiliary texts into the dimensions.
Important notes on saving:
- When saving the set of rules, the rules will be transferred to the Configuration Editor. There, the stored rules will be adjusted accordingly, or new rules will be added, or existing rules will be deleted.
- If you save a set of rules and HiCAD detects that the selected dimensioning ID is unsuited for a view, a corresponding error message will be displayed. For example, this will happen if you use, in one of the standard views, a rule with a dimensioning ID that makes sense only for sectional views (e.g. 63: Fillet radius on material subtraction on sheets/plates in sectional views). In such cases, you need to correct the settings appropriately, otherwise the rules set cannot be saved.
- If rules are identical in the Editor, (i.e. exist twice), a corresponding message will be displayed when you try to save them. The rule will only be saved once in the rules set.


Drawing Derivation • Derived Drawings: Settings • Drawing Derivation: Dialogue Window