Part Data Synchronisation with HELiOS Database
Plant Engineering > Part Data Tools > Part data synchronisation 
If the HELiOS Database has been selected as part data source, you can use this function to transfer the article data required for HiCAD Plant Engineering to the HELiOS Database. Furthermore, you can use this function to perform a data synchronisation between the part files and the corresponding database entries, namely for
- Part archive files (File type: PAA) containing the data of non-parameterised (fixed) parts
- Part variant archive files (File type: VAA) containing the data of parameterised parts
When you call the function for the first time, the window with the settings shown below will be displayed. When you change the settings, the changes will be saved in the Windows Registry and will be applied after restarting HiCAD.
Proceed as follows:
- Define the desired settings for data synchronisation.
- Select the files for which you want to perform the synchronisation.
- Start the part data synchronisation.

Setting options
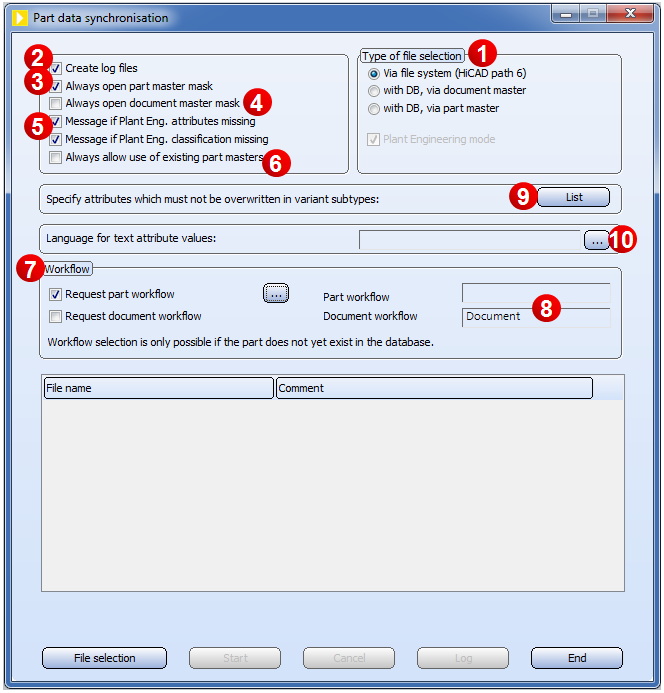
(1) Type of file selection
In this field you specify how you want to select the file(s) for which you want to perform the data synchronisation. You can only select a file via the database if corresponding data records already have been entered there. If this is the case, the file can even be selected from the Vault Server.
(2) Create log files
If this checkbox is active, a log file will be created about the part data synchronisation (recommended!).
(3) Always open article master mask
If this checkbox is active, HiCAD always opens the article data input mask of the part to be processed. In this mask you can check and modify the values of the article attributes.
If the checkbox is not active, the article data input mask will not be displayed, if all required data can be taken from the file and from the Registry. The article master mask will however be displayed, if:
- any derivations of the part exist in the database
- the part has not been classified yet
- mandatory attribute values for the respective part type are still missing (check out these attributes in the in the corresponding part type file <Part type ID>.inspect.txt in the \hicad\PlantParts\PartInspect subdirectory).
The last used values of the article attribute COMPONENT_TYPE and COMPONENT_QUANTITY_UNIT will be saved (in the Registry). If the next part file contains no values for these attributes, the saved values will be entered automatically.
(4) Always open document master mask
If this checkbox is active, HiCAD always opens the document master mask of the part to be processed. In this mask you can check and modify the values of the document attributes.
If the checkbox is not active, the document master mask will not be displayed, if all required data can be taken from the file and from the Registry. The document master mask will however be displayed, if any mandatory attribute values are still missing (check out these attributes in the in the corresponding part type file Documentinspect.inspect.txt in the \hicad\PlantParts\PartInspect subdirectory).
The last used value of the document attribute DOCUMENT_TYPE will be saved (in the Registry) . The saved value will be automatically applied to next part file.
The document attribute BENENNUNG (DESIGNATION) automatically obtains the value of the article attribute DESIGNATION, if the part file contains such value.
(5) Message if Plant Eng. attributes missing /Message if Plant Eng. classification missing
If these checkboxes are active, HiCAD checks before entering a new item into the database (i.e. if no data records for this part exist in the database) , whether the attributes required for this part type have been assigned any values, and whether there is a valid Plant Engineering classification. These checks will be omitted if the checkboxes are not active.
If the Request ... workflow checkbox is active, click the  icon to open the Extended Workflow query dialogue window.

If the Also query workflow for each variant sub-type checkbox is active, the part data mask will be opened not only for the general type, but also for each single sub-type of the variant, and - if several part workflows exist - the workflow will be queried.
(6) Allow use of existing article masters
This checkbox is important if you want to use already existing article masters for the synchronization of part variants (VAA files) or fixed parts (PAA files) with the HELiOS database. Further information on this option can be found in the Part Data Synchronization - Taking Over of Existing Article Masters topic.
(7) Request part workflow/document workflow
If these checkboxes are active, (Part and/or Document), HiCAD requests for each newly entered part the corresponding workflow name. If this checkbox is not active, this will happen only if no workflow name has been saved yet.
If you have selected a workflow name, it will be saved (in the Registry). It will then become the default workflow (see 7). This setting will apply for all newly entered parts until you select a new workflow.
If the corresponding part already exists as an article in the database, its workflow names have already been fixed. If no workflow names had been defined, they will be taken from the part and displayed in area (7).
(8) Part/Document workflow
Here you specify the workflow name that will be used for each newly entered part, if the corresponding options have not been activated in area (6).
(9) List
If you click the List button, a dialogue window showing you a list of all database part attributes will be displayed. You can select or deselect individual list items by activating or deactivating the corresponding checkboxes. Each row contains the attribute designation, followed by the attribute name in brackets.
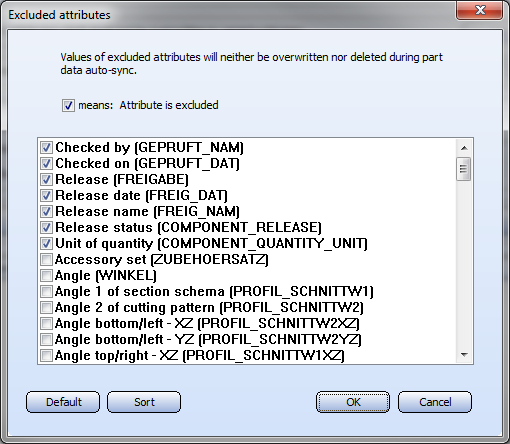
The selected attributes will be excluded from the part data synchronisation, i.e. for each of these attributes the following applies:
- If the VAA or PAA archive file contains a value for this attribute, it will not be used.
- If the article master of the general type contains a value for this attribute, it will not be copied to the article masters of the part subtypes.
When the dialogue opens, the list will always be sorted in such a way that the marked attributes will appear, in alphabetical order, on top of the list. All other attributes follow further down the list, also in alphabetical order. You can update this type of sorting at any time, by clicking the Sort button, for example after activating the checkboxes of other attributes.
If you select Default, the checkboxes will only be (or remain) activated for the attributes that absolutely need to be excluded. However, this does not necessarily mean that your special HiCAD / HELiOS environment will not require the exclusion of further attributes. This applies, for example, to ERP interfaces. If you are not sure about the correct setting, please contact your database administrator. These settings require particular care, as an incorrect selection of excluded attributes can destroy attribute values during the synchronisation process that had already been automatically set by HELiOS !
If you select Cancel, you will exit the dialogue without changing the selection of excluded attributes.
Clicking OK applies the changes after confirmation of a security prompt.
The names of the excluded attributes will be saved to the file ExcludedAttributes.dat in the directory <Part_path >\ PartDataAutoSync. <Part_path> stands for the directory path specified at position 6: in the file Filegrup.dat. If this path points to a server that is commonly used by all workstations, the excluded attributes will be identical for all workstations.
(10) Language for text attribute values
As of Version 2014, the part files (.vaa and .paa) supplied with HiCAD will contain text attributes in several languages. Click the  button to select the language in which you want the attributes to be read out. Accordingly, the dialogue window now contains an pre-selection option for the desired language (1) in which the attribute values are to be entered into the database. Before importing the data of the corresponding part file to the database, HiCAD checks which languages the file can actually supply. If the chosen language is not included, the language selection dialogue window is displayed, enabling you to choose a language that exists in the file. The chosen language applies to the current file. It can, however, also be used as a default, by activating the corresponding option in the dialogue.
Select files
Click the File selection button and select the file(s) for which you want to perform a part data synchronisation. The type of file selection is determined by the setting in area (1) (see above). The selected files will then be displayed in a table.
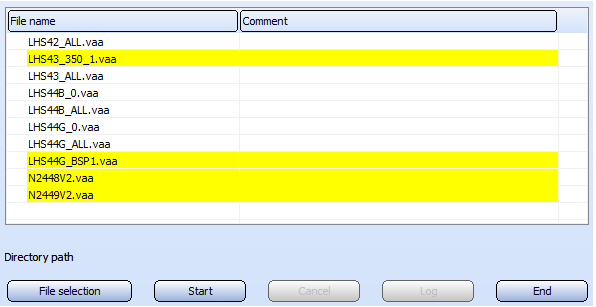
Rows containing files for which a document master already exists in the database, will be highlighted in yellow colour. If you right-click a row highlighted in yellow, a context menu will be displayed, enabling you to
- display the document master,
- completely delete the data belonging to the file from the database (this option is not available if the file is located in the Vault Server),
- remove the file name from the table.
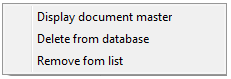
If you right-click a non-highlighted row, the context menu will only offer the option to remove the file name from the table.
Perform part data synchronisation
Click the Start button to start the part data synchronisation for the files listed in the table. If required or trigged by the settings described above, the document master mask and/or the article master mask for the currently processed file will be initially displayed, either for checking purposes, or to enable the entering of missing attribute values. After closing the mask with OK, the part data synchronisation will be performed for the corresponding file in the list.
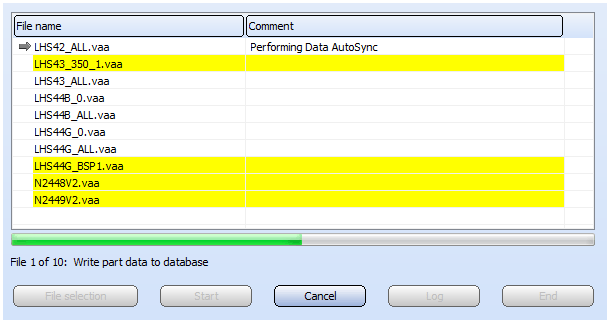
The currently processed file will be marked with an arrow symbol in the list. The progress bar refers to the processing of this file. A text line is shown below, informing you about the currently performed action.
If you click Cancel, the processing of the file that is currently marked with the arrow symbol will still be completed. The files that follow on the list will however not be processed any more.
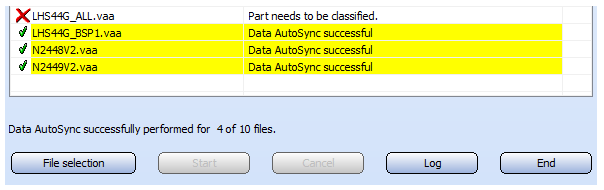
The icon in the first column on the list and the information given in the Comment column indicate whether the part data synchronisation for the corresponding part was successful, or if any errors occurred.

After completion of the part data synchronisation, you can display a Log about the process. Click End to end the program.
![]() Please note:
Please note:
Variants stored in HELiOS observe a special document/article linking model.
