Serial Document Input
Input > Serial input > New documents
This function enables you to enter general data into the database.
Open the Input tab and select Serial input >  New documents.
In the following window, choose the files that you want to be added to the database. Confirm with OK.
Further options for serial input can be specified in the following HELiOS dialogue window:

Document No.:
Since you can add several files at once, you need to assign a key for the document name. You can do this by activating either the Number Generator (the GENUMMER.EXE program in the .../exe directory) or the User defined option.
Choose User defined if you want to compose the document name of a Fixed text specified in the input field and an (incremented) Start value for numbering. Enter the text and a start value. The user-defined text will be added to the incremented number.
In the Preview for 1st document field you can then see what the generated name for the first document of the serial input will look like. The number for the next input will be incremented accordingly.
Configuration for attribute initialization
Here you can select a configuration file from the pull-down menu (if any have been created).
A default configuration called Standard is already available.
Further initializations:
In the Project input field you can select a project if all documents are to be assigned to a particular project, or choose a project-independent setting. The same principle applies to the Folder input field below. You can automatically assign a Workflow to the documents for serial input via the pull-down menu.
If desired, enter a Designation, or choose one from the predefined drop-down list.
If a mapping for the attribute Designation or for the Document type exists in the configuration, no manual input will be possible here. In such cases the field will be greyed out.
Options
If the Remove documents to be entered from original location has been activated, the source files will be deleted from the location from which they were entered. If the option has been activated, the files will remain in their original directory.
If the Show input dialogue option has been activated, the document data input dialogue will be called for each individual file for the serial input. This procedure makes sense if, for instance, additional specifications are to me made for the document master data of each file. If this option has been deactivated, the documents will be taken over without any further dialogue windows.
Activate the Write log file option if you want to record the process. The path for the file can be determined in the Log tab of the HELiOS Options dialogue window. This option is greyed out if the Show input dialogue option has been activated.
If the Cancel import upon first error or aborted input has been activated, the serial import will be cancelled as soon as an error occurs, or if data input for any individual document is aborted (if the Show input dialogue option has been activated). If this option has been deactivated, the serial input will be carried out completely, even in case of errors.
If the file selection for the serial input contains one or several ZIP archives, additional options will be shown in the dialogue:
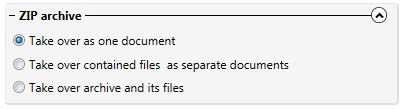
Here you can determine, by selecting one of the three available options, whether the ZIP archive is to be taken over as one single document (Take over as one document), or if the contents of the ZIP archive are to be taken over as separate documents (Take over contained files as separate documents), or if both the ZIP file and the files contained therein (Take over archive and its files) are to be taken over.
If a HiCAD file (*.sza) is selected, an additional field for the assigning of a Workflow will be shown.

The selection that you make here will then concern all .SZA files for serial input. For other file types the usual Workflow selection beneath Configuration for attribute initialization (s.a.) applies.
Click OK to start the adding of the document to the database. The files will then be copied with their corresponding master data to the database.
![]() Please note:
Please note:
- The serial input should only be used if documents without any structural dependencies to other documents are to be added to the HELiOS database.
- The dependencies between several documents of CAD drawings, for instance, will not be considered for this type of document input; only individual documents without any structural connections will be created. The input of CAD product structures should therefore take place via the corresponding CAD interface to HELiOS, and not via the serial input in the HELiOS Desktop.

