Project: HiCAD Steel Engineering
"Civil Engineering functions" docking window > Steel Engineering > Connections > Front side to front side > Front plate > Purlin joint with mitre cut (1202)
Use this function to connect 2 beams with a welded plate, which can either be fitted flush or with top, bottom or lateral projection. If required, the beams are automatically shortened, lengthened and/or mitred.
The settings in the dialogue window can be saved as Favourites and reused at any time. To do this, click on the  at the bottom left of the window to activate the context menu. More about Favourites management can be found in the Manage Favourites topics of the HiCAD Basics Help.
 The plate will be assigned to the first identified beam.

The configuration tales place via the tabs of the dialogue window.
Selected parts
This tab displays information on the previously identified beams, such as the type, the material, the dimensions of the bems etc. Changes are not possible here.
Front plate
On this tab you specify the properties of the plate.
| Semi-finished product
The plate can consist of sheet metal or flat steel. Click the |
| Geometry
The plate size will be determined by the identified beam and the specified projections. |
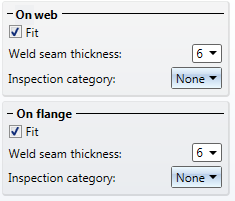
Weld seams
On this tab you specify whether you also want to create weld seams on the web and/or flange. If you want to create weld seams, activate the corresponding checkbox and enter the seam thickness.
Click the Preview button if you want to display a preview of the connection based on the currently entered data. If you want to modify the current data, apply the required changes and click Preview again to update the preview. Click OK to insert the connection according to the current data and close the dialogue window. If you click the Cancel button, the window will be closed, and the specified or changed connection will not be inserted.

Connections + Variants (3-D SE) • Dialogue Window for Connections (3-D SE) • The Catalogue System for Connections + Variants (3-D SE)
|
© Copyright 1994-2020, ISD Software und Systeme GmbH |
Data protection • Terms and Conditions • Cookies • Contact • Legal notes and Disclaimer

 icon to select the plate type and the material directly from the corresponding standard part catalogues.