Project: HiCAD Basics
The fixed part groups for the old Itemisation up to HiCAD 2017 are replaced by freely configurable part groups when you use the new Standard itemisation as of HiCAD 2018itemisation. You can use a part filter to specify the elements belonging to a part group.
By default, settings for Mechanical Engineering, Steel Engineering and Plant Engineering have been predefined, which you can load via the Favourites icon or select in the Configuration Editor.
Further topics:

|
|
Add part group
Adds a new part group at the end of the part group list. |
|
|
Remove selected part group
Please note that the part group Others cannot be deleted and will always remain at the end of the list. |
|
|
Copy selected part group
|
|
|
Collapse all part groups |
|
|
Expand all part groups |
|
|
Displays important information; here:
|
|
|
Expands a part group |
|
|
Collapses a part group |
|
|
Change part filter
|
|
|
Change itemisation text
|
|
|
Move selected part group up |
|
|
Move selected part group down |
The settings for the part groups can be expanded and collapsed with a click on the  and
and  icons. Clicking the
  and
and  icons expands and collapsed all part groups in one step.
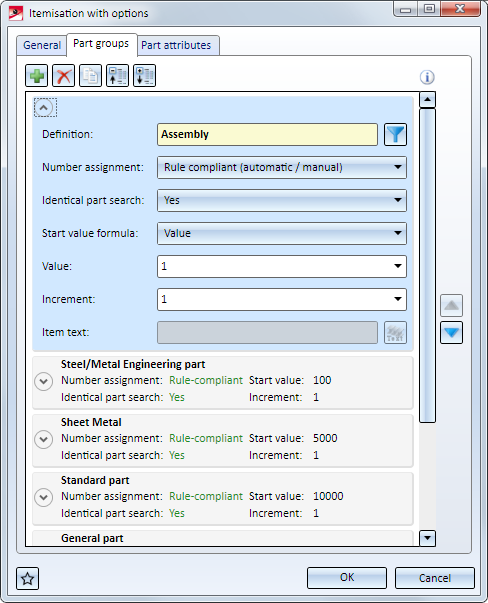
For each part group you have the input fields show below:
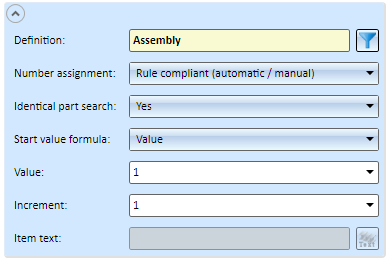
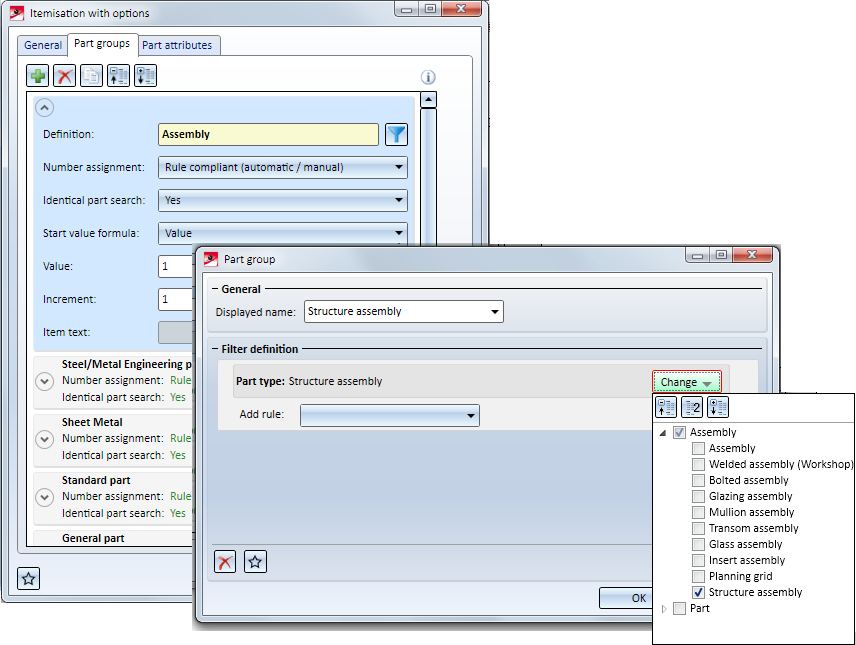
Here the name of the part group for which the numbering is to apply is shown. To change the part group, click on the Part filter  symbol. The Part group dialogue window will be displayed. You have then the option to load saved favourites, create a new part group, or add new part types to the current part group, or delete part types from it.
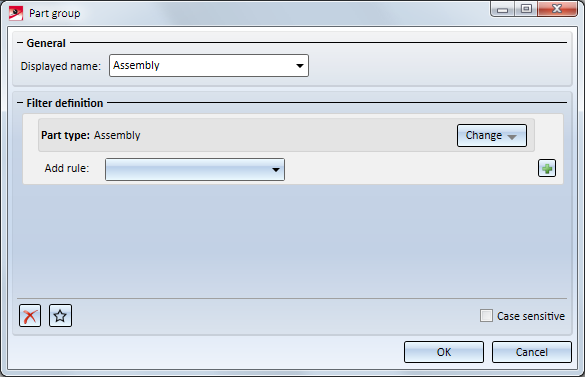
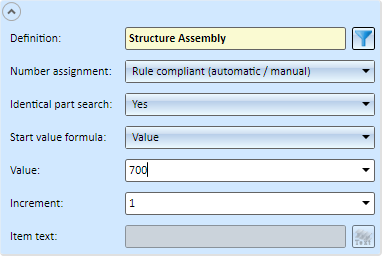
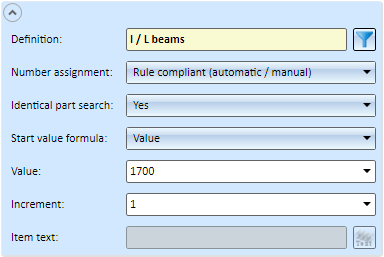
Here you enter the name that you want to appear in the Definition field on the Part group tab.
Here you specify choose the part types that are to belong to the part group.
This works in the same way as the definition of manual filters with the Part filter function of the transparent toolbar.
To select or remove a part type, click on the Change button and choose the desired part type by activating or deactivating the corresponding checkbox. Several checkboxes can be active or entire groups, e.g. all assemblies, can be selected. After selecting the part type (simply click next to the selection box) the dialogue window will be adjusted accordingly.
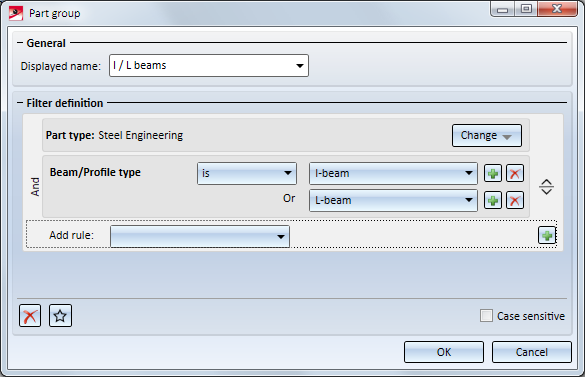
Now you can add rules for the selected part type. The selection of a rules takes place via the Add rule listbox, which contains all attributes and properties that make sense for the selected part type. Each rule (excpet for the part type) consists of the name of the attribute/the property, one operator (is, is not, ...) and at least one value (number or text).
The filter settings can be saved as favourites and can be re-used at any time.
Specify the required settings and confirm with OK.
Here you can choose whether the number assignment for the current part group is to be made Rule-compliant or Unregulated.
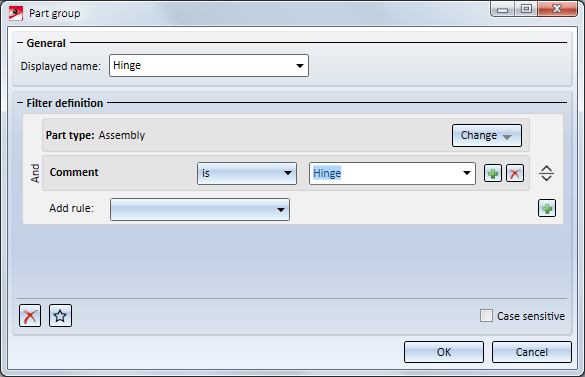
In most cases the rule-compliant itemisation will be sufficient. In some individual cases, though, it can make sense to exclude particular parts/assemblies from the rule-compliant itemisation, by creating a separate part group for these parts/assemblies, for which the unregulated number assignment can be used. A possible use case would be a case where a drawing contains hinges (as an assembly) which exist both in a "folded" and "unfolded" state in the drawing. According to the automatic itemisation and identical part search, these parts would not be identical and would therefore obtain different item numbers. If you assign to these parts a consistent feature, e.g. the Comment HINGE, a part group containing exactly these parts could be defined.
If you select a unregulated number assignment for this part group and move this part group before the Assembly part group, the hinges will be ignored by the rule-compliant itemisation and could then be itemized in unregulated mode.
If this parameter is set to Yes, identical parts of the parts group will be detected automatically according to the specified search criteria on the General tab. Identical parts will then obtain the same item number.
If No has been selected, no identical part search will be carried out, and each part of the part group will obtain its own item number. This is, for instance, the ISD default setting for weld seams. Please note that the automatic identical part search is only possible if you have chosen the setting Rule-compliant (automatic/manual) for the Number assignment parameter. Otherwise, the Identical part search field will be greyed out.
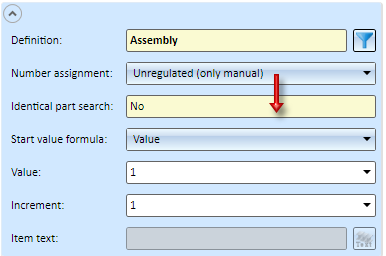
The start value is determined by a fixed Value which you can enter in an input field. New item numbers are determined by the formula Start value + Increment * n.
This field is only active if the Generate itemisation text checkbox on the General tab has been activated. Click the  icon to configure the itemisation texts. The following dialogue window will be displayed:
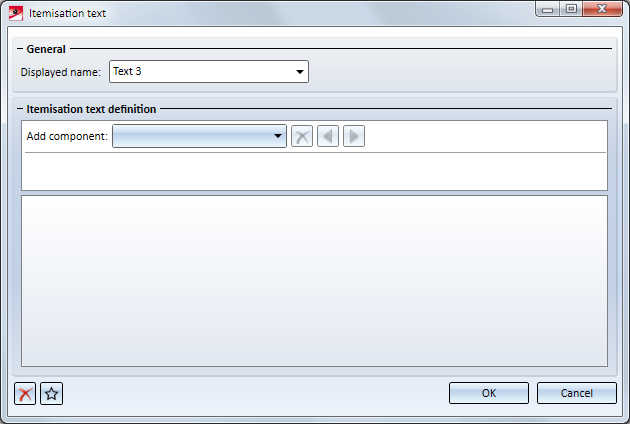
Displayed name
Here you enter the name of the configuration, e.g. the name that is to appear in the Itemisation text field of the part group.
Itemisation text definition
In the Add component selection box, choose the components of which the itemisation text is to consist. The following components are possible:
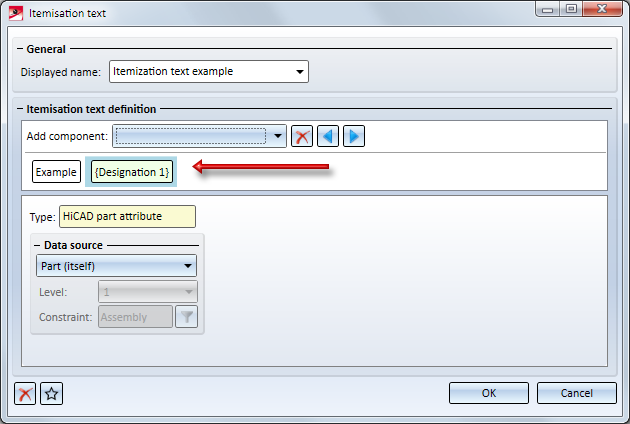
For components of the type Text you enter the desired text in the input field intended for this purpose, e.g. Example.
For the attributes you choose the desired attribute from the corresponding selection list. For HiCAD part attributes you can also specify the data source of this attribute:
If you select a superordinate element here, you have the additional option to specify the desired level and the a condition for the superordinate element. This takes place again via the Part filter symbol. For instance, you can specify in this way that only superordinate assemblies of the type Structure assemblies are to be considered, or only superordinate elements of the type General part etc.
The itemisation text determined by the selected components will be updated in the dialogue window, e.g.:
The symbols:
|
Top |
|
|
|
Deletes the currently marked component |
|
|
Moves the currently marked component to the left |
|
|
Moves the currently marked component to the right |
|
Bottom |
|
|
|
Clear filter
|
|
|
Favourites
|
Click here to view an itemisation text configuration example. To see how to create new part groups, see Example 1 and Example 2.
The order in which the part groups are listed in the dialogue window will influence the assigning of item numbers.
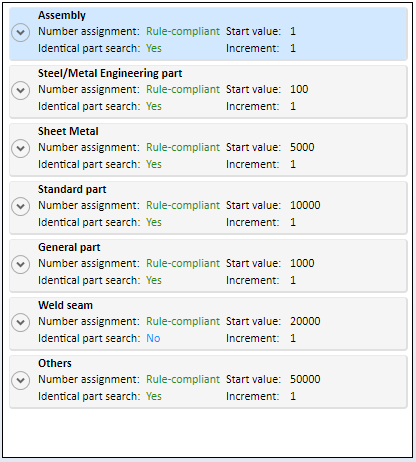
The itemisation result will be influenced by the order of the part groups, in that each part will be assigned to the first matching part group (see also Example 1 and Example 2). The order of the item number assignment itself, however, depends exclusively on the sort criteria specified on the Part attributes tab. If no distinguishing/sort criteria have been defined there, HiCAD will simply run through the part structure to assign the item numbers.
The order of the part groups can be changed with the  and
and  icons.
Structure assemblies are meant to form a separate part group and to be numbered in a different way that the other assemblies.
Proceed as follows:
 . A copy of the part group Assembly will be added behind the part group. .
button. * You may also change the part group Assembly by clicking Change part filter and deactivating Structure assembly there. No change of the sorting would then be required.
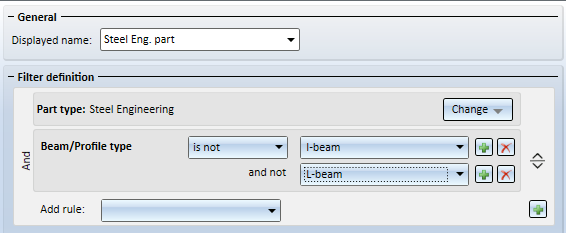
I-profiles and L-profiles are to form an own part group.
Proceed as follows:
 icon. The new part group will be placed at the end of the part group list. icon.
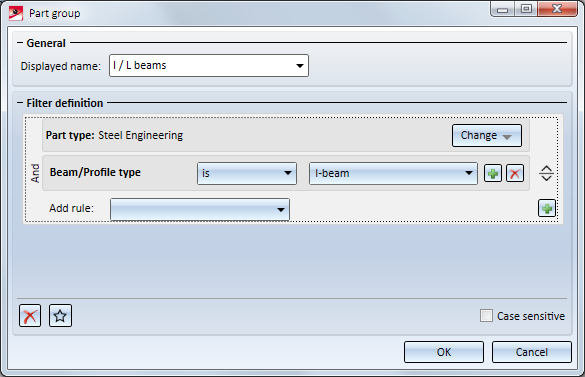
and choose L-beam.
button. * You may also change the part group Steel Engineering part by clicking Change part filter and deactivating I- and L-profiles there. No change of the sorting would then be required.
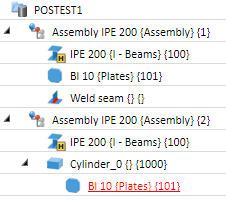
In this example an itemisation text for Steel Engineering parts is to be configured. Let's take a look at the plate with the item number 101 in the drawing structure shown below. We choose the HiCAD attribute Benennung 1 (Designation 1) as the component of the itemisation text (please remember that the Generate itemisation texts checkbox on the General tab must be activated!).
|
Data source |
Level |
Condition |
Result |
|---|---|---|---|
|
Part (itself)
|
-
|
- |
Itemisation text = Designation 1 of Part 101 |
|
Superordinate element |
1 |
All assemblies* |
Itemisation text = Designation 1 of Assembly 2 |
|
Superordinate element |
2 |
All assemblies |
Itemisation text = Designation 1 of Assembly 1 |
|
Superordinate element |
3 |
All assemblies |
Itemisation text = empty |
|
Main part |
- |
|
Itemisation text = Designation 1 of Part 100 |
* If the condition was changed in such a way that only general parts are considered, the itemisation text would be Itemisation text = Designation 1 of Cylinder 1000.
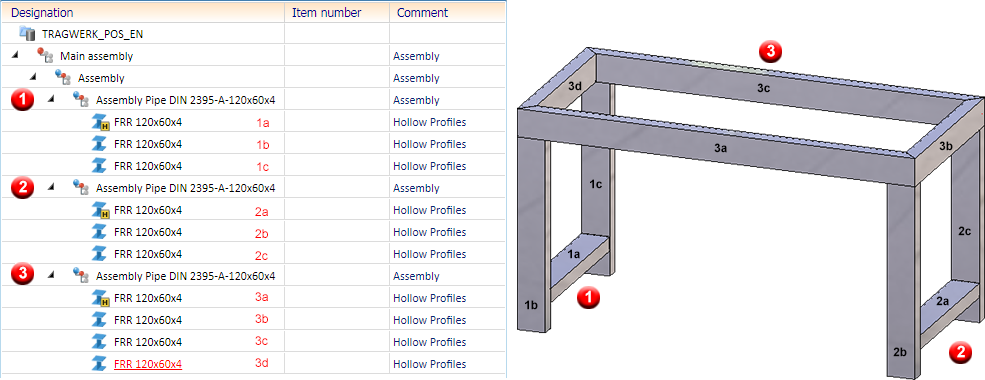
The HiCAD part attribute Item index %PIDXcan be used in order to create own incrementation in itemisation texts. If the itemisation text contains this attribute, each part with equal item number will be incremented on its own. This means that all n parts with common itemisation number will be numbered consecutively with an index from 1 to n. In practice, this is often used to allocate assemblies or parts with equal item number clearly to each information of the item number flag or BOM.
The depicted Steel Engineering drawing consists of three assemblies, which in turn consist of equal hollow profiles. The assemblies 1 and 2 are equal and consist of the parts 1b, 1c, 2b and 2c. Assembly 3 consists of four profiles, part of which are equal to 3a and 3c as well as 3b and 3d.
The drawing should be itemised. In order to set i.a. the new attribute Item index itemisation texts should be created automatically. For this, the function Drawing > Itemisation > Ite... > ... with Options will be used with the following settings:

Assemblies

Data source is the part itself.
Steel/Metal Engineering Parts
Data source is the part itself.
Result
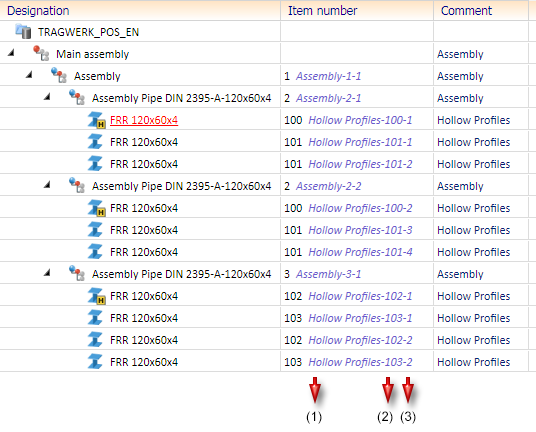
1=Part type, (2) Item number, (3) Item index
If a copy of assembly 3 would be inserted into the drawing and then itemised again, the item index continued with the next number (see example 3)

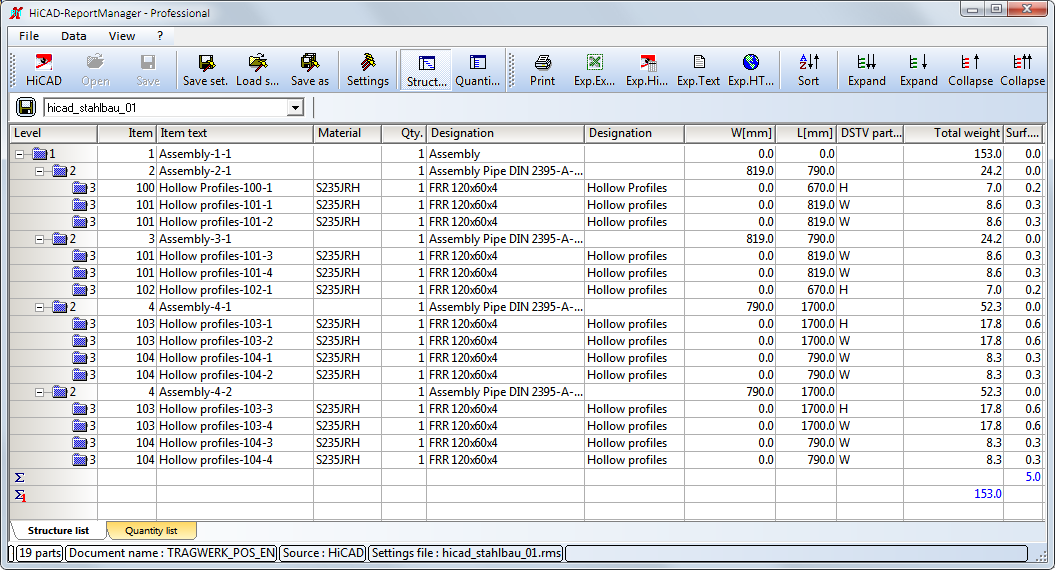
The itemisation text can also be issued via BOM.
Example - Structure list
 Please note:
When allocating the item index, it is not guaranteed whether already allocated indices still remain.
A simple example:
Let it be supposed that the original drawing contains three equal parts with position indices 1, 2 and 3. Now, the part with item index 2 will be deleted. The parts with index 1 and 3 remain. If the drawing is itemised automatically, two possible options can result:

Itemisation Functions • The "Drawing" Tab
|
© Copyright 1994-2019, ISD Software und Systeme GmbH |