Project: HELiOS
HELiOS objects (Documents, Articles, Folders, Projects) can be moved, copied or assigned to each other via Drag & Drop.
These objects can either be moved within result lists or Explorer tabs, or from one GUI element to another - e.g. from a result list into the tree structure of the Folder Explorer, or from the Product Explorer into the Project Explorer.
The Drag & Drop behaviour in HELiOS is identical to that of the Windows Explorer.
Drag while holding down left mouse button:
This means: If you want to move one article or document from a project result list to a different project, hold down the left mouse button and drag it into the desired, different project in the tree structure of the Project Explorer, or into a sub-project within the project result list. If you hold down the CTRL key while dragging, the object (or objects in case of multiple selection) will not be moved, but a derivation of it will be created at the location to which it was dragged. The data input mask of the object will open, enabling you to change the name of the object, or add further details, or make any other changes to the derivation.
If an action is not possible, (for example, you cannot assign a project to a document, but a document to a project), the cursor will change to a crossed out circle.
If you hold down the ALT key while dragging, you can define links (assignments) between a document or article and another document or article.
In this way, you can also assign a document and/or article (multiple selection is possible) to a project, or documents, articles and/or (sub-)folders to a folder.
Drag while holding down right mouse button:
If you drag an object in the HELiOS GUI while holding down the right mouse button, a context menu will be displayed.
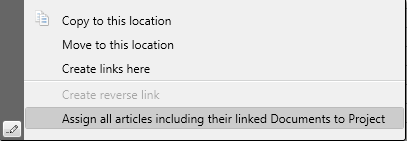
By default, the 4 functions Copy..., Move..., Create links... and Create reverse link will be offered in this context menu; depending on the object and the dragging direction, additional options may be available:
If you drag a project into a folder while holding down the right mouse button, the additional option Copy project contents to folder will be displayed (all documents, articles and folders will be copied to the corresponding folder).
If several linked documents exist for an article that is dragged from the product structure into a project while holding down the right mouse button, the additional option Assign article with linked documents to project will be displayed, enabling you to take them over as well.
In case of the Create reverse link option, the linking direction is equal to the dragging direction. Normally (i.e. if you select Create links here), the dragged document or article corresponds to the target class which is to be linked to a source. This means: If a document A is dragged onto a document B, element A will normally be subordinated to element B. But if you select the Create reverse link option, the dragged object will be the source that is dragged to a target, i.e. it will be the superordinate object of the link.
This additional option only works if documents or articles are linked to other documents or articles.
The table below gives an overview of the dragging options that are available for with the various object types:
|
|
Targets |
||||||||
|
|
Document |
Article |
Project |
Folder |
Product |
Pipe class |
Document class |
Article class |
|
|
Sources |
Document |
CA |
CA |
MCA |
MCA |
- |
- |
MCA |
- |
|
Article |
CA |
CA |
MCA |
MCA |
A |
MCA |
|
MCA |
|
|
Project |
- |
- |
MC |
(*1) |
(*2) |
- |
|
- |
|
|
Folder |
- |
- |
MCA |
MCA |
(*3) |
- |
|
- |
|
|
Product |
A (*4) |
A (*4) |
MCA (*4) |
MCA (*4) |
MA |
A (*4) |
|
A (*4) |
|
|
|
Document class |
- |
- |
- |
- |
- |
- |
MA |
- |
|
|
Article class |
- |
- |
- |
- |
- |
- |
- |
MA |
M = Move, C = Copy, A = Assign
*=Special functions, available via right-click:
Example : A Document can be Moved, Copied or Assigned to a Folder (M,C,A).
 Please note:


HELiOS Desktop: User Interface
|
© Copyright 1994-2019, ISD Software und Systeme GmbH |