Straight Stairs (3-D SE)
"Civil Engineering" docking window" > Steel Engineering > Stairs+Railings > Stairs
Straight stairs have only straight steps. The steps have a rectangular
entrance surface, the stair start is of the same size in the tread line,
at the internal stringer and at the external stringer.
Straight stairs can be generated with or without utilisation of a stairwell contour.
The staircase is fitted into a stairwell, which requires an appropriate sketch for the stairwell contour in the drawing. The sketch enables you to position the staircase in the stairwell and of determine the stair start and stair end of the staircase. First create the stairwell contour using the functions of the Sketch tab.
Regarding width and length of the sketch you should note the following:
- The width of a stairwell must at least be as large as the width of a step plus stringer width. The width of the sketch has however no influence on the width of the staircase.
- If the width of the sketch is smaller than the width of the staircase you want to generate, HiCAD issues an appropriate error message.
- Add 1000 to the desired staircase height as an approximate value for the length.
- Without stairwell contour
If you do not want to use a stairwell contour, activate the Without stairwell option in the Stairwell boundary area of the Settings: Straight stairs tab. The fitting point of the staircase is then set into the origin of the World CS. You can freely select this point when you fit the staircase.
Proceed as follows to generate the staircase:
- Activate the Stairs function, The dialogue window for stairs is displayed.
- On the Straight stairs tab, specify the stair parameters. These are:
- the size, position and type of the stair start and the stair end,
- the stringer and step type
- the stringer profile. Permissible stringer profiles are U-Beams (DIN 1026 U) from the Standard Part catalogue Semi-finished products > Beams+Profiles > U-Profiles and Flat steel > Wide flat steel (DIN 59200) from the catalogue Semi-finished products > Beams+Profiles > Flat steel.
- the grating step, which can be loaded from the Steel Eng. Standard Parts > Grating step > DIN24531.
- specifications of the nose overhang and the distances between stringers and steps
- bolting settings.
- Activate the Settings: Straight stairs tab and select
- the bolt type,
- the strength class of the bolts that are required to secure the stairs to the stringers, and
- the type of stairwell.
- Once you have competed your settings, re-activate the Straight stairs tab and exit the window with OK.
- Step 4. is skipped if you have selected the Without stairwell option on the Settings: Straight stairs tab. Otherwise HiCAD will prompt you to identify the stairwell sketch at the stair start or stair end.
- The possible Rise variants for the stairs are displayed. Select the desired variant.
- Click Fit to generate the stairs.
- If you work without stairwell boundary, you will now be prompted to specify a fitting point on the stairs, and the position of this point in the drawing.

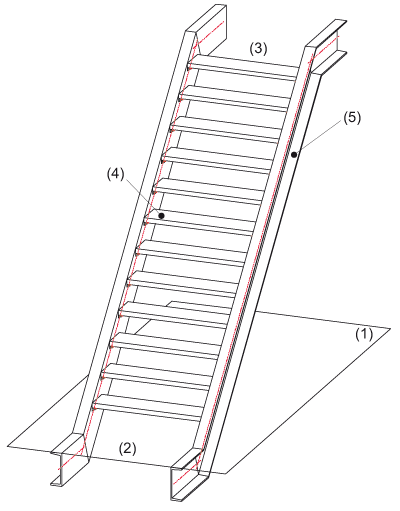
Stairs with stairwell contour : (1) Sketch, (2)
Stair start, (3) Stair end, (4) Step, (5) Stringer
 Notes:
- The
Stairs dialogue window is always defaulted with the values that
were last specified.
- The stairs are fitted
as an assembly with the article number (designation) STAIRS.
- All fitted stairs will get a special stairs ID, and the stairs data will be saved with the drawing. This enables you to apply subsequent changes to stairs with the Change staircase function whenever you want. The dialogue windows will then be defaulted with the data of the identified stairs.
- The stringer profiles and grating steps are loaded from Standard Part catalogues. You can use the HiCAD Catalogue Editor to add further U-beams or grating steps of the same type to the existing tables.
- If the configuration file for boltings does not exist, cannot be read, or does not contain a valid configuration with the required nominal diameter, the message No valid bolting exists! will be shown, and the query Create railing without boltings? appears. If you answer Yes, the dialogue will be closed and the railing will be created without boltings. If you select No, the dialogue will not be closed. You can then either change the settings or end the dialogue with Cancel,


Stairs and Railings
(3-D SE) • Sketch (3-D)
|
© Copyright 1994-2018, ISD Software und Systeme GmbH
Version 2302 - HiCAD Steel Engineering
Date: 28/09/2018
|
> Feedback on this topic
|


![]() Notes:
Notes: