Drawing Derivation: Dialogue Window
Drawing > Itemisation/Detailing > Drawing derivation 
You specify the settings for derived drawings in the Derived drawing dialogue window:
The dialogue window consists of the following areas:

Drawing target
Derived drawings are created as sheet views of the current or new model drawing and can be called via the Views tab of the ICN at any time. The following targets for derived drawing creation are possible:
- To existing drawing
The derived drawing is created as sheet view of the current model drawing.
- To external drawing
A new drawing file is created for the derived drawing. This drawing is saved to the same directory in which the original model drawing is located. The file name is composed of the prefix CD and an unambiguous ID generated by HiCAD, e.g. CD_263485165. The workshop drawing is assigned to the sheet with the number n .
- Detail drawings to external drawings
An individual detail drawing is created for each of the itemised Steel Engineering parts in the current model drawing.
- New external drawing for each drawing frame
A new drawing will be created for each drawing frame. The drawings will automatically be saved to the same directory in which the original model drawing is located. The file name is composed of the prefix CD and a unique ID generated by HiCAD.
If you have selected an external drawing as drawing target, the Externally generated drawings input area will be activated:
- Close created drawing
Closes the drawing file containing the derived drawing. HiCAD switches back to the original drawing.
If you have selected Steel/Metal Engineering as the default template in the Parameter Configuration (ParConfigComp.exe) tool, this will be the default setting.
- Leave open, switch back to original drawing
The drawing file containing the derived drawing remains open, but HiCAD switches back to the original drawing.
If you have selected Mechanical Engineering or Plant Engineering as the default template in the Parameter Configuration (ParConfigComp.exe) tool, this will be the default setting.
- Leave open, remain in created drawing
The drawing file containing the derived drawing remains open and active.
Detail drawing for each sub-part
If this checkbox is activated, a detail drawing will be created for each sub-part. This also applies to Steel Engineering parts which are sub-parts to a non-Steel Engineering part.
 If you use an external drawing as drawing target, and load the drawing parameters from a predefined configuration, parts appearing exclusively as "attached parts" in the workshop drawing will also be included in the drawing BOMs. You can change this behaviour in the Configuration Editor if desired: Select Active configuration > Automatic drawing derivation, and activate the Remove BOM-relevance of non-detailed parts in external drawing checkbox.

Sheet selection
Derived drawings are created as sheet views of the current drawing or a new drawing and can be called any time via the Views tab of the ICN. The following sheet settings are possible:
- New sheet for each view group
A new sheet view is created for each view group. This enables an output of individual parts and welding assemblies to the different, individual drawing sheet areas.
- New sheet for each assembly
A new sheet view is created for each assembly.
- New sheet
A new sheet view is created.
- Sheet n
The derived drawing is assigned to the sheet with the number n.

Alignment of assemblies
Assemblies can be aligned in the drawing in
- Fitting position ("ready-to-use position") or
- Processing position.
This enables you to create drawings both for overview and processing purposes.
 Important:
- This setting will only be considered for assemblies with a Steel Engineering main part.
- Railing segments, too, can be displayed in fitting position or in processing position. The fitting position makes sense for inclined railings, the processing position should be used for railings in X-direction, i.e. with horizontal handrail.
- Right-click an assembly and select Properties > Alignment of derived drawings to specify
- which view is to be the front view or the top view, or
- whether this assignment is to be reset.
Please note that this also affects derived drawings! An example can be found in the Derived Drawings - Active View as Front View/Top View topic.

Part selection
Here you specify which parts of the drawing are to be taken over in the workshop drawing.
- All
All parts are taken over into the workshop drawing.
- Only new
Only new parts which are not yet in the workshop drawing are taken over.
- Select, individual
The parts for the workshop drawing are specified individually by identification. When you exit the dialogue window, HiCAD prompts you to identify the required parts. Press the middle mouse button to end the selection.
- Selection list, with sub-parts
All elements of the active selection list including their sub-parts are taken over. To create a selection list, press and hold down the CTRL key and identify the steel engineering parts you want to take over to the workshop drawing - either in the ICN or in the drawing. You can also select the parts by drawing a rectangle: Press and hold down the CTRL key and use the left mouse button to draw a rectangle around the required drawing detail.
- Selection list, without sub-parts
All elements of the active selection list except for their sub-parts are taken over. Please note that the option chosen for Part selection field and the options chosen for View groups to be created for... influence each other.
An example: Your selection list contains several assemblies. If you now choose the Selection list, without sub-parts option while only the Main parts as assembly beneath View groups to be created for ... is active, no drawing can be created because the sub-parts will not be considered. In this case the following message will be displayed: Selection set is empty or parts are not relevant.
- Assemblies, Beams, Plates, Sheet Metal, General partsYou can restrict the number of parts to be taken over to the workshop drawing by activating or deactivating the corresponding checkboxes. In this way you can, for example, auto-generate production drawings for sheet metal parts or general mechanical engineering parts.
 Please note:
- Developments and sectional views of sheet metal parts are created in separate views, for which you can select different view scales if desired.
- General parts (mechanical engineering) will not be dimensioned in the derived drawing!
- Only BOM-relevant assemblies, sheet metal parts and general parts will be considered for the drawing derivation.
- Sheet metal is distinguished between sheets with identical cross-sections (unprocessed) and processed sheets.
- Unprocessed sheets with identical cross-sections are characterised by at least one bend zone, parallel front edges of the flanges (width of flange) and no further processing, e.g. subtractions, bores etc. For these sheets a drawing is not necessary, only a BOM.
- All other sheets count as unalike and processed. These sheets require drawings.
The output of sheet metal with identical cross-sections can be suppressed in the workshop drawing. To do so, the Suppress production drawings for sheets with identical cross-sections when deriving drawing checkbox has to be activated in the Configuration Editor under Sheet Metal.

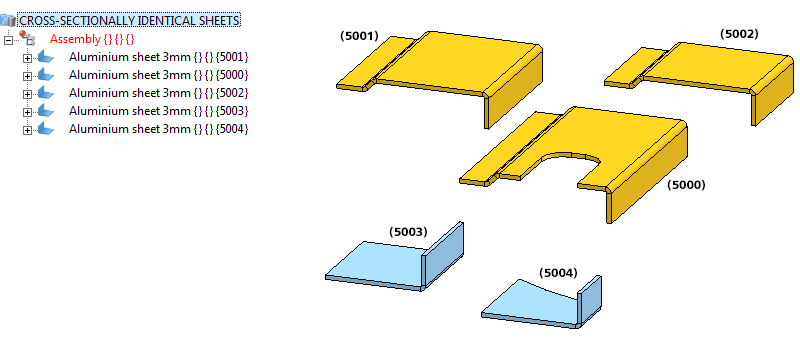
Example
The displayed drawing contains 5 aluminium sheets. Sheet 5001 and 5002 have different sheet depths, but they have identical cross-sections and are unprocessed. This does not apply to sheet 5000 as it has a subtraction, thus it is processed. Analogous to that, sheet 5003 is unprocessed and sheet 5004 is processed due to the subtraction.

If the Suppress production drawings for sheets with identical cross-sections when deriving drawing checkbox is active, only sheet 5000 and sheet 5004 will be considered in the drawing derivation.


Derived Drawing - Functions • Derive Drawings • Derived Drawings: Change Settings • Derived Drawings - Settings File or Configuration
|
© Copyright 1994-2018, ISD Software und Systeme GmbH
Version 2302 - HiCAD Basics
Date: 30/10/2018
|
> Feedback on this topic
|


 If you use an external drawing as drawing target, and load the drawing parameters from a predefined configuration, parts appearing exclusively as "attached parts" in the workshop drawing will also be included in the drawing BOMs. You can change this behaviour in the Configuration Editor if desired: Select Active configuration > Automatic drawing derivation, and activate the Remove BOM-relevance of non-detailed parts in external drawing checkbox.
  Important:
 ![]() Please note:
Please note:

