Part Structure: Advantages and Planning
What is the purpose of a Part structure?
For large and complex drawings a logical structuring of the data is absolutely essential. In HiCAD such structuring will be enabled through the subdivision of the model drawing into Main assembly, Assemblies, Main parts and Sub-parts. This part-oriented data structure allows the creation of model drawings the logical structure of which corresponds to that of real products - consisting of one main assembly, sub-assemblies and individual parts.
The HiCAD part structure is a tree structure - similar to the directory structure on the hard disk of your computer.
The advantages:
- Orientation within the model drawing is facilitated.
- Design-relevant data and BOM-information can be attached to the designed part.
- The part structure allows the creation of structure BOMs and quantity BOMs.
- Part where-used lists enhance the reuse rate of parts.
- Company-specific assemblies can be visualized via the parameterisation of parts.
- Parts can be transferred from a draft to a single part production drawing.
- A consistent modification of a reused part throughout all related drawings is possible.
- Designing in 2-D requires a calculation of overlaps in assembly drawings, realized via overlap levels of parts.
- The associativity of hatchings is ensured via the part.
- Part scales irrespective of the drawing scale enable optimised representations.
- Processing functions mostly refer to parts.
- 3-D parts which are structured into Assemblies, Main parts and Sub-parts can be highlighted in different colours.
- The Usage attribute can be assigned to parts and assemblies. In this way you can, for instance, define parts as columns, girders, mullions, transoms etc. for design tasks in civil engineering. This classification of parts according to types of use allows the creation of usage-dependent workshop drawings or bills of materials.
If a clear and logical part structure is used, this will normally also result in a more precise and clearer construction of the individual parts. In this way, error sources can be minimised as well.
During designing, an overview of the current 2-D and 3-D part structure of your drawing will be shown in the Information + Communication Navigator (ICN).
The part structure affects the following actions:
- Transformations
If you move or rotate a part, its sub-parts will be automatically rotated as well.
- Overlaps
You can determine for complete 2-D parts that they are located in front of or behind a different part, i.e. you do not need to specify this for each single line of the part (in 3-D, HiCAD automatically knows the depths of the parts).
- Hatchings
Part hatchings will never require any rework. Sub-parts (e.g. bores, cut-outs, bolts...) will be automatically excluded from hatching. If you create assembly drawings, contours frequently change due to overlapping workpieces. Here, too, no rework will be necessary, as part hatchings are based upon the part structure and not on line contours.
- Reuse
If you reuse a part in a different drawing, all data contained in this part (hatching, overlap level, master data for the BOM, part attributes...) will be copied as well. The automatic copying of the master data, for instance, ensures that no part will be missing in the new drawing.
- BOMs
BOMs can be created "at the push of a button", as the names of the parts and the corresponding master data have already been defined in the drawing.
- Workshop drawings / Derived drawings
Here, a well thought out part structure is an advantage, too. You can, for instance, specify which views are to be shown in the drawing - separately for assemblies, general parts, beams, plates and sheets. In addition, the views can be managed in so-called "view groups". During definition of these groups you distinguish between assembly main parts, main parts and sub-parts. Another advantage is that you can assign to assemblies a usage that will be considered during workshop drawing creation, e.g. for the dimensioning.
Werkstattzeichnungerstellen
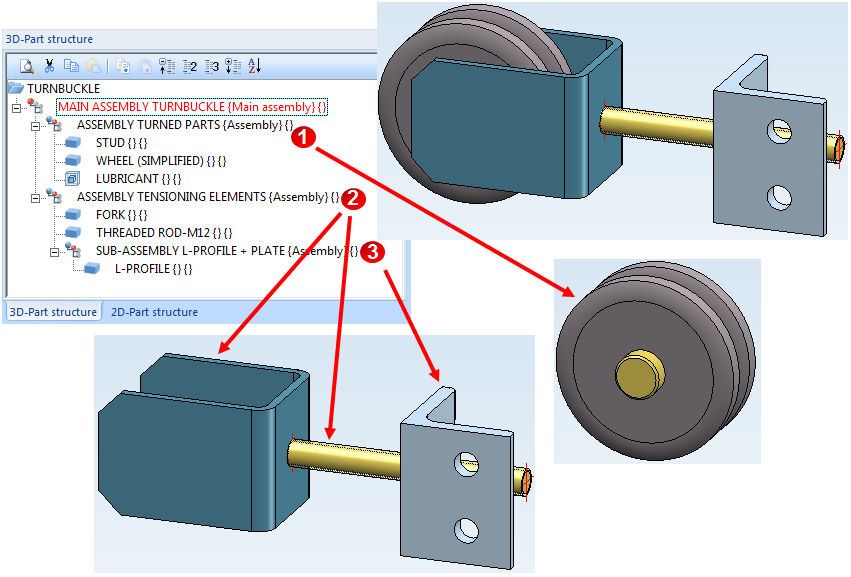
Example: Turnbuckle:

Assumptions:
Stus and Wheel are mounted to each other, i.e. they belong to an assembly - here: the Assembly Turned Parts (1). Via this assembly you can move, rotate copy, delete etc. these parts together.
Fork, L-profile and Threaded rod are also mounted together. They are linked together in the Assembly Tensioning Elements (2).
Altogether these assemblies constitute the product Turnbuckle, which is represented by the same-named Main assembly Turnbuckle. All parts of this model drawing belong to this main assembly. This means that if you move the main assembly, all subordinated assemblies and the parts contain therein will also be moved (or also be deleted, copied etc.).
If you noticed that the Threaded rod is not connected to the Fork or the L-profile, but belongs to the Turned parts, you would move it below the Assembly Turned Parts, accordingly.
Following the same principle, the Assembly Tensioning Elements has a further sub-assembly containing the L-profile (3).

Planning of the part structure
Before you start creating your model, you should appropriately preconceive its product structure, and then create the assemblies, main parts and sub-parts of your model drawing (i.e. the part structure) accordingly.
- If desired, specify the settings for assemblies in the Configuration Editor.
- Chose the assembly drawing when you create new drawings. This ensures that a main assembly will be automatically created, to which all subsequently created assemblies and parts will be assigned. Especially for referencing, itemisation, BOM creation and for a combined working with the PDM system HELiOS, this procedure provides significantly more efficiency.
- Make use of the possibility to create assemblies. This enables you to determine the part structure of your product right from the start. Specify appropriate assembly points, allowing you to directly identify the assemblies in your drawing.
- Please ensure that an assembly main part is defined in the assemblies. This assembly man part often needs to be specified manually.
- Observe the part rules while creating main parts and sub-parts.
- Choose meaningful names for the parts and assemblies you create, as this facilitates their retrieval during the design process.
- Specify the attributes for assemblies and parts. In particular, do not forget to fill in the Article number field.


Drawing and Parts • Part Structure Representation in the ICN • Drawing Objects
|
© Copyright 1994-2018, ISD Software und Systeme GmbH
Version 2302 - HiCAD Basics
Date: 30/10/2018
|
> Feedback on this topic
|


