2-D Dimensioning + Text > Text > > Itemise part ![]()
The functions and selection options of the Item Number menu allow you to assign annotation texts to 2-D parts. These may include the item number or additional texts as well as any combinations of part attributes, database attributes and texts. The item number is also displayed in curly brackets following the part name in the part structure of the ICN, e.g. {5}. If the item number is a negative value, e.g. –5, it is displayed in the form {5*}.
Settings before itemising:
 If you make subsequent changes to the part and database attributes,
existing annotations are automatically updated.
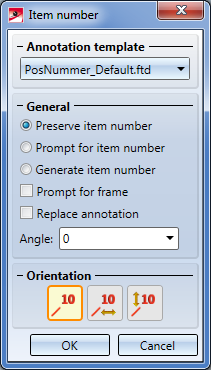
Once you have activated the function, the system displays the Item number dialogue window, where you can select the annotation file and define the item number and define the orientation.
If you right-click to activate an existing itemisation, a context menu with various other functions will be displayed.

|
Function |
Description |
|
|---|---|---|
|
|
Annotation template |
You use the annotation file (*.FTD), which you select beneath Annotation template, to define the attributes of the annotation. Examples include:
Various FTD files are shipped with HiCAD. In addition, you can also use the Itemising Settings function (right-click the Itemise Part icon) to define your own FTD files. |
|
|
Preserve item number |
If this setting is active, the current item number of the part will be used. If no item number has been assigned to the part, the corresponding entry in the annotation will remain empty. |
|
|
Prompt for item number |
If this setting is active, the system prompts for the item number after you have selected the function in the Orientation area. If an item number has already been assigned to a part, it is displayed. You can accept this number or change it. In addition, a warning icon This function assigns item numbers without checking for possible conflicts; i.e. conflicts with other items will not be recognized, so that different item numbers may be assigned to identical parts! |
|
|
Generate item number |
If this setting is active, the item numbers are automatically generated once you have selected the function in the Orientation area after specifying the increment and the start value. Increment is the value by which you want the automatically generated numbers to increase each time. In terms of start value, HiCAD offers you the value of the highest item number in the drawing + increment. In addition, a warning icon This function assigns item numbers without checking for possible conflicts; i.e. conflicts with other items will not be recognized, so that different item numbers may be assigned to identical parts! |
|
|
Prompt for frame |
If this setting is active, you are prompted for the annotation frame after selecting the function in the Orientation area. You can choose between:
|
|
|
Replace annotation |
If this setting is active, existing annotations are replaced by the current settings of the item number menu once you have selected the function in the Orientation area. You will need to re-define the leader line. |
|
|
Angle |
If you want the part annotation to be created at a particular angle, enter the angle you require. |
|
|
Set a new item number. |
|
|
|
Item number n is aligned horizontally to an existing reference tag. |
|
|
|
Item number is aligned vertically to an existing reference tag. |
|
To modify existing annotations, right-click the annotation and select the desired function from the context menu:
|
Function |
Description |
|
|---|---|---|
|
|
Edit |
Use this function to edit existing annotations. You can also change the composition and representation of the annotation. Identify the desired annotation. The Annotation Settings dialogue window will be displayed. Specify the settings as required and confirm with Apply. The annotation will then be adjusted accordingly. |
|
|
Move |
Use this function to move the annotation by defining an inflexion point for the leader line. Right-click to end the leader line and attach the annotation to it. |
|
|
Fit |
Use this function to fit the entered text exactly between two points. |
|
|
Clone |
Copies the selected annotation to other parts. Identify the part to which you wish to assign the copy of the selected annotation. |
|
|
Delete |
Deletes the selected annotation. |

Text with Leader Line (2-D)• New Text/Annotation (2-D)
|
© Copyright 1994-2018, ISD Software und Systeme GmbH |