Example - Bore Patterns (3-D)

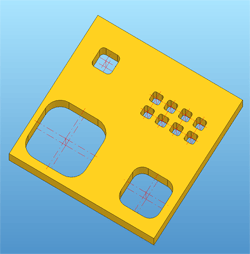
The depicted 2-D part is intended to be used as a bore pattern in various sizes.

Create the 2-D Part

  1. Create an empty 2-D part, e.g. PATTERNEX.
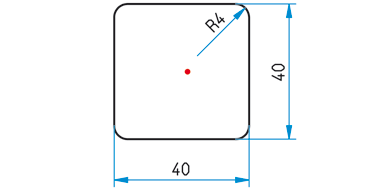
  2. Draw a square of size 40x40, and fillet the corners with radius 4.
  3. Place an isolated point in the middle of the square. To do this, activate the 2-D Geometry tab and select Tools > New point .
  4. Move the 2-D part so that the isolated point lies in the Absolute point (0.0).

Derive the 2-D HCM Model

  1. Activate the Information tab. In the 3-D, Further function group, select Var... > Delete variables .
  2. Activate the 2-D Part tab.
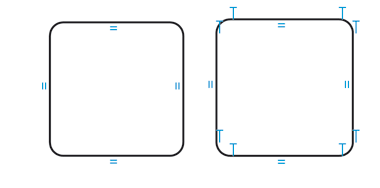
  3. In the 2-D HCM Constraints function group, select Fix... > Positional constraints; Parallel in order to specify the parallelity constraints. To do this, first identify the two vertical lines, and then the two horizontal lines.
  4. Then select Positional constraints, Tangential to specify the tangential constraints of the elements. Identify one of the straight lines and one arc (total of 8 tangential constraints).
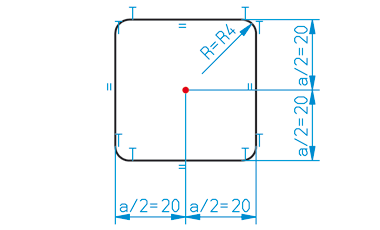
  1. Assign the depicted dimension conditions. Instead of entering a value, press the right mouse button each time to enter the formula a/2 or R. Choose a=40 and R=4 as an initial value.

  1. As all fillets should be identical, apply the Dimensional constraints > Radius, Equate constraint to the non-dimensioned fillets.
  2. Fix the isolated point with Positional constraints > Fix.
  3. Save the HCM model with the Save > Without database function. Choose the HiCAD folder KATALOGE/WERKSNORMEN/MUSTERBOHRUNGEN as the target folder.

Enhance the BORE PATTERNS Catalogue

  1. Start the catalogue editor by calling the program CATEDIT.EXE in the HiCAD EXE directory.
  2. Open the BORE PATTERNS table and use Extras > Table > New table to create a new table for the bore pattern, e.g. PATTERNEX.
  3. Choose the 2-D Pattern category. Click OK to exit the dialogue window.
  4. The new table contains columns ID, MOD, STATUS and DESCR.
  5. Now insert further columns by right-clicking the header of column DESCR and choosing New Column.

Description

Data Type

Comment

NAME

Text

Path of the HCM model

A

Floating point

Side length of square

R

Floating point

Fillet radius

  1. Now create the following records:

ID

MOD

StAT.

DESCR

NAME

A

R

1


A10R2

MUSTERBOHRUNGEN\MUSTERBSP.DCF

10

2

2


A20R4

MUSTERBOHRUNGEN\MUSTERBSP.DCF

20

4

3


A40R10

MUSTERBOHRUNGEN\MUSTERBSP.DCF

40

10

4


A60R15

MUSTERBOHRUNGEN\MUSTERBSP.DCF

60

15

  1. The new bores will then be available to you in HiCAD.

 Related Topics

Bore Patterns (3-D) • Standard Processings (3-D)Variable Through Holes (3-D)Repeated Fitting of Standard Parts (3-D)

Version 1702 - HiCAD 3-D | Date: 9/2012 | © Copyright 2012, ISD Software und Systeme GmbH