 > Settings, Text block
2-D Dimensioning + Text > Text > New > Settings, Text block
2-D Dimensioning + Text > Text > New > Settings, Text with leader line 
2-D Dimensioning + Text > Text > New > Settings, Itemisation 
2-D Dimensioning + Text > Text > New > Settings, Standard designation 
You use the annotation editor to define the settings for the following annotations:
You also make changes to these annotations in the annotation editor. Furthermore, you also create text blocks and texts with leader line there.
A text block/annotation may, in turn, consist of several text blocks, which can be formatted differently. Multiple selection of text blocks is possible:
After selecting the texts you can use the key shortcut CTRL+C to copy them to the clipboard, thus making them available to other programs (Word, Excel, etc.). You can also copy tables from Word or Excel into the Annotation Editor with CTRL+V, retaining their tabular structure.
2. Structure of the annotation
4. Insert, delete, move and display text blocks
5. Representation of outer frame and leader line
6. Representation of frame around text blocks
8. Background, Zoom, End Editor

![]()
To assign text elements to a text block, place the cursor into the corresponding text block. You can now directly enter normal texts via the keyboard. Furthermore, you can load texts from a file, paste texts from/copy texts to the clipboard.
Use this function to load texts existing in particular files.Possible are the following options:
Fonts can be taken over from formatted RTF files. Even various formattings within a line will be considered, except for subscripted and superscripted text. In HiCAD, text height and colour have another meaning than in text processing programs and will therefore not be taken over. Please also note that for 3-D texts only the first line of the file will be taken over.
No formattings will be taken over from CSV files. If you copy and paste them from Excel, fonts will be considered as well.
Use this function to save texts for a later re-use -either as text file (.TXT, .DAT) or as comma-separated CSV file.
Use this function to insert texts from the clipboard. If the clipboard contains a text which has been copied to it with the Text Editor, the complete HiCAD text formatting (colour, font, text height, italic, bold, line spacing etc.) is taken over. When inserting texts from other Windows applications, you can, if desired, take over the font, but not the colour or text height.
The currently marked text is copied to the clipboard. When copying texts from the clipboard to other Windows applications, HiCAD fonts are copied as Courier fonts.
Texts that have already been used, or special characters can be copied from the list box: Simply select the required text and click the symbol for text insertion. If a text element in the text block is marked, it will be replaced. If the cursor has been placed somewhere in the text block, but no text element is marked, the text will be inserted at the current position of the cursor.
![]()
![]()
An annotation is composed of various text blocks. Each of these text blocks can consist of various text elements. These include part attributes, database attributes, special characters or any alphanumeric texts. The annotation you choose is displayed in the preview window. Each text block is marked by a prominent border, the active text block by a black border. Part attributes within a text block are displayed in curly brackets, database attributes being additionally prefaced by the string %DBAT.
The example shown above consists of 4 text blocks. The first text block contains an arbitrary text, the second the item number attribute, the third a database attribute and the fourth is again a text.
If you want to use Drawing attributes within an annotation, precede the attribute name in brackets with the string %SA.
No automatic updating of the tags will be performed if the drawing attributes are changed.
The following attributes are allowed:
| Attribute | Attribute name | Attribute designation |
|---|---|---|
| Order No. | _SZNATTRS01 | H_Auftragsnummer |
| Order text | _SZNATTRS02 | H_Auftragstext |
| Customer | _SZNATTRS03 | H_Kunde |
| Drawing No. | _SZNATTRS04 | H_Zeichnungsnr. |
| Sheet No. | _SZNATTRS05 | H_Blattnr. |
| Designation 1 | _SZNATTRS06 | H_Benennung 1 |
| Designation 2 | _SZNATTRS07 | H_Benennung 2 |
| Created by | _SZNATTRS08 | H_Ersteller |
| Created on | _SZNATTRS09 | H_Erstellt am |
| Auxiliary text 1 | _SZNATTRS10 | H_Zusatztext 1 |
| Auxiliary text 2 | _SZNATTRS11 | H_Zusatztext 2 |
| Auxiliary text 3 | _SZNATTRS12 | H_Zusatztext 3 |
| Auxiliary text 4 | _SZNATTRS13 | H_Zusatztext 4 |
| Auxiliary text 5 | _SZNATTRS14 | H_Zusatztext 5 |
The Use attributes of the product structure, too, can be displayed in annotations. Precede the attribute name in brackets with the string %DBVA.
No automatic updating of the tags will be performed if the Use attributes are changed.
| Attribute name | Meaning |
|---|---|
| POSITIONSNUMMER | Item number |
| HEL_ANZAHL | Quantity per part |
| BEMERKUNG | Comment |
| TEILEART | Part type (e.g. spare part, wear part etc.) |
![]() If you want to use attributes of the superordinate part
when annotating a part, you can precede the attribute with the string %U.
The letter U can also be used repeatedly so as to use the attributes in
the structure of even higher parts, e.g. %U{item
number} or %UU{item
number}.
If you want to use attributes of the superordinate part
when annotating a part, you can precede the attribute with the string %U.
The letter U can also be used repeatedly so as to use the attributes in
the structure of even higher parts, e.g. %U{item
number} or %UU{item
number}.
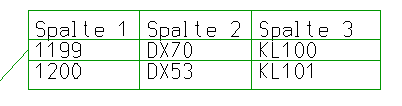
You can use tab stops (besides the selection of HiCAD fonts) to apply a tabular alignment to text blocks of an annotation. To do this, just place the cursor at the required position of the text and press the tab stop key on your keyboard.
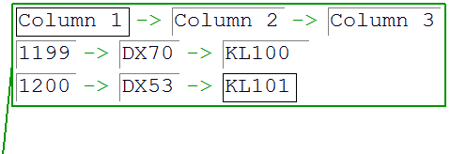
In this context please also note that you can assign horizontal and vertical dividing lines to texts which have been separated with tab stops. This allows the creation of complete tabular annotations. In the Columns area, you can set the width for each column explicitly.
Use the option at the bottom right of the dialogue to specify the number of decimal places for each numerical text block.
To assign text elements to a text block, place the cursor in the relevant text block. You can now enter texts directly via the keyboard.

Use the three icons shown above to load texts from a file, take over texts from the clipboard or copy them to the clipboard.
|
Load text from file |
Use this function to load ASCII files or formatted text (*.RTF, RichText). When loading text from RTF files you can also take over the font, as well as tab stops and indents. |
|
Insert text from clipboard |
Use this function to insert texts from the clipboard. If the clipboard contains a text which has been copied to it with the Annotation Editor, the complete HiCAD text formatting (colour, font, text height, italic, bold, line spacing etc.) is taken over. When inserting texts from other Windows applications, you can, if desired, take over the font, as well as tab stops and indents. |
|
Copy text to clipboard |
The currently selected text is copied to the clipboard. When copying texts from the clipboard to other Windows applications, HiCAD fonts are copied as Courier fonts. |
When copying texts from RTF files or the clipboard to HiCAD, bullet lists, numbered lists and indents will be taken over as well.
Before you insert the text, HiCAD asks you whether tab stops and indents are to be represented as blank spaces. In the Annotation Editor, texts that have been separated by tab stops will be arranged in columns when they are taken over. It can therefore make sense to replace the tab stops by blank spaces.
To insert texts or special characters that have already been used, click the  icon. The area under the toolbar is used for direct text entry. Simply place
the cursor in the area and enter the text.
icon. The area under the toolbar is used for direct text entry. Simply place
the cursor in the area and enter the text.
![]()
![]()
You can assign the following properties to each text block of an annotation:
HiCAD offers all installed Windows fonts, as well as special HiCAD fonts for selection. The HiCAD fonts are non-proportional and therefore particularly well-suited for tabular texts. The representation of the characters in the specified text height is independent of the scale of the drawing. The text height refers to the capital letters in standard text font.
For HiCAD fonts, you can specify width factor and inclination of the text.Default value is 1.0. If the value is less than 1, the text is compressed horizontally. If the value is larger than 1, the text is stretched horizontally.
The values in the drop-down lists for text size and text width can be expanded in the system file TXTPAR.DAT if required. After re-starting HiCAD the new values are available.
Each text can be placed on one of 1000 available layers. On layer 0 are texts which are not represented in the drawing. These are special texts which are only used for the indication of non-graphical texts, e.g. factual data. The text layers are identical with the layers of the corresponding elements and are not managed separately. The layer number is considered as an attribute for the selection of active attributes.
The Aspect ratio and inclination angle of text pull-down menu determines the typeface and the inclination of HiCAD fonts. If the aspect ratio of less than 1, the text will be compressed, if the aspect ratio is larger than 1, the text will be stretched. If the text inclination is 0.00 degrees, the text has no inclination and appears in normal style. If the inclination is 15.00 degrees, the text is represented in italic style.
![]()
![]()
A text block or an annotation may, in turn, consist of several text blocks, which can be differently formatted.
You use these functions to process the active text block.
| Functions for text blocks | |||
|---|---|---|---|
|
|
inserts a new text block (behind the active one) |
|
inserts a new text block in a new line |
|
|
deletes the active text block |
|
moves the active text block to the left |
|
|
moves the active text block to the right |
|
moves the active text block up one line |
|
|
moves the active text block down one line |
||
![]()
![]()
In the Entire window pane, you define the display of the entire annotation. This includes:

You can create the complete annotation with or without a frame, as well as underlined, i.e. with an extended tag.

The text lines can be separated by dividing lines.
If you want the part annotation (including the extended tag) to be created at a certain angle, then enter the angle you require.
If this checkbox is active, the annotation is created with a leader line.
Enables you to specify the alignment of the leader line, which depends on the type of the selected total frame.
 If you choose a rectangular or circular frame, the leader line is automatically aligned to this frame.
  If the annotation is underlined (by the leader line), the leader line can be aligned to the frame or - in the case of multi-line annotations - to a particular line. You can switch between the lines with the arrow keys
  .
.  For annotations without a total frame you can, in addition to the alignment to the frame or to a text line, also align the leader line to a specific text element of the annotation. You can switch between the text elements with the arrow keys.
 For annotations without leader line, the alignment of the annotation is specified via the insertion point, which you select by activating the appropriate radio button.
 Please note:
Use the option at the bottom right of the dialogue to specify the number of decimal places for each numerical text block.
![]()
![]()
|
Function |
Description |
|---|---|
|
|
Active text block without frame |
|
|
Inserts a frame around text block |
|
|
Inserts a double frame around the active text block. |
|
|
Inserts a round frame around the active text block. |
|
|
Inserts a frame with rounded edges around the active text block. |
![]()
![]()
In the window area Lines you set the Line colour and the Line type for the Leader line. Select colour and line from the list box. If you want to draw the leader line with a symbol (e.g. an arrow), select the required symbol from the Base point listbox.
You can freely select the size of leader line symbols, e.g. the arrow. The arrow size will be saved together with the drawing, thus retaining the symbol geometry, irrespective of the workstation. Furthermore, you can preset in the file POS3DPARNEU.DAT the angle and width of symbols (in addition to their length) as defaults.
Settings specified in the file POS3DPARNEU.DAT are default dimensions for the creation of new leader lines, and the changing of older leader lines for which no arrow dimensions have been saved yet.
![]()
![]()
|
Function |
|
|---|---|
|
OK |
The current settings are used as default settings for subsequently created annotation texts. |
|
Cancel |
Ends the function without applying the made settings. |
|
Background |
The background of the text input area is switched temporarily. This can be useful, for example, if it is difficult to see the selected font colour on the background. |
|
Zoom |
The zoom functions enable you to enlarge or downsize the text in the input window, or fit it to the entire width of the window. |
![]()
Related Topics
New Text/Annotation (2-D) • New Text (2-D)
Version 1702 - HiCAD 2-D | Date: 9/2012 | © Copyright 2012, ISD Software und Systeme GmbH
 Example text with indents, numbered and bullet lists


