Document Detail Window
The Document detail window consists of several tabs.
If the chosen document is a CAD file, the Mask tab shows you the most important entries in a preview, e.g. of the model drawing graphic.
Functions for the editing and processing of documents can be found in the context menu (right-click) for documents or on the Ribbon of the detail window. The context menus and the Ribbon menu are divided into the following areas: General , Assignments, Input and Output.

|
Mask |
Displays general document data, e.g. Document number, Designation, Document type etc.. |
|
Extended mask |
Displays further document data, e.g.Scale, Format, Status, Index etc. |
|
Graphics |
Shows an extended preview. The control keys of the Viewer can be moved within the graphics window by clicking on the small fix button (top left). Use the arrows to move to the required direction. Plus and minus represent the zoom functions. Use the context menu to call several functions in order to Print and Save the graphic. If you select the Save as BMP... function, a window will be displayed where you can specify the file size and the path. Use the View all function to return the whole drawing to the window after modifications of the view (zooming and/or moving of the graphic).
|
|
Targets |
Shows all documents or articles that are linked as targets. The current document is the source. It can also be links of different types. |
|
Sources |
Shows all documents or articles that are linked as sources to the current document. The tab is structured like the Links tab. |
|
Folders |
Shows the Folders in which the document is contained. When you right-click on an empty area in the Folders tab, a context menu with the following options will be opened:
|
|
Projects |
Shows the Projects in which the document is contained. When you right-click on an empty area in the Projects tab, a context menu with the following options will be opened:
|
|
Annotation |
If a linked notes document exists for the document, a preview of it will be shown. |
| Model structure |
The information on this tab provides an overview of the sub-documents to the entire model structure of the document managed in HELiOS. Icons in the tree structure indicate the model type (part, assembly...) and dependent parts are also marked as such. Also, it is indicated for each Inventor-related item whether it is a "regular" Part / Assembly, a parameter reference or a third party reference. The Edit attribute configuration dialogue window for result list configuration on the Model structure tab offers the additional Model item tab with model item attributes.
The Model structure display is currently only available for Inventor files. To ensure a correct result list representation of the model structure, the Article context of the top part must be unambiguous! If only a document structure instead of a model structure is available, this model structure will be displayed here in some cases (in Excel, AutoCAD and Navisworks interfaces). |
|
Use |
This tab shows a result list of all documents that are used in conjunction with the active one, i.e. it is shown which sub-documents are linked to a document within the data structure saved in HELiOS. On the Use tab you can find sorting functions for the display of the structure depth and the taking into account of indices: Levels: Here you can select how many structure levels of the documents are to be shown. If you have selected All, all levels will be shown. If you have selected a particular value, all levels up to this value will be shown. That is, for the value "1", only the first level will be shown, for the value "2", the levels 1 and 2, for the value "3", the levels 1, 2 and 3 etc. All indices: If this checkbox is active, all indices of the document will be taken into account. If the option has been switched on, the uses of the newer and older indices of the document will be shown. If the option has been switched off, only the use of the currently shown index will be considered. |
 If you want to compare the graphics of several documents, fix
the windows by activating the pin icon in the bottom left corner.
If you want to compare the graphics of several documents, fix
the windows by activating the pin icon in the bottom left corner. 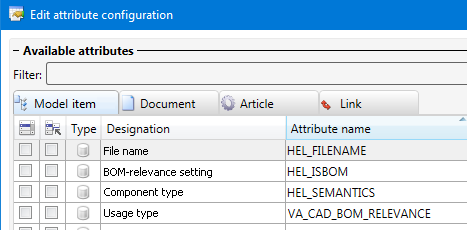
Right-clicking other areas of the document detail window opens the context menu for documents.
At the top right of the window you have the option to add the current object to your Favourites, and activate or deactivate the so-called "content focus":
 Add to favourites: Click the symbol to add the object to the Favourites window. The colour of the icon will change from grey to yellow
  . Click again to remove the object from the Favourites window again. The colour of the icon will then change back to grey.
  Display new contents in this window. This window has the content focus, i.e. it always shows the details of the currently marked object in the result list. When you move the cursor up or down in the result list, the contents of the detail mask will be changed accordingly.
  Do not display new contents in this window. If no window having the content focus is open, a new window will be opened when you select an object, e.g. by double-clicking an item in a result list.
If thze document detail mask was called from a specific Project context or Folder context, this context will be indicated in the caption of the dialogue window:

On the Display tab of the HELiOS Options dialogue window you can specify the default setting for the calling of object detail windows (activate or deactivate the Show new contents in same window checkbox).


Documents • Find Document • Links • Folders