Using the settings at PDM > Management + BIM > Production drawings > Title blocks, you can specify that in production drawings
- customer-specific and/or
- usage-dependent
title blocks should be used. HiCAD's scope of delivery includes the corresponding title block templates and the corresponding drawing frames. These templates and frames can be found in the HiCAD sub-directory Templates\Module_3DSteel\BIM\Szenen\BIM:
|
Drawing frame |
|
Title block templates for detail drawings |
Used for |
|---|---|---|---|
|
ST_DINA0.FGA |
|
ST_TB_DEFAULT_ASSEMBLY.FGA |
Assembly |
|
ST_DINA1.FGA |
ST_TB_DEFAULT_BOLTEDASSEMBLY.FGA |
Mounting assembly |
|
|
ST_DINA2.FGA |
ST_TB_DEFAULT_GRATING.FGA |
Grating |
|
|
ST_DINA3.FGA |
ST_TB_DEFAULT_MAINASSEMBLY.FGA |
Main assembly |
|
|
ST_DINA3_KANTBLECHE.FGA |
ST_TB_DEFAULT_PANE.FGA |
Glass |
|
|
ST_DINA4H.FGA |
ST_TB_DEFAULT_PLATE.FGA |
Steel Engineering plate |
|
|
ST_DINA4H_BLECHE.FGA |
ST_TB_DEFAULT_PROFILE.FGA |
Beam, Profile |
|
|
ST_DINA4H_PROFILE.FGA |
ST_TB_DEFAULT_PURCHASEDPART.FGA |
Purchased part |
|
|
ST_DINA4Q.FGA |
ST_TB_DEFAULT_SHEET.FGA |
Sheet Metal part |
|
|
|
ST_TB_DEFAULT_WELDEDASSEMBLY.FGA |
Welded assembly |
|
|
|
ST_TB_DEFAULT.FGA |
Others |
Based on these templates, you can create additional title blocks, for example for certain types of parts. Make sure that you name the title block correctly.
The following settings are available for customer-specific or use-specific title blocks in the Configuration Editor at PDM > Management + BIM > Production drawings > Title blocks:
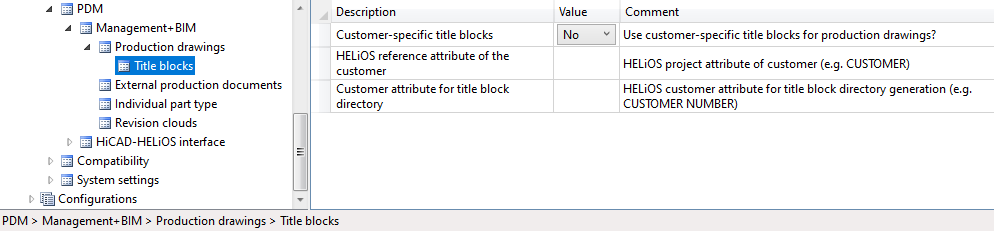
Customer-specific title blocks
This parameter must be set to Yes if you want to use individual title blocks. The default setting is No.
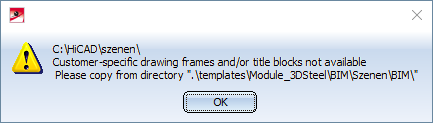
If the switch is set to Yes, you have to copy the above-mentioned drawing frames and title blocks from the HiCAD sub-directory templates\Module_3DSteel\BIM\szenen\BIM to the directory you specified in the file filegrup.dat under the ID C:. By default, this is the HiCAD Szenen directory.
If the frames and title blocks are not present in this directory when HiCAD is started with Management + BIM, a warning message appears:
HELiOS Reference attribute
If you want to use customer-specific title blocks, enter the attribute CUSTOMER as a reference attribute here. In this case, you must also specify the project attribute in the field Customer attribute for title block directory, after which the title block directories are named.
If you only want to use title blocks for a specific purpose - independent of the customer - leave the HELiOS Reference attribute field empty.
Customer attribute for title block directory
This attribute determines the criteria by which the title block directories are named. Enter the appropriate project attribute, for example, CUSTOMER NUMBER.
An example:
You have chosen the attribute CUSTOMER as the reference attribute and CUSTOMER NUMBER as the customer attribute. You are processing two customer projects.
Project: P1, customer:CUSTOMER1, customer number: 4711
Project: P2, Customer: CUSTOMER2, Customer number: 0815
In this case, you must create subfolders 4711 and 0815 in the directory specified under identifier C: in the Filegrup.dat file. These folders must contain the custom title block files.
If the title blocks are not available in the respective folder during automatic drawing derivation, a message is displayed:
The drawings are generated, but possibly without a title block.
Proceed as follows:
- You make the required settings in the Configuration Editor
- You copy the files from the folder templates\Module_3DSteel\BIM\szenen\BIM to the HiCAD folder for designs (identifier C: in the file filegrupdat).
- If you have selected CUSTOMER as reference attribute in the Configuration Editor, create corresponding sub-folders (e.g. with the customer number) in the HiCAD folder for model drawings. Copy the title block templates into these customer folders.
- Now adapt the title blocks.
- To do so, load the corresponding title block with the function Drawing > Insert Part > Exp... and place it in the point Absolute 0,0.
- Now adapt the title block as required, e.g. exchange the logo, change the variables etc. (see also the information given in the Drawing Frame and Title Block topic of the HiCAD Basics Help).
- Then save the title block by clicking with the right mouse button on the name SCHRIFE in the 2-D part structure of the ICN, then activate the function Save part and select the options Save, as 2-D part and Without database.
Based on the ISD templates, you can also create additional title blocks, e.g. for different part types. For example, if you want to create a special title block for part type I-Profile, this file must have the name ST_TB_I - PROFILE.FGA.
|
Please note the following: If you start the automatic drawing derivation under Management + BIM and the Customer-specific title blocks switch is set to Yes, the title blocks of the detail drawings are always searched for in the following order:
Click here for more information about Usages. |
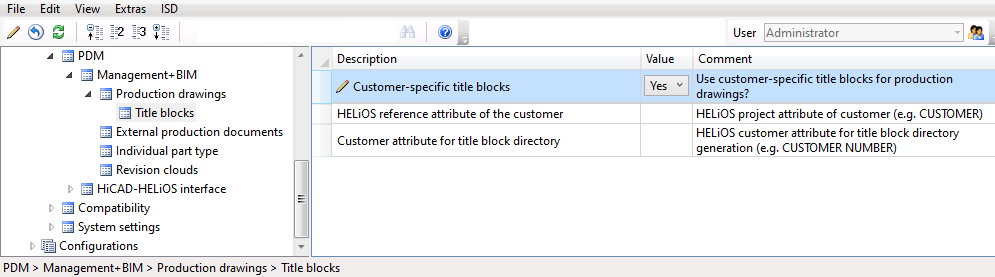
An example:
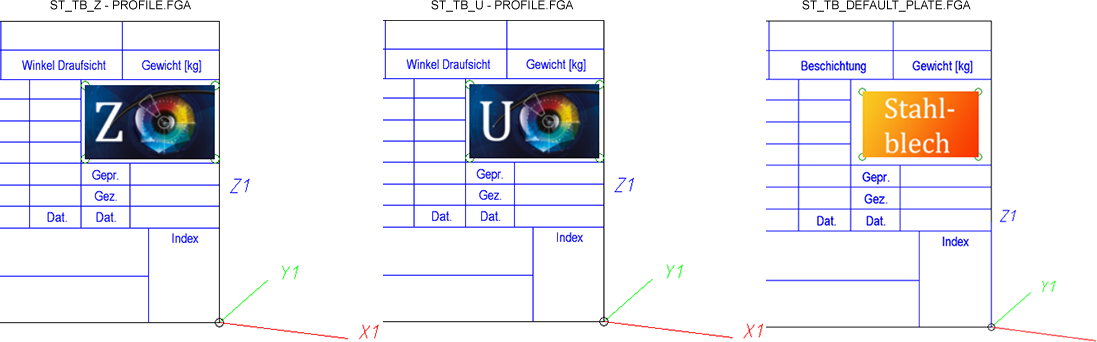
WWe want to ensure that I, Z and U profiles and steel engineering plates have special lettering fields. Special logos should be used in the detail drawings of these parts. To achieve this, title blocks must be created for the part types I - profiles, Z - profiles and U - profiles. That means, we need the title blocks
ST_TB_I - PROFILE.FGA
ST_TB_Z - PROFILE.FGA
ST_TB_U - PROFILE.FGA
Furthermore, the file ST_TB_DEFAULT_PLATE.FGA must be adapted.
In the Configuration Editor we change the settings as shown below:
To create the title blocks for the profiles, we use one of the supplied templates, e.g. ST_TB_DEFAULT_PROFILE.FGA, exchange the logo there and save it under the new name, e.g. for I - profiles under the name ST_TB_I - PROFILE.FGA.
We proceed in the same way for the other part types:
Now we take a look at the following model drawing:
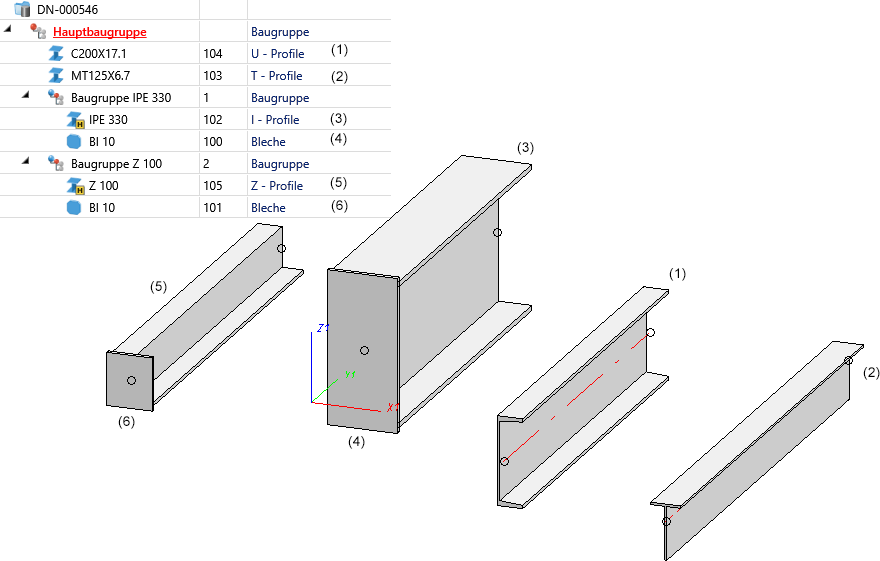
If the automatic drawing derivation (Management+BIM) is started, the following title blocks are used in the detail drawings:
|
Part |
Title block |
|---|---|
|
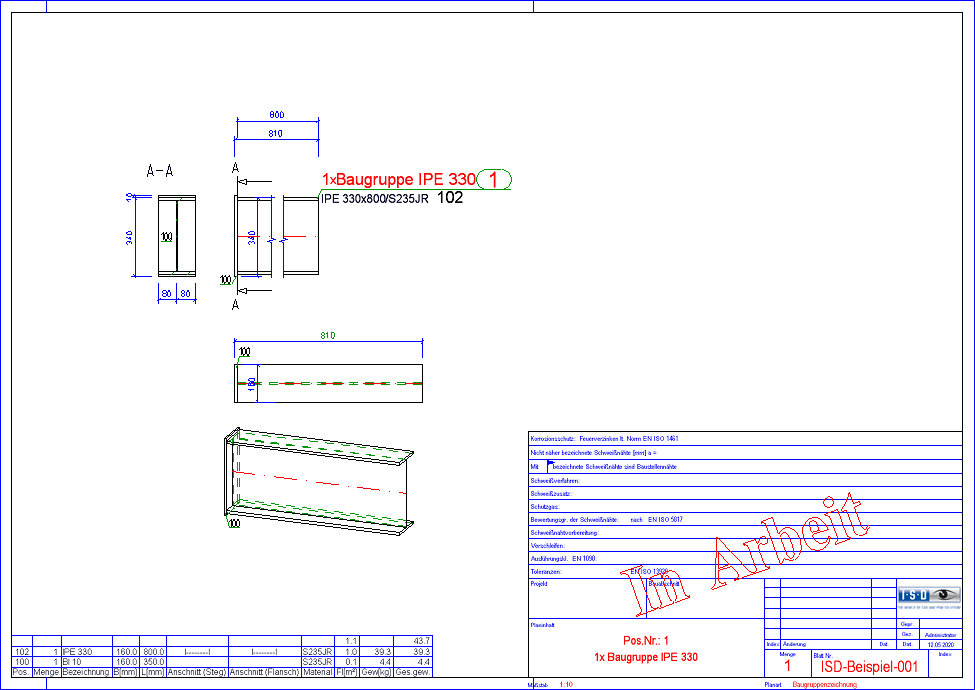
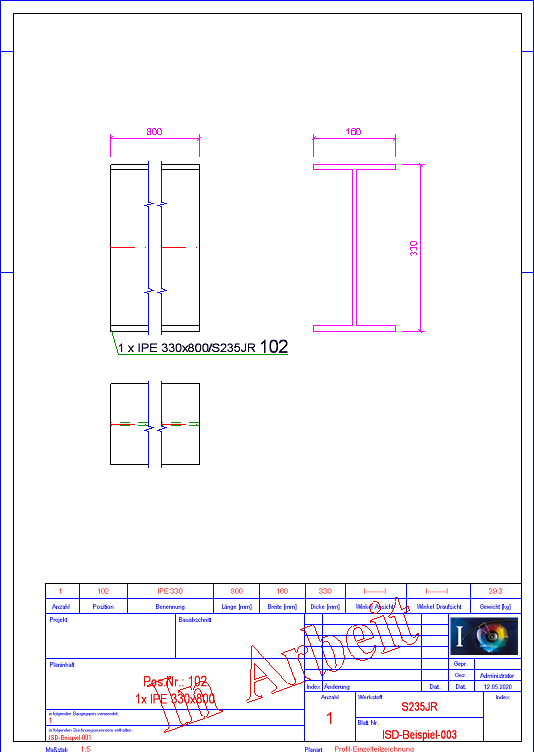
Assembly IPE 330 |
|
|
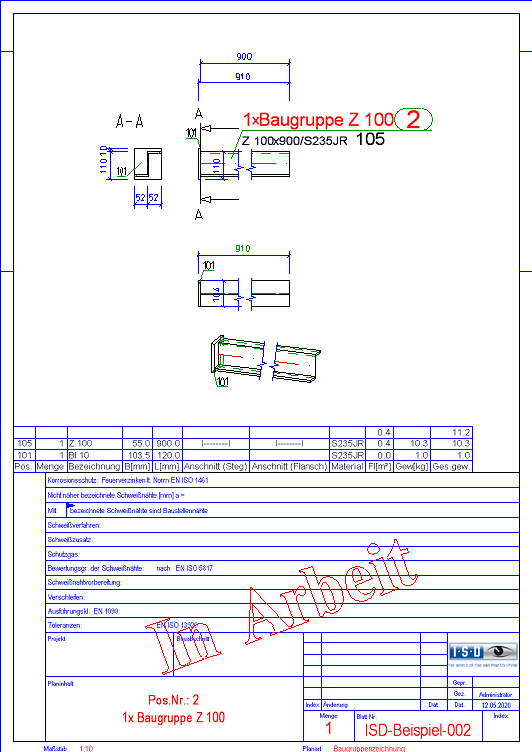
Assembly Z 100 |
|
|
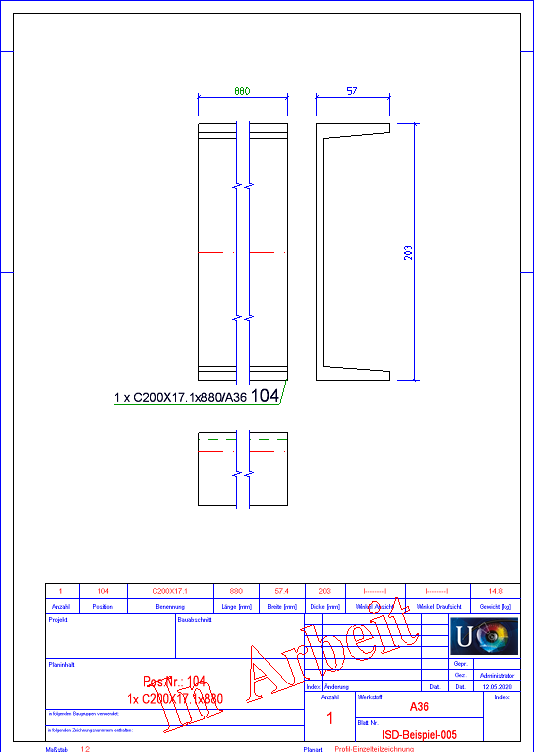
U - Profile (1) |
|
|
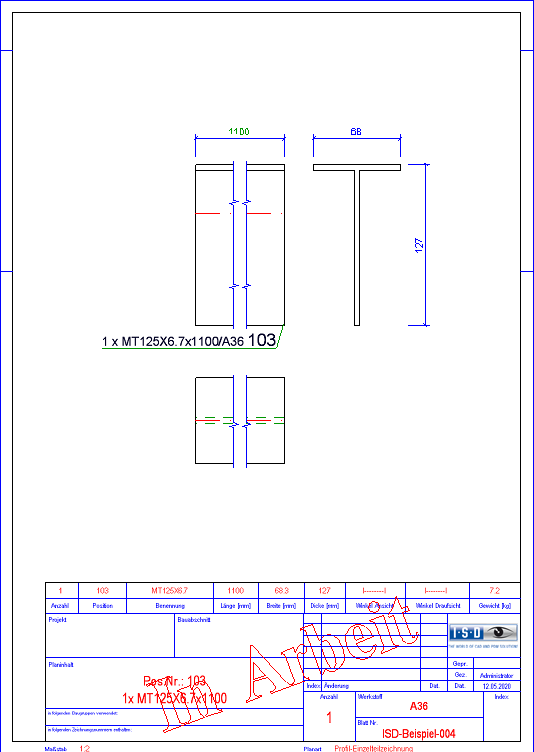
T - Profile (2) |
|
|
I - Profile (3) |
|
|
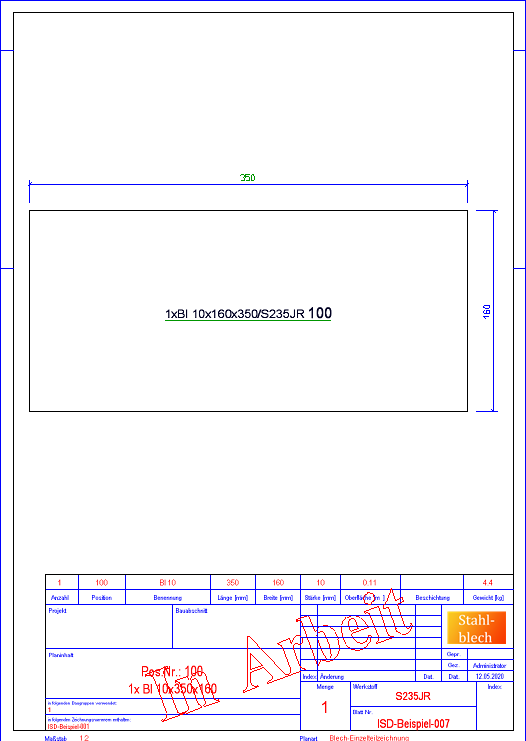
Plate (4) |
|
|
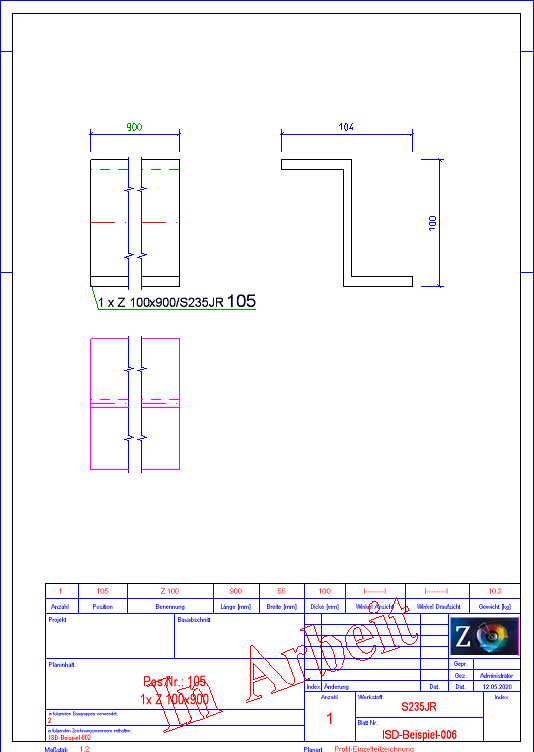
Z - Profile (5) |
|
|
Plate (6) |
The drawing frames (ST...) are automatically adapted to the size of the part.


Requirements for a Smooth Operation (ManBIM) • Management + BIM Settings in the Configuration Editor (ManBIM)• Important Information (ManBIM)