Ellipse
Ellipses can be inserted in the active sketch or 3-D sketch as
Ellipse
Sketch > Draw > Ellipse 
The function dialogue for full ellipses depends on whether or not a sketch or 3-D sketch is active:
A sketch is active.
The Full ellipse input window is displayed. proceed as follows:
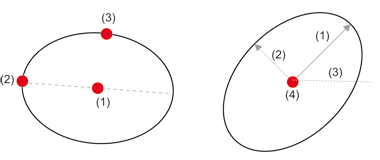
- Enter the value for the length of the 1st semi-axis (1) and the 2nd semi-axis (2).
- Specify the angle (3) between the x-axis and the 1st semi-axis.
- Specify the centre point (4) of the ellipse. Under Pick , select the icon
 and specify the required point in the drawing.
 - Click OK to exit the window
![]() Please note:
Please note:
- To take over angle or distance values from the drawing into the input field, right-click on the appropriate input field. Select the Angle function, or Pick distance, respectively.
- If no centre point was selected, the centre point will be placed into the origin of the active coordinate system.
A 3-D sketch is active.
HiCAD requests the following entries, in turn:
- the midpoint (1),
- the length of the 1st semi-axis and a point on this axis or the 1st vertex (2) (END, right mouse button),
- the length of the 2nd semi-axis and a point on the ellipse plane or a point (3) on the ellipse (END, right mouse button).

Links: 3D-Skizze aktiv, Rechts: Skizze aktiv
Partial ellipse
Sketch > Draw > Partial ellipse 
To create partial ellipses, click  and select the Partial ellipse function.
You use this function to create partial ellipses. The function generally works in the same way as the Ellipse function, the difference being that you also need to specify
- a point on the semi-axis from the centre point through the start point, and
- a point on the semi-axis from the centre point through the end point.
For sketches, the specification of the start point and the end point can - like the centre point specification - directly take place in the Partial ellipse input window. Under Pick, click the  , resp..
  icon and specify the required point in the drawing.
![]() With partial ellipses, two solutions are always provided.
With partial ellipses, two solutions are always provided.

