 > Lettering
Project: HiCAD Sheet Metal
3-D Standard > Standard Processings > Bore > Lettering
This function enables you to emboss any texts.
The rear of the sheet is determined by the position of the processing plane.
You can now fit the lettering individually or compile a group via the Grid menu that appears.
The sheet is embossed. You can now fit the lettering a second time. Alternatively, you can use the right mouse button to activate a context menu before defining the new fitting position. The functions of this menu enable you, for example, to change the fitting direction. Use the middle mouse button to end the function.
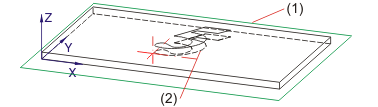
(1) Processing plane
(2) Punch including rear
 Please note:
You can also change the punched text via the feature log: Double-click the "Number punches" entry and change the text in the Text Editor.


|
© Copyright 1994-2019, ISD Software und Systeme GmbH |