
Project: HiCAD Sheet Metal
Sheet Metal > New > New sheet from sketch (Main part)
Sheet Metal > New > From Skt  > Sub-part
The New sheet from sketch functions for main parts and sub-parts create a sheet from a drawn sketch, taking sheet thickness and fitting direction of the sheet into account. Depending on the chosen function, the sheet will be created as a main part or sub-part. To create a sub-part, you need to create a main assembly or a normal assembly beforehand. As soon as the assembly is active, the sheet from the sketch will be subordinated to the assembly after selection of the function.
Proceed as follows:
The Sheet from sketch dialogue window will be displayed:

1. Sketch
3. General

If a sketch is active in your drawing, this sketch will be automatically chosen for the creation of the new sheet. If there are several sketches, you need to select the sketch from which you wish to create the sheet. You can also call click the  symbol and choose the
  New sketch in plane function, and then draw a new closed polyline with the Draw functions on the Sketch tab.
As soon as you have identified the sketch, a preview of the new sheet will be shown. If you prefer a different sketch for sheet creation, click the  icon beneath Sketch and identify a new sheet.
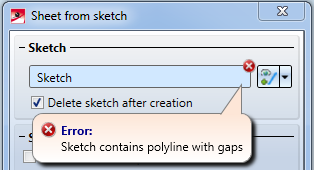
If the sketch contains several, closed polylines, a sheet with flange will created from them. If there are polylines that are not closed, an error message will be displayed:
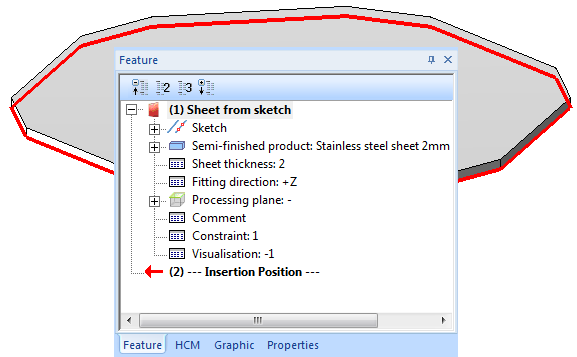
If the polylines intersect, the error message shown below will be shown. However, the sheets will also be created in case of such self-intersections.

To modify the sketch, click the symbol and choose Process sketch  . You can then process the sketch using the functions of the Sketch tab. You end sketch processing via the processing dialogue and will be redirected to the Sheet from sketch dialogue window.

Even if you delete the sketch from the part structure, you have still the option to change the sketch for the sheet via the feature log.
The standard for semi-finished products can be taken from the HiCAD Catalogue Editor by clicking the  icon. The selection of a semi-finished product influences the sheet thickness, the material and the article number. If you want to change the article number, deactivate the checkbox at the bottom of the dialogue window. If you double-click the feature Sheet from sketch you have the option to activate or deactivate the semi-finished product later.
By specifying the fitting direction you determine the direction for the applying of the sheet thickness (+ or – Z-axis).
Frequently used part are often saved as referenced parts. Such parts will then be additionally saved as individual parts at the end of the function-related process, and will not be integrated as a "fixed" part into the drawing. If any changes are then applied to this part, it can then be updated in the drawing.
To deactivate Feature logging during sheet creation, deactivate the Create feature ![]() checkbox. By default, this checkbox is active
checkbox. By default, this checkbox is active ![]() .
.
The name of the sheet will be generated automatically. You can overwrite it in the Article No. text field if you have not activated the Use semi-finished product checkbox.
If the Use semi-finished product has been activated you can take the Article number from the catalogue. To do this, activate the Via catalogue  checkbox at the bottom of the dialogue.
Once you have entered all required data, you can create the new sheet. Click Apply to insert the sheet, while the dialogue window remains open. After identifying the sketch, you can then assign the entered data to further sketches, either by clicking Apply again or pressing the MMB. Click OK to insert the sheet and close the dialogue window. Click Cancel to close the dialogue window and discard all inputs, without creating the sheet.
![]() Please note:
Please note:
Incorrect inputs will be indicated by the  symbol. Move the cursor over the symbol to display the error message.

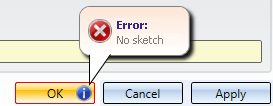
If the function cannot be executed with the entered data, the  symbol will be displayed next to the OK button. Move the cursor over the symbol to display the error message.
Example:

|
© Copyright 1994-2019, ISD Software und Systeme GmbH |