Project: HiCAD 3-D
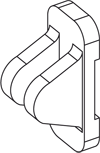
Example: Bracket
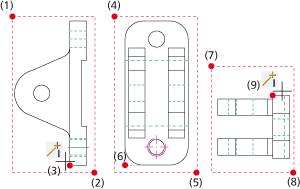
This example illustrates the conversion of the 2-D drawing shown below to a 3-D model of a bracket.

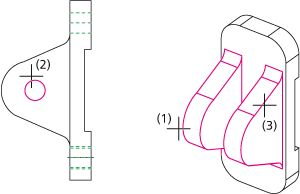
(1) front view, (2) side view, (3) top view
Proceed as follows:
Load the REKO_BSP3.SZN file and activate the conversion module (3-D Standard > New > Extruded  > 2-D->3-D Conversion).
The conversion to the 3-D model comprises three steps:
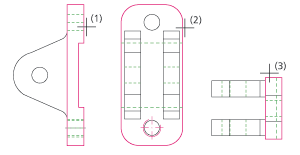
Step 1: Define views
- Select the Views function from the 2-D->3-D Conversion menu.
- Create a selection box for the front view (1), (2) and specify the reference point (3); in our example, it is the start point of the left edge plate that was chosen as reference point.
- Create a selection box for the side view
(3), (4) and select the theoretical intersection point of the left edge and the upper edge as reference point (6).
- Create a selection box for the top view (7), (8)
and select the start point of the upper edge as the reference point (9).

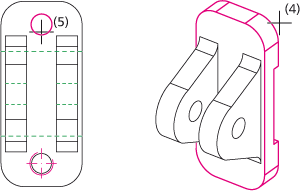
Step 2: Define polylines
- Select the Part from Views function from the 2-D->3-D Conversion menu.
- Identify the polyline (1) in the front view .
- Identify the polyline (2) in the side view.
- Identify the polyline (3) in the top view. The 3-D model of the plate will automatically be created.
- Next, create the right-hand side part. Call the Part from Views function and identify the polylines for the right-hand side part in the front view (4), the side view (5) and the top view (6).
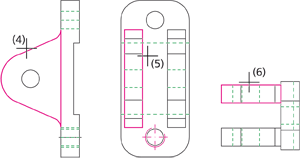
- Repeat step 5 for the left-hand side part, i.e. call the Part from Views function again and identify the polylines for the part in the front view (7), the side view (8) and in the top view (9).
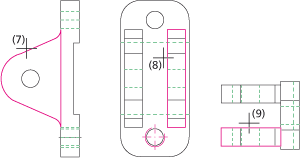
Step 3: Holes and threads
- Select the Holes function from the 2-D->3-D Conversion menu.
- Identify the 3-D model for the left-hand side part (1), then identify the hole contour in the front view (2).
- Right-click to end the selection. The hole will be created.
- Repeat steps 1 and 2 for the right-hand side part (3) and the hole contour (2).
- Select the Holes function again.
- Identify the 3-D model of the plate (4), the identify the hole contour in the side view (5).
- Right-click to end the selection. The hole will be created.
- Select the Through hole thread or Blind hole thread function.
- Identify the 3-D model of the plate (6), then identify the thread in the side view (7).
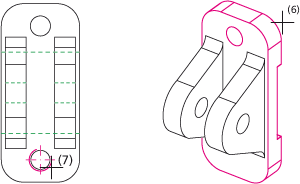

The 3-D model has now been completed.

Example: Flange
• Example: Cast Part
|
© Copyright 1994-2019, ISD Software und Systeme GmbH
Version 2402 - HiCAD 3-D
Date: 06/10/2019
|
> Feedback on this topic
|