
Project: HiCAD 3-D
If you have selected a weld seam for processing that was created with an older HiCAD version (i.e. older than Version 1600), the old dialogue window for weld seam processing with the
tabs will be displayed.
First, specify in the above-mentioned tabs the desired settings and parameters. You have then the following options:
|
Create |
The weld seam is created according to the specified parameters. If you want the weld seam to be displayed with a tag, HiCAD prompts you to specify the start and inflexion points of the tag. Right-click to end the point specification. Please note that another point is set when you exit the function with a right-click. After creation of the tag, the Weld seam function remains active! |
|
Execute |
Same as Create, with the difference that the function is ended after creation of the tag. |
|
Close |
This button ends the Insert weld seam function. Edges shown in the edge list which have not yet been welded will not be considered. |
Here you determine the parts and edges to be welded together, as well as the seam type, the thickness of seams and the representation of weld seams.
Important weld seam types are:
The toolbar in the upper area of the tab contains a selection of various weld symbols. The active symbol is highlighted:
![]()
If you want to change the configuration of this row, proceed as follows:
You specify the weld seam thickness by entering a value in the corresponding input field. You can enter the desired value manually or select a predefined seam thickness from the listbox.
The following combinations are possible for the representation of weld seams:
|
|
Symbol Create tag |
Weld symbol with tag |
|
|
Symbol Create tag |
Weld symbol without tag |
|
|
None Create tag |
Without symbol, but with tag (workshop/site seams) |
|
|
Solid Create tag |
Solid with tag |
|
|
Solid Create tag |
Solid without tag |
If you want to divide the weld seam into seam segments, enter the number of seam segments and their distances.
To select the parts to be welded, click the Select parts button. Identify the part to be welded on, then identify the target part to which the welded connection is to be made. Please note that the weld seam will always be assigned as a sub-part to the first selected part!
![]() Please note:
Please note:
The setting options in the Edge selection area are only active after selection of the parts to be welded together. Here you specify how the edges to be welded together are to be determined.
|
Individual |
You select the edges by identification with the cursor. All identified edges are entered into the edge list. |
|
Auto |
HiCAD automatically detects all possible edges and enters them into the edge list. This option is only possible if you weld two different parts together. |
You can remove entries from the list by placing the cursor in the corresponding row and pressing the DEL key, or by right-clicking an entry and selecting the Delete function in the context menu.
Here you specify the parameters for the symbol and solid representation of the weld seam. These are
![]() If you have selected the "Solid" representation on the Insert tab, the input fields are inactive.
If you have selected the "Solid" representation on the Insert tab, the input fields are inactive.
Here you specify the parameters for the tag. These are type, form, direction and leader line of the tag.
You select the desired parameters by activating the corresponding symbol or the option field below. By clicking the Multiple inflexion option you can create tags with several inflexion points.
Furthermore, you can create tags With tail ![]() and Without tail
and Without tail![]() .
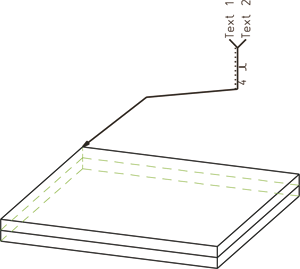
If you have selected the With tail option, you can enter the annotation texts for the two branches in the fields Text1 and Text2.
.
If you have selected the With tail option, you can enter the annotation texts for the two branches in the fields Text1 and Text2.
The field in the Form area are only evaluated if the "Solid" representation has been selected!

Weld Seams (3-D) • Process Weld Seam (3-D) • Insert Weld Symbol (3-D) • Standard Parts (3-D)
|
© Copyright 1994-2019, ISD Software und Systeme GmbH |