In the combination field Value for you can select the variables group subsequently shown in the Table Box for processing. The structure description specified for the base variant, to which the current variant belongs, determines selection. These definitions are stored in the Source Definition file.
A variables group may comprise:
If you select a sub-part or a complete, assembled part, the appropriate header (or all headers) in the Preview Box, change from matt to bright.
If you select a sub-part with an On/Off capability, the program displays two buttons next to the Combination field
![]() , enabling you to toggle it On or Off. A green point on the appropriate button indicates that the part is On, while a red point indicates that it is Off.
, enabling you to toggle it On or Off. A green point on the appropriate button indicates that the part is On, while a red point indicates that it is Off.
 As simple variants do not contain part-specific groups, the combination box is only active for structured variants.
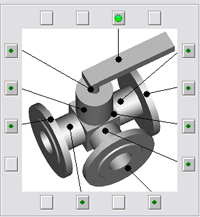
The preview box displays an image of the base variant to which the loaded structured variant belongs. This is only possible if the image exists in an EMF file (Windows Enhanced Metafile). By default, these files are located in the HiCAD subdirectory ega. They have the ame name as the variant file and the extension EMF.

Example: ARM3WKHF2
Click the  icon to subsequently assign a preview image to a variant. Select the desired folder and the EMF file.
 When creating a feature variant via Drawing > Save/Reference > Part
  > Create feature variant
  , a graphical preview image will be automatically created for the Variant Editor, provided that the shaded representation has not been activated.
In the illustration of a base variant, leader lines from parts point to buttons in the margin of the preview box. The coloured point on a button indicates:
|
Green |
The corresponding part is On. |
|
|
The part is Off |
|
|
The part has been selected for processing. The part data in the current record is displayed in the Table dialogue box. |
|
Red |
The corresponding part is Off. |
|
|
The part is currently deselected for processing |
|
|
The part is currently selected. The part data in the current record is displayed in the Listbox. |
Click the appropriate button to activate the appropriate part for processing. The coloured point on the button is now bright. This procedure works in the way described for selection in Select parts.
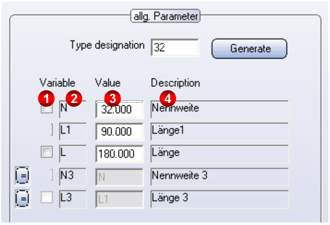
The designation of the selected variables group is in the top line of the box., e.g. General parameter. The Type designation entry field at the top of the box shows the die Type designation contained in the corresponding record. The table is comprised of four columns:

You can define "take over" options for a variable. In the example above, this applies to variables N3 and L3: In this case, N3 should take over the Value N and L3 the value of L from the same record. This convention applies to all records belonging to the variant.
You can activate or deactivate the "take-over" with the button  .If you click the button for variable N3, the following prompt is displayed: Take over value from
N (General parameter)?
Select Cancel to abandon changes. Select Yes to take changes over. If you select No to deactivate the "take-over", you can specify a numerical value in the entry field of the Value column.
You can also define a "take over" option for all single parts. For example:

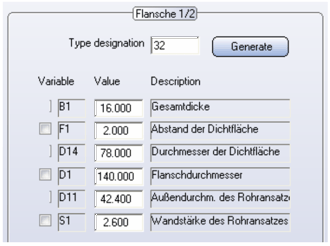
In this case, the variables of the part Flange 3 take over the values belonging to the corresponding variables of the part Flange 1/2 in the same record. This convention applies to all records belonging to the variant.
You can activate or deactivate the "take-over" with the button ![]() The following prompt is displayed when you click the button, Take over value from "Flange
1/2" ?
The following prompt is displayed when you click the button, Take over value from "Flange
1/2" ?
Select Cancel to abandon changes, or Yes to accept them. If you select No to deactivate the "take-over", you can specify a numerical value in the entry field of the Value column.
The same option buttons as for simple variants are available at the bottom of the Table dialogue box.

The User Interface • Settings • Change/Generate Type Designation • Edit Simple Variants
|
© Copyright 1994-2018, ISD Software und Systeme GmbH |