For some variants, such as Cross-bracings, End plates and Purlin joints, the Rule Editor is available, a tool that allows the definition of customer-specific configurations in accordance with of Steel Engineering-specific standards and construction guidelines (rules). The dialogue windows of these connections contain a button enabling you to start the Rule Editor:

 Please note:
The Rule Editor is a tool for administrators or users with thorough knowledge of the HiCAD API and Python Script creation. The Editor allows the creation of customer-specific configurations. Users without sufficient knowledge should not use the Rule Editor!
This dialogu window lists all variants used in the currently selected variant. The list consists of five columns:
|
Column |
Content |
||||||
|---|---|---|---|---|---|---|---|
|
1 |
Type indicator The first column contains the so-called "type indicator", which determines whether a value or a rule is assigned to a variable. By default, the type Value is initially assigned to all variables.
To change the type, right-click the indicator and select the required type in the context menu. |
||||||
|
2 |
This column contains the names of the variables. To each of the listed variable belongs an input field, an option or a checkbox in the dialogue window of the variant. Examples:
|
||||||
|
3 |
This column contains the current Contents of the variables. |
||||||
|
4 |
This column contains the Type of the variable. System.Double stands for "Real" values, System.INT32 for "Integer" values and System.Boolean for "True/False" values. (e.g. for checkboxes). Furthermore, there are values that are based on API classes, e.g. DV.GUI.Model.General.Rectangle or HiCAD.Welds.Model.WeldsModel. |
||||||
|
5 |
Contains short descriptions of (some) variables. |
||||||
The sequence in which the rules are processed corresponds to the sequence of variable in the Rule Editor. If you want to change the sequence, place the cursor onto the row and move the row with the arrow symbols  and
and  .
.
Switch type indicator from Value to Rule
If you want to assign a rule instead of a value to a variable, right-click the type indicator and select Rule  . in the context menu. In the dialogue window of the variant, the corresponding variable is deactivated. At the right hand side of the Rule Editor dialogue window, a Text Editor for rules is displayed:
|
|
Load the rule from a file |
|
|
Save the rule as a file |
|
|
Cuts the current selection and copies it to the Clipboard |
|
|
Copies the current selection to the Clipboard |
|
|
Pastes the content from the Clipboard |
|
|
Revokes the last entry (UNDO) |
|
|
Revokes the last UNDO step (REDO) |
|
|
Deletes the current selection |
|
|
Activates/deactivates the wrapping mode. If the mode is active, (green), the horizontal scroll bar is hidden and the text is automatically scrolled when required (e.g. when entering longer texts). |
|
|
Hides/shows the row number (green = ON) |
|
|
Hides/shows the paragraph marks (green = ON) |
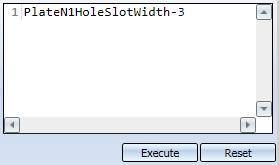
In the text field you enter - depending on the type of the variant - a value, a formula, the Boolean valueTrue or False, or the command of an API class. Formulas can contain the common arithmetical operators or variables names.

Execute
To execute the rule, click the corresponding button. If the calculation was successful, i.e. free of errors, the rule will be entered into the Contents field of the corresponding variable, the result will be shown in the Result field and the corresponding field in the dialogue window of the variant.
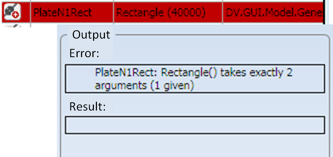
If an error occurs during calculation,an appropriate error message is issued in the Error field of the Output area, and the corresponding row of the variable is highlighted. Correct the rule and click Execute again.

Reset
As long as the calculation has not been carried out, you can reset the rule shown in the text field to its original state.
An example:
Let us assume that you want to create, in, a configuration with the following properties in the End plate dialogue:
To do this, you need to set the type indicator of the variables shown below to Rule  , define the rule in the Text Editor window, and adopt the settings with Execute:
|
Parameter |
Variable |
Rule |
||
|---|---|---|---|---|
|
1 |
Bore type |
PlateN1HoleType |
1 |
1 for slot |
|
2 |
Diameter |
PlateN1HoleFreeDiameter |
PlateN1HoleSlotWidth-3 |
Formula form diameter |
|
3 |
Plate size |
PlateN1Rect |
Rectangle (400,400) |
API command |
|
4 |
Shorten beam |
BeamP1Cut |
True |
Boolean value |
When you exit the Rule Editor with OK, the corresponding values are preset in the dialogue window of the end plate, and the corresponding option/input fields are deactivated:
Save the configuration. If the  symbol is shown at the top of the dialogue window, you have changed the current configuration, but have not saved it yet.
 Variables to which a rule has been assigned are deactivated in the dialogue window and can no longer be edited there.

Variants + Connections (3-D SE) • Insert Connections - Procedure (3-D SE) • Dialogue Window for Connections (3-D SE)
|
© Copyright 1994-2018, ISD Software und Systeme GmbH |