"Civil Engineering functions" docking window > Steel Engineering > General > Purlin joint (1204)
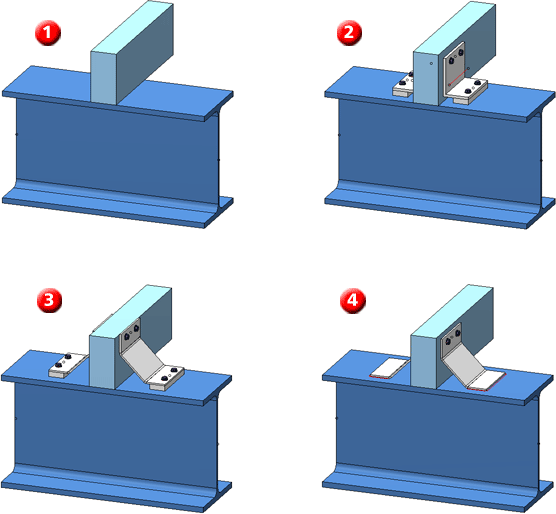
Use this Design Variant to connect one girder and one purlin with a folded sheet (with single or double fold), or with an L-profile that is bolted or welded onto the purlin and the girder. One-sided and two-sided connections are possible. The purlin can be any 3-D part.

(1) Original
(2) Two-sided purlin joint, with L-profile and connecting plate, welded to girder and purlin
(3) Two-sided purlin joint, with double-folded sheet and connecting plate, welded to girder and purlin
(4) Two-sided purlin joint, with double-folded sheet, welded to girder, without connecting plate
Proceed as follows:
Configurations for purlin joints can be saved, which enables you to access your individual configurations at any time afterwards.
The purlin joint is configured via the tabs of the dialogue window.
Geometry
On this tab you specify the dimensions of the purlin joint.
The input fields displayed on this tab depend on the selected purlin anchor.
Fixing
Here you specify the fixing of the folded sheet/L-profile to the girder and the part connected with the girder.
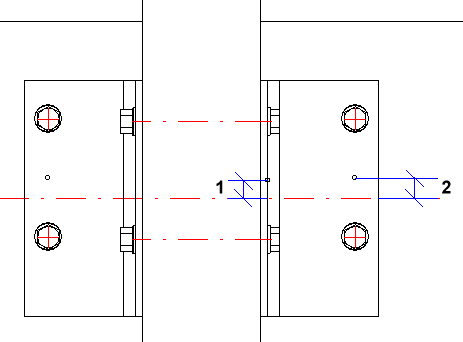
The fixing to the part connected with the girder takes place via boltings. Click the  symbol to select the bolts and bores directly from a standard part catalogue. In the fields below, specify the total number of bolts (max. 2) and the distance between the bolts. In addition, you can enter an offset. If you want to reverse the direction of the bolting, activate the Invert checkbox.

1 Offset on part to be connected to girder, 2 Offset on girder
You can either bolt or weld the folded sheet/L-profile to the girder.
Purlin anchor
Here you specify the type of fixing.
You have the following options for the definition of the purlin joint:
The fixing can be on the left, on the right, or on both sides.
Enter the width of the folded sheet/L-profile, and click the  symbol to select the desired folded sheet/L-profile directly from a standard part catalogue. The sheets are located at FACTORY STANDARDS > SHEETS.
In addition, you can insert a distance plate. Activate the Create checkbox and select the desired plate.
Click the Preview button if you want to display a preview of the connection based on the currently entered data. If you want to modify the current data, apply the required changes and click Preview again to update the preview. Click OK to insert the connection according to the current data and close the dialogue window. If you click the Cancel button, the window will be closed, and the specified or changed connection will not be inserted.

Connections + Variants (3-D SE) • Dialogue Window for Connections - Type I (3-D SE) • The Catalogue System for Connections + Variants (3-D SE)
|
© Copyright 1994-2018, ISD Software und Systeme GmbH |