Sketch > Transform > Scale 
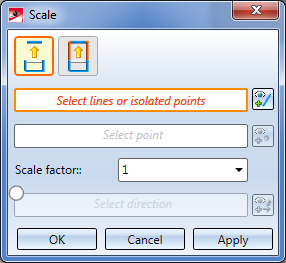
Use this function to scale, move and rotate lines and isolated points of a sketch in one step. When you call the function, the Scale dialogue window will be displayed:

The currently active step will be highlighted with an orange frame in the dialogue window. After calling of the function these steps consist in the selection of lines or points.
Step 1: Select option
Use the symbols at the top of the dialogue window to specify the handling of connected lines during scaling.
|
|
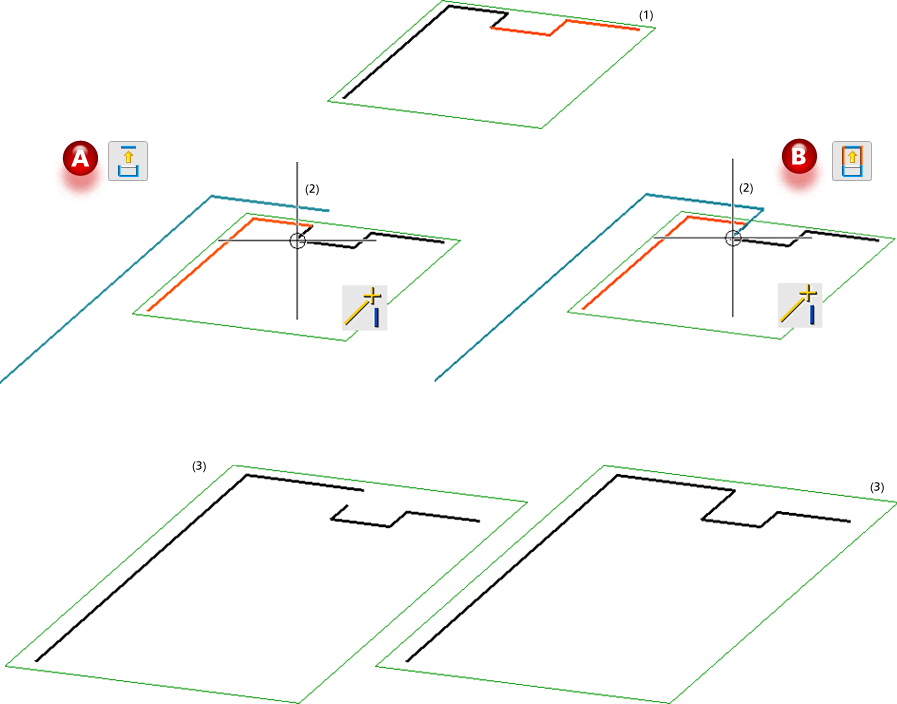
Scale lines, individually If this option is active, only the actually selected lines (highlighted red) will be scaled. Connected lines will not be adjusted.
|
|
|
Preserve connected lines and adjust length If this option is active, HiCAD will attempt to preserve the position of the connected lines if possible. In the process, the length of the lines to be scaled may be adjusted by means of new intersections. For distances the angle between connected lines will be preserved. If it is not possible to preserve the connected lines, the |
Step 2: Select elements
Select the lines or isolated points that you wish to scale in the drawing, or use the functions of the context menu that you can open with a right-click during the selection process.

|
Connected lines or edges* Use this function to select all lines or edges that are connected to the next identified edge in one step. The lines and edges will be selected up to a point where a continuation would no longer be unambiguous.
|

|
Tangentially connected lines or edges* Choose this function if you also want to select all tangentially connected lines or edges when identifying the next line or edge. |

|
Lines in rectangle (CTRL+LMB)* Use this function to select lines by means of a selection rectangle. Please note that only lines of the active part will be considered. If the rectangle is drawn from the top left to the bottom right, all lines which are completely located within the rectangle will be selected. If the rectangle is drawn from the top right to the bottom left, lines only portions of which are located within the rectangle (i.e. intersect with the rectangle) will be selected as well. The selected lines will be highlighted in a different colour. You can also call the function via the keyboard. Proceed as follows:
|

|
Cancel (Esc) Cancels the function. |
*Normally, already selected lines and edges will be de-selected if you click them again.
For the above functions marked with an asterisk *, however, the following applies: If you click lines that have already been selected or if already selected lines are located in a selection, they will not be removed from the selection.
The selected elements will be highlighted in the drawing and the number of selected elements will be shown in the dialogue window:

Press the middle mouse button to end the selection. Click the  icon to expand the selection.
Step 3: Select point
After completion of the line selection (press middle mouse button), HiCAD automatically switches to the selection of the fixed point - the point the position of which is to remain unchanged. Specify this point using a point option.
In the case of planar sketches you have the option to select the origin of the active coordinate system. To do this, right-click and select Origin  in the context menu.
To change den fixed point, click the  symbol and select the desired point.
Step 4: Enter scale factor
Enter the scale factor or choose a value from the listbox.
Step 5: Select direction
If you want to perform the scaling in only one direction, activate this option.

The, determine the direction by
You have the additional option to right-click and open a context menu with further functions for direction specification.
|
|
Origin
|
|
|
X-axis (only for 3-D sketches) |
|
|
Y-axis (only for 3-D sketches) |
|
|
Z-axis (only for 3-D sketches) |
|
|
Step back
|
|
|
Cancel
|
To change the direction, click the  symbol and select the new direction as described above.
The result of the scaling will be dynamically visualized in the drawing.
If you want the scaling to be performed - as shown in the preview - click OK or Apply.
When you select Apply, the dialogue window will remain open after performing the scaling. Only the list of the selected elements will be deleted in the process, all other settings will be preserved and cannot be changed. In this way, further elements can be scaled in the same way.
When you select OK, the dialogue window will be closed after the scaling.
When you middle-click in the drawing while the dialogue window is open, the following will happen:

Example 1 - Scale factor 2, without direction: A: Scale lines individually, B: Adjust connected lines; (1) Selected sketch planes; (2) Fixed point; (3) Result

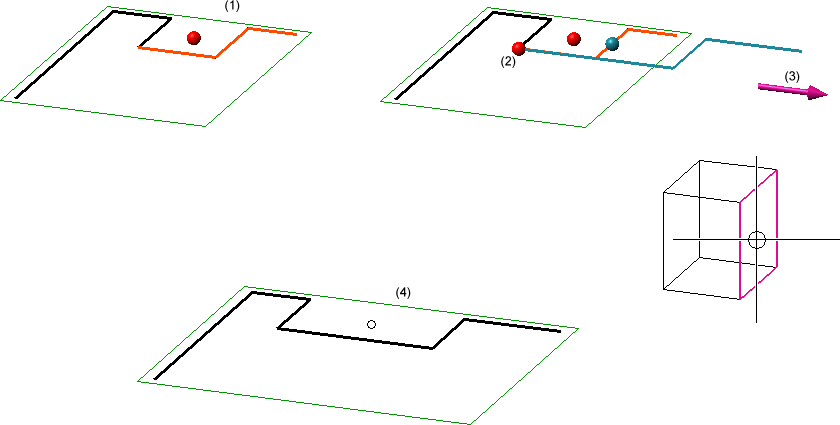
Example 2 - Scale factor 2, Direction via plane selection: (1) Selected sketch plane; (2) Fixed point and direction, (3) Result - Scale lines individually

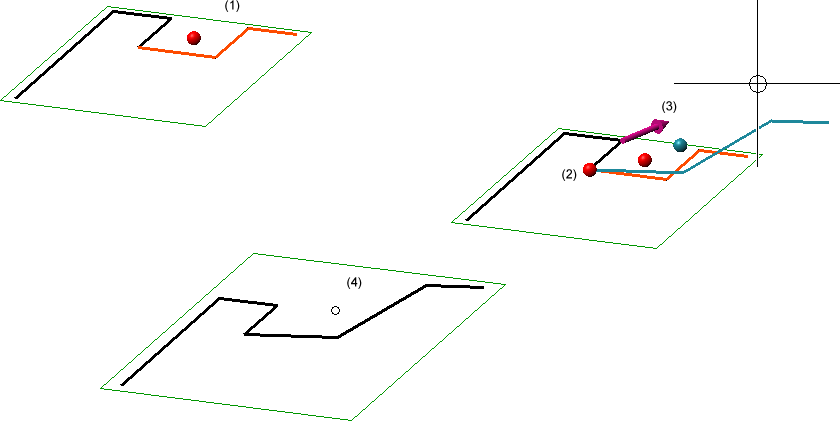
Example 3 - Scale factor 2, Direction via specification of 2 points: (1) Selected sketch elements, (2) Fixed point and direction; (3) Result - Scale lines individually
 Please note:
The selected lines and isolated points must belong to the same sketch. Otherwise, a corresponding error message will be displayed.
If, after clicking Apply, a renewed selection of lines / isolated points leads to a conflict with an already selected direction, it will be deleted and needs to be selected anew.

Sketch Functions (3-D) • Clone Sketch Elements (3-D)
|
© Copyright 1994-2018, ISD Software und Systeme GmbH |