Point Cloud > Clipping Box Manager 
The Clipping Box Manager makes it easier to work with different sections or clipping boxes of the point cloud.
-
In the 3-D Model view, you can switch between different clippings to see the appropriate section for modelling .
-
In the Sheet view, you can assign different clippings (sections) of the point cloud to the different views (front view, top view, ...).
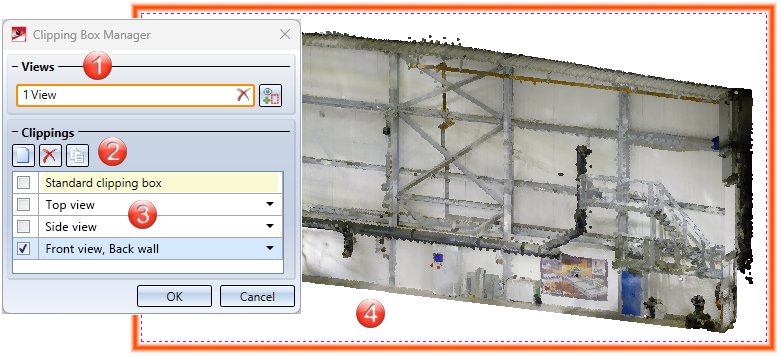
((1) Select and remove views
(2) Icons for creating and deleting different clippings (sections) of the point cloud
(3) List of differently clipped sections of the point cloud
(4) Active clipping Front view, Back wall in the 3-D model view

Views
The field shows the number of selected views. There is a cross on the right-hand side of the field to remove all selected views from the selection at once. To select a view, click on it with the left mouse button or by selecting the  icon in the drawing. If the view is already active, it is deleted from the selection. The activated views are marked with an orange border in the drawing.
Clippings
Use the functions in the Clipping Box Manager under Clippings to create, copy and delete sections of the point cloud. The active clipping has an activated checkbox  . Verlassen Sie dann den Manager mit OK, If you then exit the manager with OK, all edits done with Edit clipping box
  or Subtract
  , refer to the activated clipping in the drawing. If you have selected several views (e.g. in the sheet view), several clippings can also have a tick in the list.
|
|
New |
Use this function to derive a new clipping of the complete point cloud. The new point cloud is automatically active. |
|
|
Delete |
This deletes the active clipping box |
|
|
Copy |
Use this function to copy the active clipping box of the point cloud with subtractions. |

If the Clipping Box Manager is open, the display of the point cloud changes immediately after the clipping is activated.
The Clipping Box Manager for the Views
If you create a sheet with several views, you can also use the Clipping Box Manager to assign the different representations of the point cloud to the views.
-
To do this, activate the sheet in the ICN and create, for example, 4 new standard views
 via right-click.
 -
From the 4 standard views, select the Top view.
The Sheet views of the point cloud are only displayed in shaded mode. The active view is now highlighted in red in the ICN.
-
Open the Clipping Box Manager
. -
Create a new clipping box
 for the active view.
 -
Then exit the Clipping Box Manager with OK.
-
You can now use the Edit clipping box
function in the top view to define a section of the point cloud or create a subtraction Subtraction . -
Open the Clipping Box Manager again.
-
Select a new view
(e.g. the front view) in the drawing. -
Assign a clipped point cloud to this with Copy
 or create a new complete clipping box with New.
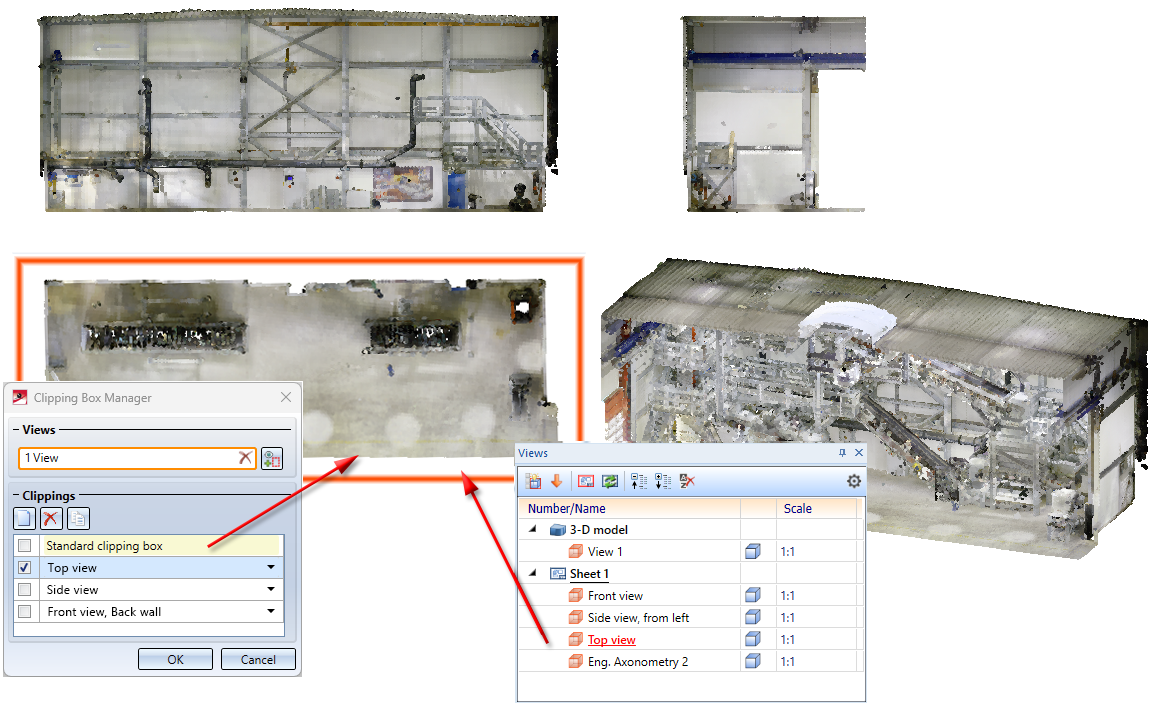
Sheet with 4 different views, in each of which the point cloud has a different clipping box and subtraction.
