Customer-Specific Adjustments of HELiOS Context Menus
The CSV files can also be used in conjunction with the PARCONFIGCOMP.EXE or HELIOSCLIENTCONFIG.EXE tool to expand HELiOS context menus (XML files), e.g. in order to integrate programmed KST functions. The PARCONFIGCOMP.EXE or HELIOSCLIENTCONFIG.EXE tool will then automatically generate the complete line in the XML file from the corresponding entries of the CSV file.
This procedure makes sense as customer-specific adjustments to menus will be overwritten in case of an update. By using appropriate CSV files the customer-specific adjustments can then be added again via the PARCONFIGCOMP.EXE or HELIOSCLIENTCONFIG.EXE tool.
Add menu items
| Column | Content | |
|---|---|---|
|
A |
Position of new menu item in the following form: XMLFILE::"HIERARCHICAL_IDS"::{POSITION} |
|
|
|
XMLFILE |
Name of the XML file with a relative path in the HiCAD/HELiOS installation directory, e.g. \Resources\Menus\Helios.PM.List.Article.xml |
|
|
HIERARCHICAL_IDS |
A path within the XML file leading to the sub-menu to which you want to add the new element. The path consists of the corresponding menu IDs which are separated by the > character. It needs to be in quotation marks " ", e.g. like this: "Helios.PM.List.Article>General" "Helios.PM.List.Article>General>Assignments"
If the path is missing, the item will be added to the main menu! |
|
|
POSITION |
Determines the position of the new menu item in the menu. Allowed entries are:
{post:"Helios.Article.Modify"}
|
|
B |
-20 |
This is the code for the insertion of a new entry in the XML file of a HELiOS context menu. |
|
C |
|
A comment of your choice, e.g. a short description of the KST functionality. |
|
D |
- |
The minus sign is a fixed and mandatory value! |
|
E |
KST-Command ID |
The desired KST command ID of the customer-specific function, e.g. ArchHelPrt1c_OnMenu_TryArchiving. The KST-Command IDs can either be taken from the documentation for the respective KST adjustment or can be received from your contact at the ISD Consulting. |
|
F |
1 |
"1" is a fixed and mandatory value! |
 Please note:
The designation of the command that will be shown in the menu later will be automatically supplied by the KST programming.
Example:
Let us assume that you want to add some KST menu items to the Article context menu Helios.PM.List.Article.xml. Three new commands are to be added In the General section beneath the Edit article master... menu item.
- ArchHelPrt1c_OnMenu_TryArchiving
- ArchHelPrt1b_OnMenu_TryArchiving
- ArchHelPrt1a_OnMenu_TryArchiving
and three further commands at the end of the context menu
- ArchHelPrt2c_OnMenu_TryArchiving
- ArchHelPrt2b_OnMenu_TryArchiving
- ArchHelPrt2a_OnMenu_TryArchiving
Please note:
In the complete XML file the order is reversed.
Context menu for articles
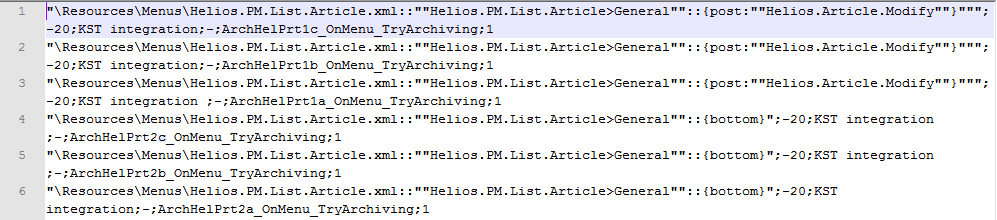
In our example we will create a new CSV file, e.g. HELiOS_KONTEXT with the following content:
In Excel:

In Notepad:
![]() Please note:
Please note:
In this example automatic line breaks have been activated.
|
Column |
Content |
|---|---|
|
A |
The content consists of 3 parts, which are separated from each other by ::
|
|
B |
Code for XML: -20 |
|
C |
Short description of the functionality of the KST, e.g. KST Integration. |
|
D |
- The minus sign is a fixed and mandatory value! |
|
E |
The desired KST command ID,e.g. ArchHelPrt1c_OnMenu_TryArchiving |
|
F |
1 "1" is a fixed and mandatory value! |
 {post:"Helios.Article.Modify"}"
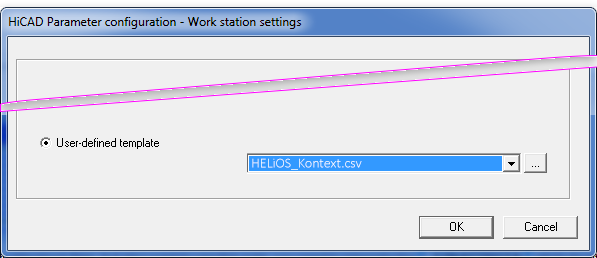
To use the file, open the PARKONFIGCOMP or HELIOSCLIENTCONFIG.EXE tool. Select the file and confirm with OK.
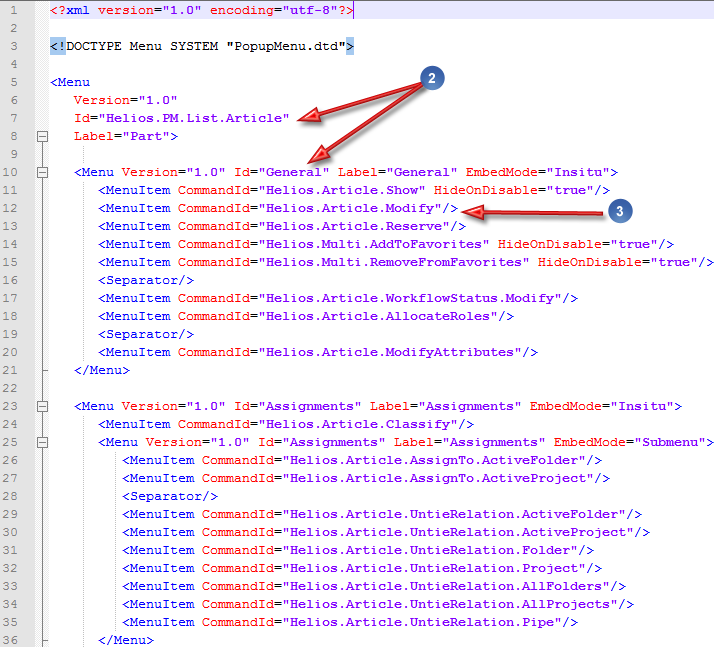
After successful configuration, the XML file will be expanded by the menu items that were added via the CSV file:
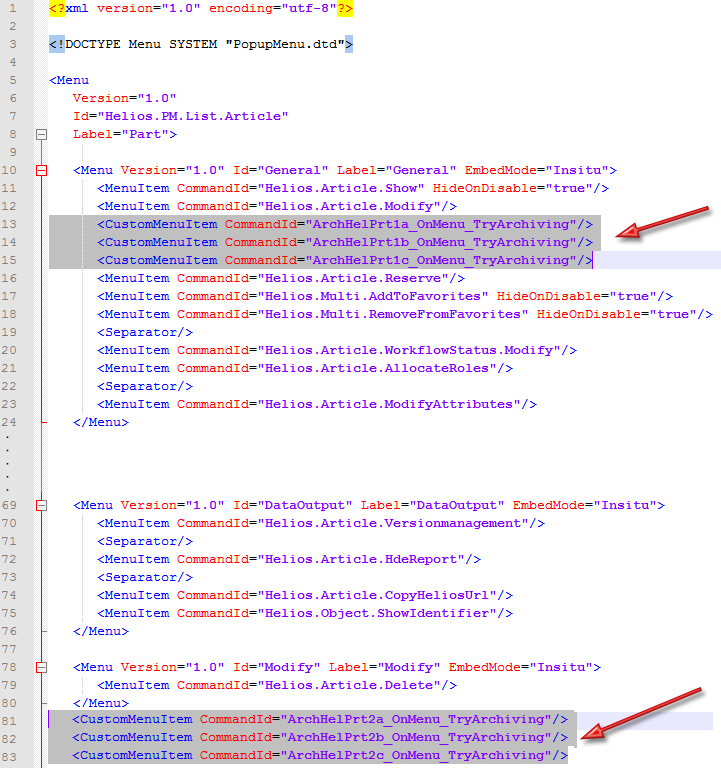
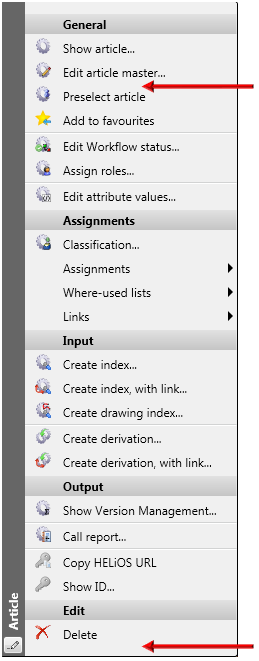
The corresponding HELiOS menu can then look as follows:


Delete menu items
Cases are conceivable where you want to delete added menu items again, e.g. if
- you want to replace a HELiOS standard function with a KST function, or
- the customer wants to deactivate particular standard functions , or
- if a customer-specific KST entry is to be removed again.
In this case the entries in the CSV file must be composed as follows:
| Column | Content | |
|---|---|---|
|
A
|
Position of new menu item in the following form: XMLFILE::"HIERARCHICAL_IDS"::"ID" |
|
|
XMLFILE |
Name of the XML file with a relative path |
|
|
HIERARCHICAL_IDS |
A path within the XML file leading to the sub-menu from which you want to delete the new element. The path consists of the corresponding menu IDs which are separated by the > character. It needs to be in quotation marks " ". |
|
|
ID |
ID of the entry to be deleted. If the ID is not specified, the complete menu section will be deleted. |
|
|
Example: \Resources\Menus\Helios.PM.List.Article.xml ::"Helios.PM.List.Article>General" ::"ArchHelPrt1c_OnMenu_TryArchiving" deletes the KST entry from the Example in the "Add menu items" paragraph again. |
||
|
B |
-21 |
This is the code for the deletion of a menu item. |
|
C |
|
A comment of your choice, e.g. the reason why the line is to be deleted. |
|
D |
- |
The minus sign is a fixed and mandatory value! |
|
E |
|
This column will not be evaluated an remains empty. |
|
F |
1 |
"1" is a fixed and mandatory value! |
