
Define Steel Engineering Grid
Steel Engineering > Further functions > Settings  > 3-D Grid
Using a steel engineering grid is particularly recommended if several beams located in the same plane need to be fitted. Examples include stages, bridge frames, substructures for car parks, roof constructions etc. When specifying the start and end points of the beams, you can then access the grid points directly, which speeds up fitting.
The Grid dialogue window is displayed to enable you to configure steel engineering grids.
|
Options and Buttons |
|
|---|---|
|
Number |
Number of grid lines in x-/y-direction |
|
Distance |
For even axis distances, enter the distance between the axes in the Distance field. If you want unevendistances between the axes you can enter the values directly into the table on the right-hand side of the window. |
|
Axis annotation |
You can specify the start value for consecutive axis annotation here. If you do not want the annotation to be consecutive, you can also enter the axis annotation directly into the table on the right-hand side of the window. |
|
Planes |
Steel engineering grids can consist of several planes. Specify the number of planes and the distance between each of the planes. |
|
Projection |
This value specifies how far the grid lines project beyond the border of the grid. |
|
Text parameters |
Click this button to define the text parameters for the axis annotation. |
|
Save |
Saving the current grid settings. The data is saved in the HiCAD subdirectory Makro 3-D/Raster under the specified name with the extension .RST. The RST files can be reused at any time – even for other steel engineering constructions. |
|
Load |
Loading a saved 3-D grid (.RST). |
After specifying the required grid settings, choose OK to exit the window. HiCAD displays a preview of the grid.
- Select a fitting point on the grid. Right-click to apply the origin of the grid (bottom left intersection point) as the fitting point.
- Specify the position of this fitting point in your drawing. If you want to place the grid in the origin of the active coordinate system, right-click and choose Origin.
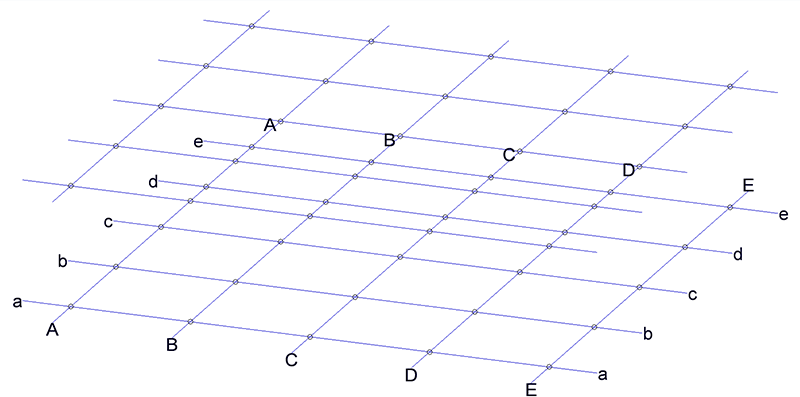
Steel Engineering grid with 2 planes
![]() Please note:
Please note:
- The isolated points for the intersection points of the grid lines are only shown and are only identifiable if the display of isolated points has been activated. You can access this function via ... Visualisation > Show/Hide, Via element type. Here, the isolated points symbol needs to be activated
 .
. - Grids can be hidden and redisplayed in any view. Activate the view in which you want to hide or show the grid. Right-click the Steel Engineering grid assembly in the ICN and select Hide or Show in the context menu. The selected representation applies to the active view only, the grid representation in other views will remain unchanged.
- You can apply 3-D dimensioning functions to the axes and points of the grid. If you create a dimensioning and place the base point on a grid line (system axis), the corresponding dimensions will be adjusted when you change the grid.
- Irrespective of the settings specified with this function, you can use the Grid annotation
 function to assign user-defined annotations to individual axes of the grid. Please note that changes of the grid , e.g. the parameters, may also influence system axis annotations.
 - You can define so-called Grid sub-systems to refine the structure of 3-D grids or a Steel Engineering grids. Different sub-systems can be created on the various planes of the grid, and can also run diagonally to them. A grid sub-system consists of a start point and an end point and is represented as an edge. Along this refined grid, constructions can be erected, and the corresponding beams can be placed.

Grid Annotations • Settings/Management (3-D SE) • Steel Engineering Functions