Clamping Plate
'Civil Engineering functions' docking window > Steel Engineering >General > Clamping plate
Clamping plates are used if parts are not to be bolted or welded together. werden eingesetzt, wenn Bauteile nicht verschraubt oder verschweißt werden sollen. The following connections are possible:
- One plate between two beams
The clamping plates are bolted to the plate. - One beam and one plate
The clamping plates are bolted to the plate. - Two beams
The clamping plates are bolted to the second beam.
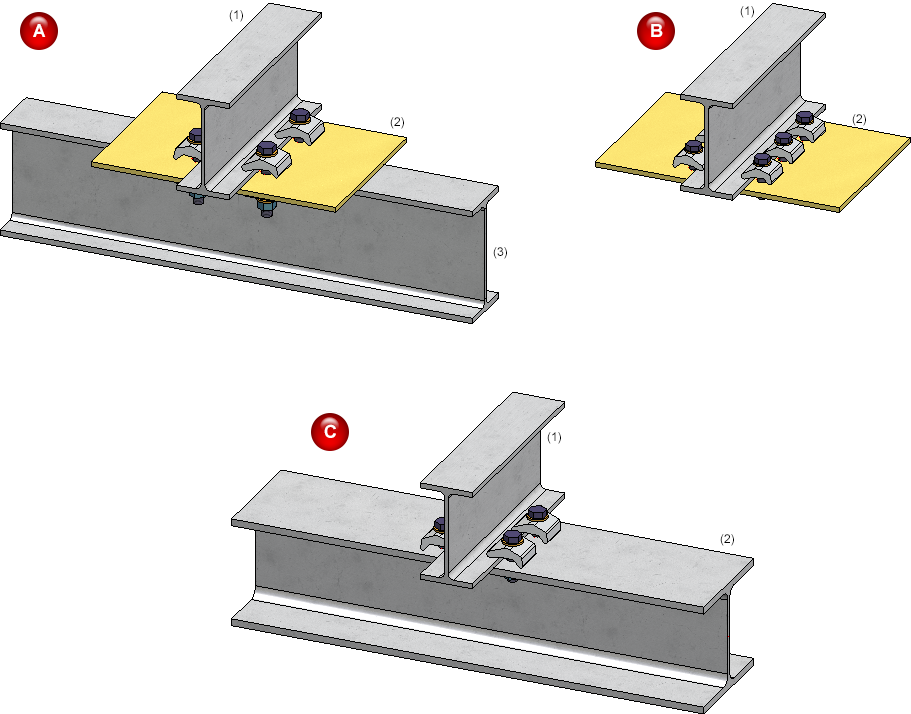
(A) Plate between 2 beams, the plate is drilled; (B) Beam and plate, the plate is drilled; (C) 2 beams, the 2nd beam is drilled
After calling the function, the Clamping platedialogue window is displayed.
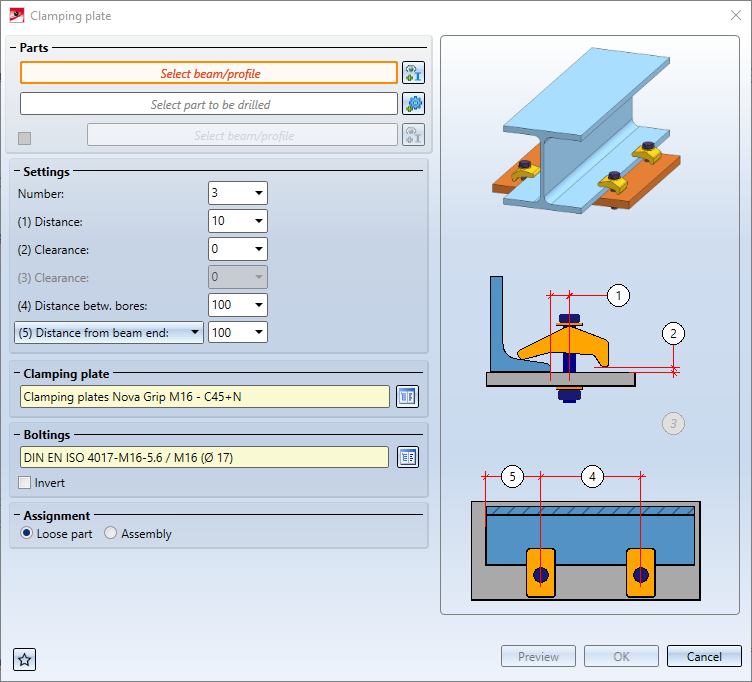
Select the beam to be fixed with clamping plates and then the beam or plate to which the clamping plates are to be bolted. In the case of a plate, you can attach another profile to the plate with clamping plates. To do this, activate the checkbox and then select the beam.
Settings
| Number |
Number of clamping plates on the left and right hand side |
| (1) Distance |
Distance of bores (centre) from the beam |
| (2) Clearance |
Distance between clamping plate and beam/plate |
| (3) Clearance |
Distance between clamping plate and second beam (for 1 plate and 2 beams) |
| (4) Distance betw. bores |
Distance between the bores (centre) fpr 2 clamping plates |
| (5) Distance from beam end / Distance from point |
Distance of the first clamping plate to the end of the first beam or to an arbitrary point |
Clamping plate
Select the desired clamping plate from the catalogue by clicking on the  symbol. The following plates are available:
- Clamping plates according to DIN 3568
Catalogue: Fasteners > Washers > Clamping plates - Spring clips MTH Nova -Grip
Catalogue: Factory standards > Purchased/Factory standard parts > Spring clips - Spring clips Lindapter Type A, B and D2
Catalogue: Factory standards > Purchased/Factory standard parts > Spring clips

From left to right: DIN 3568, MTH Nova-Grip, Lindapter Type A/B, Lindapter Typ D2
Boltings
Here you define the bolting, e.g. type of bolt, hole diameter, etc. To do this, click on the symbol and then compile the components of the bolted connection. The determination is analogous to the Steel Engineering Bolting function. If the bolting direction is to be reversed, activate the checkbox Invert.
Assignment
- Loose parts
Clamping plates and bolting are combined in a structural assembly with the name Loose parts. The clamping plate and the associated bolted connection each form an assembly. The assembly Loose Parts is assigned to the assembly with the part to be drilled, if available.. - Assembly
The clamping plate and the associated bolted connection each form an assembly with the name Clamped connection. The assemblies Clamped connection - if available - are assigned to the assembly with the part to be drilled..
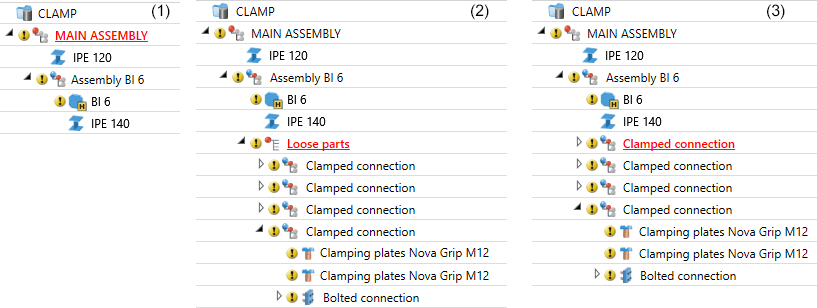
(1) Original structure, (2) Insertion with option Loose parts, (3) Insertion with option Assembly
By clicking on the Preview button, you can preview the connection - based on the data currently entered. If you want to correct the data, make the changes and click Preview again to update it. Click OK to insert the connection with the current data and close the dialogue window.
If you exit the dialogue window with Cancel, the function is cancelled without inserting the new connection or changing the existing connection.
If the connection cannot be inserted due to the selected settings, this is indicated by the  symbol on the OK button. If you point to this symbol with the cursor, a corresponding explanation is displayed, e.g.:

The settings of the dialogue window can be saved as favourites and reused at any time. To do this, click on the  , symbol at the bottom left of the dialogue window to activate the context menu. You can find more about managing favourites in the HiCAD Basics Help in the topic Manage Favourites.
To edit an already inserted clamping plate connection, double-click on the Clamping plate entry in the Feature log.


Connections+Variants (3-D SE) • Dialogue Window for Connections (3-D SE) • The Catalogue System for Connections+Variants (3-D SE)