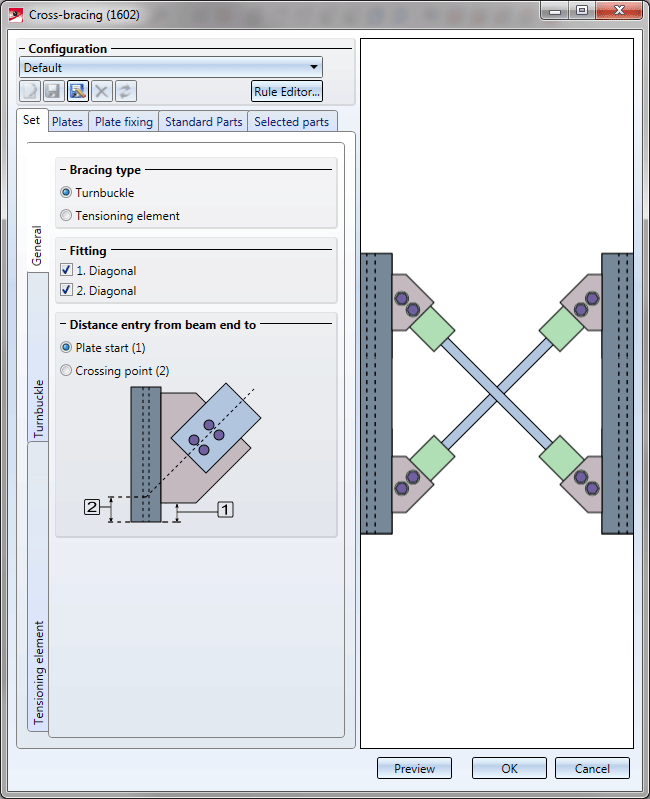
"Civil Engineering functions" docking window > Steel Engineering > Connections > Web/flange to web > Cross-bracing (1602)
Use this function to insert a design variant-based round steel cross-bracing with turnbuckle or tensioning element in order to connect and stabilize two existing beams.
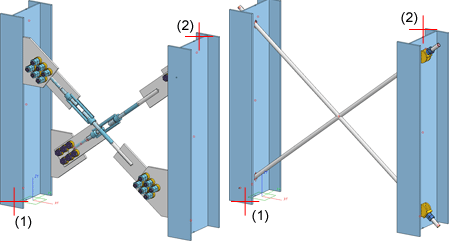
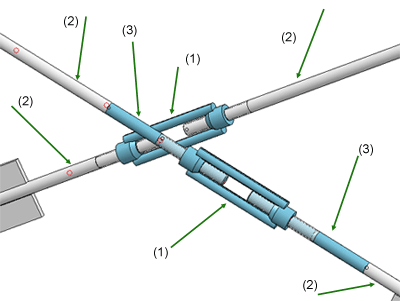
Left: Cross-bracing with turnbuckle, Right: Cross-bracing with tensioning element , (1) and (2) identified beams
When you activate the function, HiCAD will prompt you to identify the two beams between which you want to insert the cross-bracing. Please note the following:
After identifying the two beams the Cross-bracing (1602) dialogue window will be displayed.

Configurations for cross-bracings can be saved, which enables you to access your individual configurations at any time afterwards.
The configuration of the cross-bracing takes place via the different tabs of the dialogue window:
Click the Preview button if you want to display a preview of the connection based on the currently entered data. If you want to modify the current data, apply the required changes and click Preview again to update the preview. Click OK to insert the connection according to the current data and close the dialogue window. If you click the Cancel button, the window will be closed, and the specified or changed connection will not be inserted.
![]() Please note:
Please note:
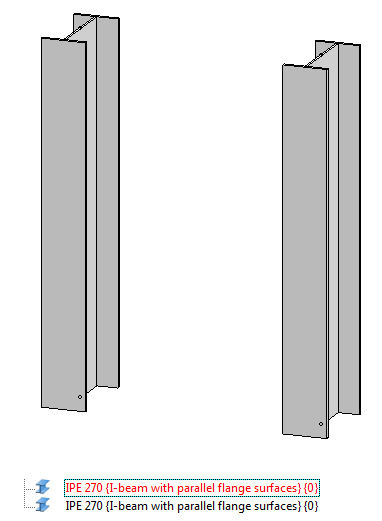
One beam and the plates mounted to it will form one assembly. All other components will be combined into a separate assembly (per diagonal bracing member).
Example:
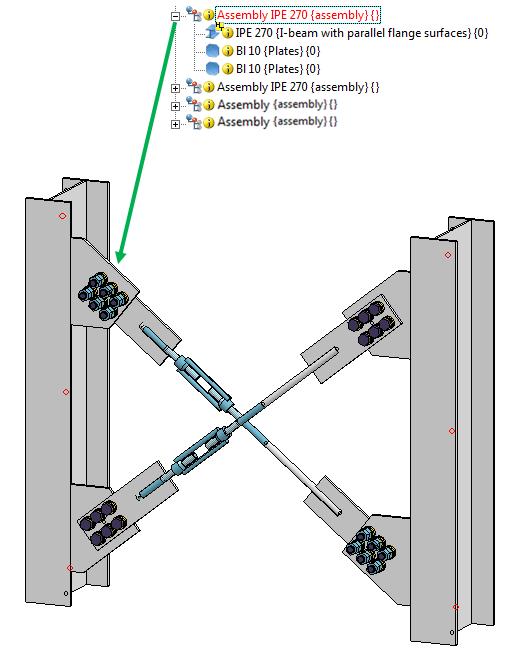
One beam and the plates mounted to it will form one assembly.
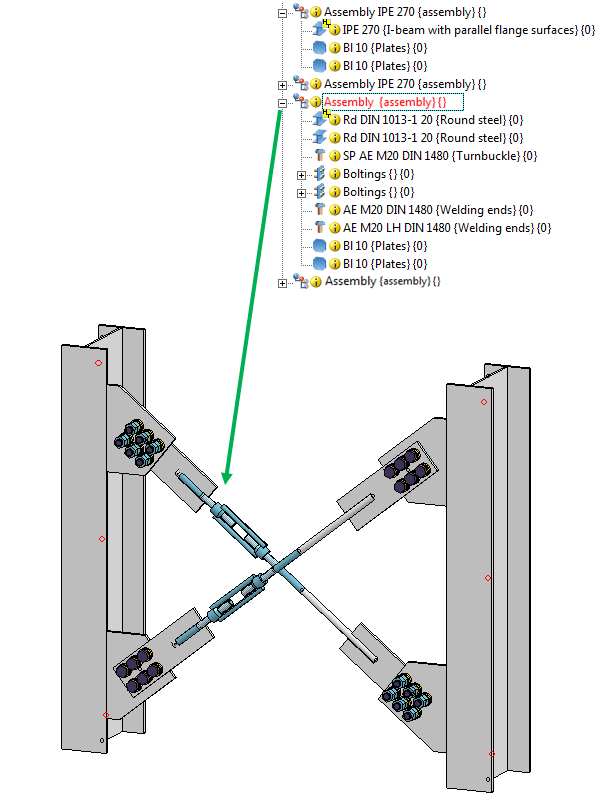
All other components will be combined into a separate assembly (per diagonal bracing member).
This tab displays information the previously identified beams on the sub-tabs 1st beam and 2nd beam, such as the type of the beam, its material, its dimensions etc. Entries or changes are not possible here.
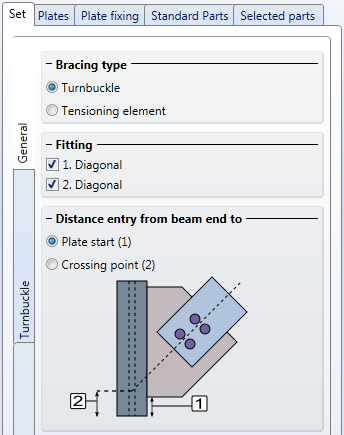
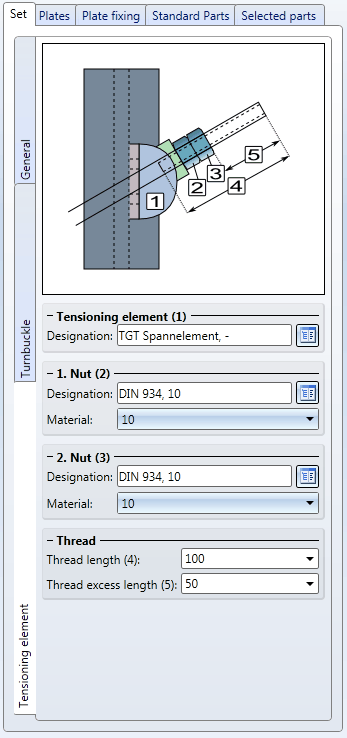
On this tab you define the cross-bracing set: You select whether the cross-bracing should be created with turnbuckle or tensioning element, and specify various other settings.
On the General sub-tab you select the bracing type and specify whether you want to insert 1 or 2 diagonal bracing members.
In the Distance entry from beam end to ... area you specify whether the distance to the beam end that you entered on the Plates tab should be interpreted as the distance between beam end and plate start, or the distance between beam end and the crossing point between the axes.
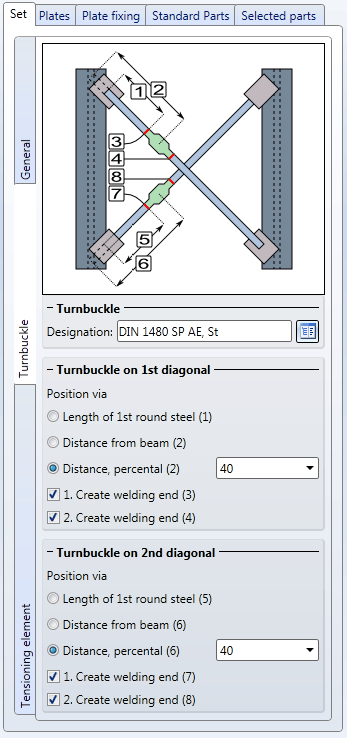
Depending on the bracing type you can then specify the corresponding parameters for Turnbuckle or Tensioning element.
| Turnbuckle on 1st/2nd diagonal | |
|---|---|
|
Designation |
In this field the selected turnbuckle is displayed. Click the |
|
Position via |
You use these options to specify the position of the turnbuckle on the first and the second diagonal. The following options are available:
|
|
Create welding end |
By activating/deactivating of these checkboxes you specify whether the welding ends are to be created or not. The turnbuckle can be created without, with 1 or with 2 welding ends. Depending on the position of the turnbuckle, 1 or 2 round metal bars with or without threads will be created.
(1) Turnbuckle, (2) Round steel, (3) Welding ends |
| Tensioning element | |
|---|---|
|
Designation |
In this field the selected tensioning element is displayed. Click the |
|
Nut |
In this area you select the nuts. Click the
|
|
Thread length, Thread excess length |
Enter the length and excess length of the thread here. |
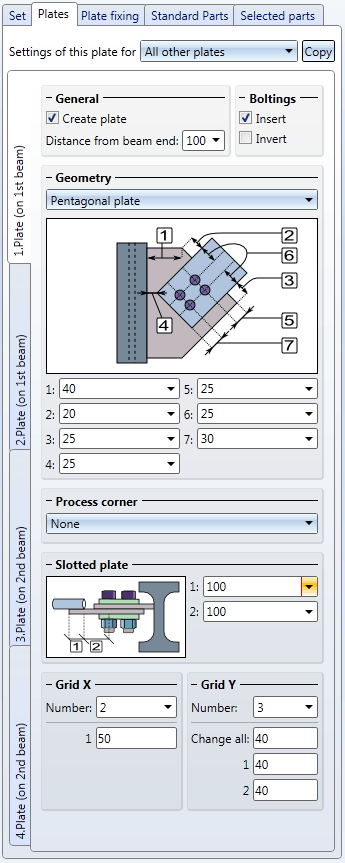
On this tab you specify whether you want to use steel plates for the mounting of the bracing members to the beams and, if so, what types of plates, and in which way you want to mount them to the beams.
For each of the 4 possible plates the following parameters can be specified:
|
General |
In this field you determine, via activation or deactivation of the Create plate checkbox, whether a plate will be created or not. If you want to insert the plate, specify the distance from the beam end. If you select the Plate start option in the Distance entry from beam end to ... area on the General sub-tab of the Set tab, the specified value will refer to the upper edge of the plate and the end of the vertical beam to which the plate will be mounted. If you select the Crossing point option, the specified value will be the distance from the beam end to the crossing point of the axes. |
|
Boltings |
In this field you determine, via activation or deactivation of the Insert checkbox, whether a bolting will be created or not. In addition, you have the option to change the direction of the bolting by activating the Invert checkbox. The arrangement of the boltings can be specified in the Grid area at the bottom of the dialogue. The bore diameter is specified on the Standard Parts tab. |
|
Geometry |
The gusset plates to be mounted to the beam can either be rectangular or pentagonal. After selecting the plate type, enter the desired dimensions. |
| Process corner |
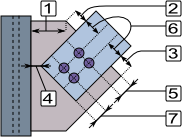
If you want the corner of the gusset plate to be chamfered or filleted, select the desired processing option from the listbox. The following corner processing options are available:
(1) no corner processing, (2) outer fillet, (3) inner fillet, (4) chamfer |
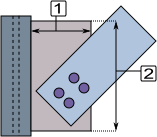
| Slotted plate |
For the slotted plate (which is a strap for the fixing of the round steel bar) the following specifications can be made: (1) Length of the slot / the weld-on length (2) Distance round steel -> centre axis 1st bolt |
| Grid X/Y |
The bore grid determines the arrangement of the boltings that connect the gusset plate and the slotted plate. Enter the number of bores in X- and Y-direction , and their distance to each other. If you want all bores running in one direction to have the same distance to each other, you can simplify the data entry by doing the following: Enter the distance value into Change all field. All fields will automatically be assigned the entered value. |
The settings of the current tab can also be applied to other plates. Select the desired option from the Settings of this plate for... listbox and click the Copy button.
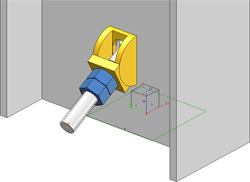
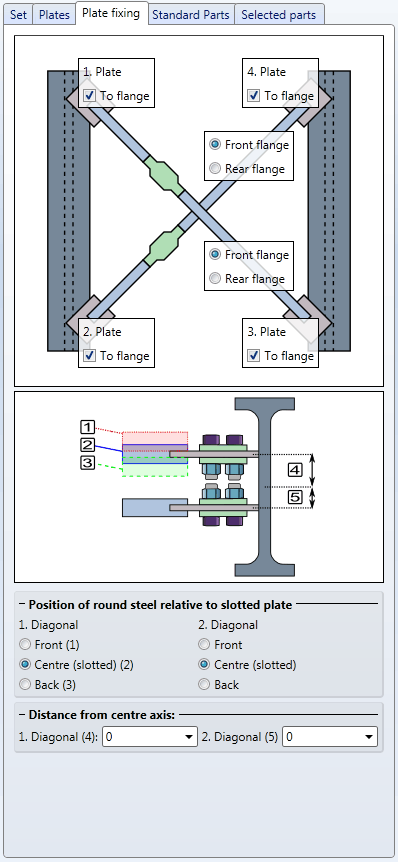
On this tab you specify where exactly on the beams the gusset plates are to be mounted, and determine the position of the round steel relative to the slotted plate.
In the graphic you can specify via the corresponding checkboxes whether the plates will be aligned to the web or to the flange. If you select "To flange", you can also select between front and rear flange.
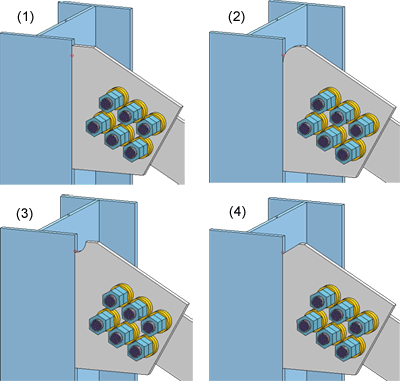
The options provided below Position of round steel... enable you to determine the position of the round steel bar relative to the slotted plate (separately for the 1st and the 2nd diagonal). The following options are available:
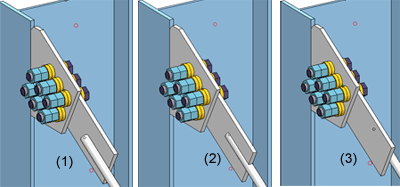
(1) front, (2) slotted, (3) rear
Furthermore, you can specify the distance from the beam axis. This value determines the fitting point of the first plate on the first identified beam.
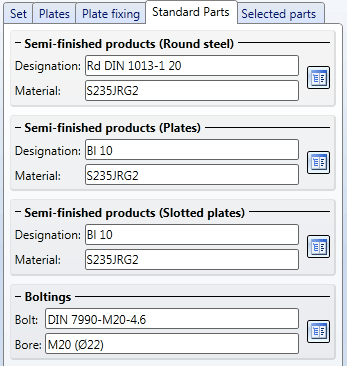
On this tab you select various semi-finished products:
Click the  icon to select these semi-finished products directly from the corresponding Standard Part catalogues. Permissible semi-finished products are:
|
Round steels |
|
|
|
Plates |
|
|
|
Slotted plates |
|
To obtain the desired bolting, click the icon and select the required components in Bolting dialogue window. The dialogue is operated in the same ways as for the 3-D Bolting function.
![]()
Related Topics
Connections + Variants (3-D SE) • Dialogue Window for Connections (3-D SE) • The Catalogue System for Connections + Variants (3-D SE)
|
Version 2102 - HiCAD Steel Engineering | Date: 15/11/2016 | © Copyright 1994-2016, ISD Software und Systeme GmbH |