
Sketch > Draw > Freehand > Spirals
Procedure:
To create individual spirals, proceed as follows.
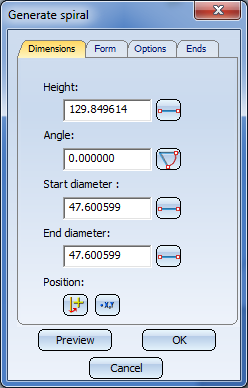
On the various tabs of the dialogue window you can specify the parameters for spiral generation. Click the Preview button to see how the current settings will influence the appearance of the spiral.
The Generate spiral dialogue window
Please note that these values influence each other mutually.
Click the  or
or  button to activate the Distance or Angle menu and apply the corresponding value from the drawing.
Beneath Position you can click the  or
or  button to change the centre axis or the start point of the spiral.
Moreover, you can influencethe representation accuracy of the spiral: In the Specify accuracy field, select Number of points per full cycle or Tolerance. You can only specify a tolerance for compound curves!
![]() The total height of the spiral is 1/2 * number
of revolutions * (Lead at the Start + Lead
at the End).
The total height of the spiral is 1/2 * number
of revolutions * (Lead at the Start + Lead
at the End).
Example 1:
|
Dimensions |
Form |
Type |
Ends |
||||
|---|---|---|---|---|---|---|---|
|
Height |
100 |
Turns: |
4 |
Spline |
|
Start |
|
|
Diameter, Start |
30 |
End angle: |
0 |
Tolerance |
0.01 |
End |
|
|
Diameter, End |
50 |
Lead, Start: |
25 |
|
|
|
|
|
Angle |
autom. |
Lead, End: |
25 |
|
|
|
|
Spiral in side view, top view and axonometric view
Example 2:
|
Dimensions |
Form |
Type |
Ends |
||||
|---|---|---|---|---|---|---|---|
|
Height |
100 |
Turns: |
4 |
Spline |
|
Start |
|
|
Angle |
45 |
End angle: |
0 |
Tolerance |
0.01 |
End |
|
|
Diameter, Start |
30. |
Lead, Start: |
25 |
|
|
Angle |
45 ° |
|
Diameter, End |
auto. |
Lead, End: |
25 |
|
|
|
|
|
|
|
Rotation direction, inv. |
|
|
|
|
|
Spiral in side view, top view and axonometric view
![]()
Related Topics
3-D Sketch (3-D) • Sketch Functions (3-D)
|
Version 2102 - HiCAD 3-D | Date: 15/11/2016 | © Copyright 1994-2016, ISD Software und Systeme GmbH |