In the sheet area the production drawings are displayed. By defining several sheet areas, these can also be output on several sheets.
Create new sheet area
- On the toolbar of the Views window of the ICN, select Create new sheet area
 .
.
HiCAD automatically creates a new sheet area with the next free sheet number. - Right-click the name of the active sheet area Sheetn and choose New view from the context menu to define a first view for the sheet area..
 Alternatively, the Create new sheet area function is also available in the context menu of the ICN view window. You activate the menu by right-clicking in an empty area of the Views window..

Edit sheet area
To edit a sheet area, you must first activate it. You have to distinguish whether the sheet area already contains views or not.
- No view exists yet
Right-click on the corresponding name and select the Activate function. The following context menu is displayed: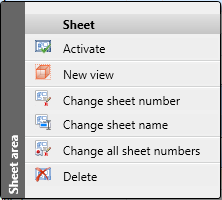
- Views already exist
In this case the sheet area can be activated by clicking on a view in the ICN. The name of the sheet area is underlined and displayed in bold. If you now right-click on the name of this sheet area, the following context menu is displayed: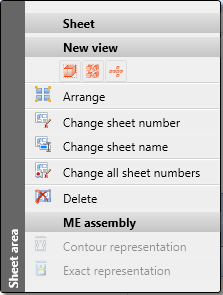
These are the processing and editing functions for views:
|
|
Activate
|
|
|
New view, without link |
|
|
4 standard views |
|
|
6 standard views |
|
|
Arrange
|
|
|
Change sheet name
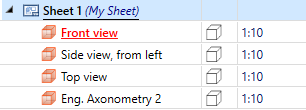
When creating new sheets, the designation Sheet n is assigned by default, where n is a consecutive number. With the function Change sheet name, a sheet name can also be specified, which is then displayed in brackets behind the sheet designation in the Views window of the ICN.
Sheet names can also be used for sheets in the production drawings created with the drawing derivation function. These are retained even when the drawing is updated. |
|
|
Change sheet number |
|
|
Change all sheet numbers
When changing sheet numbers, the Windows standard multiple selection with the CTRL or SHIFT key is also possible. Right-clicking the multiple selection function provides the Change all sheet numbers function from the context menu. Activate the function and enter a free sheet number. The numbers of the selected sheet areas are then assigned consecutively according to the display order of the sheet areas. |
|
|
Delete |


For Metal Engineering assemblies you have the additional option to change the type of representation.
Additional functions for editing and processing sheet areas and views are also available in the toolbar of the Views window of the ICN.
|
|
Only the active view is displayed. |
|
|
All views are displayed. |

|
With a click on this symbol HiCAD jumps to the active view in the view structure. |
|
|
This function creates a new sheet. |

|
All sheet views are updated. |

|
Expands the view structure. |

|
Collapses the view structure. |

|
The sheet views displayed in the ICN can be sorted alphabetically by their name - ascending or descending. To do this, activate the sort mode by simply clicking on the Designation column. In the column heading, the To deactivate the sort mode, click on Show unsorted |

|
Opens the Settings dialogue window. Here you can switch the multi-column display of the view structure on or off. In the single-column display, the display type and scale are placed in brackets after the view name. |


 or
or  symbol is displayed. By clicking on the column heading again, you can sort the column in ascending or descending order. If you create new sheet areas in this mode, they will be automatically sorted accordingly.
The order of the displayed sheet areas is saved together with the model drawing.

Activate View (3-D) • Model Views and Sheet Views (3-D) • Views (3-D)