Itemise Part
3-D Dimensioning + Text > Text > Itemise part 
This function is used for fast annotation without the setting options of the Part annotation function, an item number being assigned to a part at the same time. The item number is displayed in curly brackets behind the part name in the part structure of the ICN, e.g. {5}. If the item number is a negative value, e.g. –5, it will be displayed as {5*}.
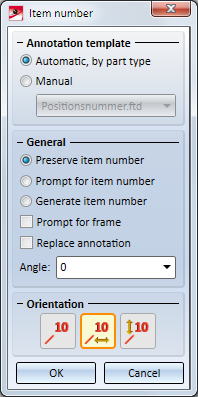
The Item number dialogue window is displayed for you to define the annotation.
It consists of the following input areas and functions:
Please also note the Itemisation functions in the Edit menu.
 You can specify in the Configuration Editor (ISDConfigEditor.exe) at System settings > Annotation tags > Querying of coincident points how to proceed for the identification of base points that coincide with other points.
- No query
HiCAD identifies the uppermost of the coincident points. - Query
Here you will be asked to specify the point you want to identify. To do this, enter the corresponding point number. HiCAD numbers the points from front to back, i.e. the point in the front has the highest number. This is the default setting. - Use general setting
Here the general setting specified at System settings > Identification > Querying of coincident points will be used. If the checkbox has been activated here, HiCAD will display a query, otherwise not.

Annotation template
Here you define the attributes of which you want the annotation to consist. Examples include
- the item number,
- the designation,
- designation and item number,
- the article number (DB) and
- the article number (DB) and the item number.
Various FTD files are supplied with HiCAD. If desired, you can also define your own FTD files using the Annotation Settings function. Choose the desired template.
- Automatic, by part type
A template will be selected automatically for the respective part type. The following templates are assigned to the part types: - Steel Engineering plates: PosNummerStb_Blech.fdt
- Steel Engineering beams: PosNummerStb_Profil.fdt
- Sheet Metal: PosNummer_Kantblech.fdt
- General parts: PosNummer_Allg_Bauteil.fdt
For all other parts the PositionsNummer.fdt template will be used.
- Manual
Here you can select a particular annotation template, e.g. PosNummerSTB.ftd for Steel Engineering.
General
These settings will be evaluated for the functions described in the Alignment paragraph, and determine the behaviour of these functions.
|
Preserve item number |
The current item number of the part will be used. If no item number has been assigned to the part, the corresponding entry in the annotation remains empty. |
|
Prompt for item number |
With this function you manually assign each part to an item number, i.e. HiCAD will ask you to specify the item number. The function proceeds analogically to the function Itemise part |
|
Generate item number |
The item number will be automatically generated by HiCAD. Enter an increment for the number and a start value. When you activate the function, the |
|
Prompt for frame |
If this option is active, HiCAD will ask you to choose a frame for the item number. |
|
Replace annotation |
If this option is active, existing annotations for already annotated parts will be replaced. Otherwise, an additional annotation will be inserted. |
 (via Drawing > Itemisation/Detailing > Itemisation)
 symbol will be displayed. Click on the symbol to view the warning message.
 If you want to insert the annotation at a certain angle, enter the desired Angle or choose a value from the listbox. The angle will only be applied for the  Free annotation function.
Alignment
|
|
Free annotation
The dialogue sequence is as follows:
This selection applies to all subsequently itemised parts – within the current function call.
|
|
|
Align annotation horizontally
Identify the reference tag. The remaining function dialogue depends on the settings as with the Free Item Number function. The new tag is aligned horizontally to the reference tag. The end point of the pointer line does not lie in the entered point, but is determined by the perpendicular of this point to the horizontal defined by the item number of the reference tag. |
|
|
Align annotation vertically
|


Edit annotations
Clicking  beneath Item... opens a pull-down menu with the following functions:

|
Increment range of numbers
|
Increases item number ranges by a particular value. Specify the first and the last item number to be changed. Define the increment. For example, entering 1 4 3 causes item numbers 1 to 4 to be increased by 3, i.e. to become item numbers 4 to 7. |
|
|
Align horizontally / Align vertically |
Subsequently aligns tags horizontally or vertically to a reference tag. |


Further editing functions can be found in the context menu of an annotation. Right-click the annotation to open the context menu:

|
New
|
Use the functions of this menu to insert further annotations:
|
||||||||
|
|
Edit Use this function to modify the annotation settings. |
||||||||

|
Move Moves the selected annotation. Specify the new position of the inflexion points and the end point. |
||||||||

|
Delete Deletes the selected annotation. |
||||||||

|
Clone Copies the selected annotation to other parts. Just identify the part to which you want to assign a copy of the selected annotation. |


