
Project: Report Manager
In this example a BOM template is to be adjusted. The following considerations play an important role for this adjustment:
It is recommended to save your own templates under a different name, to ensure that they will not be overwritten accidentally (e.g. when performing an update).
You will find the supplied templates in the HiCAD SYS folder of your installation. In this example, the template HiCAD_Stahlbau.2100.0.xlsx is to serve as the basis. Create a copy of this file and give it a suitable name, e.g. your_company.xlsx.
Open the new template in Excel.
In Excel, switch to the Settings sheet. In the table, starting at and including the line 10, you will find definitions for the sheets to be used.
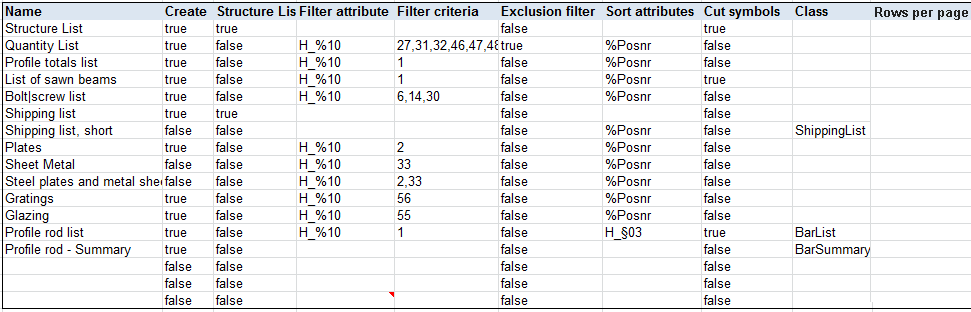
In our example only two lists are of interest for our company:
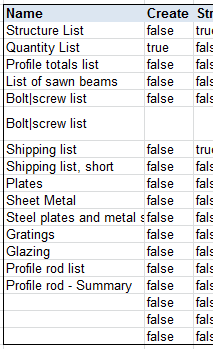
The other sheets are not needed and should therefore not be created. Therefore, we will set the value in the Create column for all sheets except for the Quantity list to false to suppress their creation. You can also completely delete these rows, but the advantage of their deactivation is that is can be revoked later very easily.
For the list of all plates, glass panes and gratings we will use the Grating sheet as a template. There, we will set Create to true again, to ensure that this sheet will actually be created. The filter attribute there is H_%10, the filter criterion is 56, Exclusion filter is false. This means that only parts the part type (Attribute H_%10) of which has the value STAHLBAU_GITTERROST (56) will be included in this sheet (Exclusion filter false).
We want to supplement this list in such a way that glass parts and plates will also be listed.
In the list of part types we can find the part types STAHLBAU_GLAS and STAHLBAUBLECH with the numbers 55 and 2. Therefore, we change the filter criteria to 56,55,2, so that only parts of the part types Glazing, Plates and Gratings will be used for this sheet.
In addition, we will change the name of the sheet to Plates. For this to happen, the corresponding entry in the Name column of the table needs to be changed. Also, the sheet itself needs to be renamed.
In the Sort attributes column, %Posnr is entered here, which would sort the list by item numbers. But, as we prefer a sorting by weight, we enter H_§01 instead.

An entry for the Quantity list already exists. The Structure list entry is set to false, causing the creation of a "flat" list which is not sorted by assemblies. The Filter attribute is the part type (H_%10) again, Filter criteria are 27,31,32,46,47,48,49,50,51, which stands for ASSEMBLY, WELDING GROUP, MOUNTING GROUP, GLAZING GROUP, MULLION ASSEMBLY, TRANSOM ASSEMBLY, GLASS ASSEMBLY, INSERT ASSEMBLY and PLANNING GRID according to the list of part types. Since the Exclusion filter has been set to true, this filter works in reverse fashion: Here, only parts having NONE of this part type will be considered. As a result, structural parts of the drawing will be ignored for this list. The value in the Sort attributes column is %Posnr (item number) again.
The Quantity list is OK as it is and needs no adjustment.
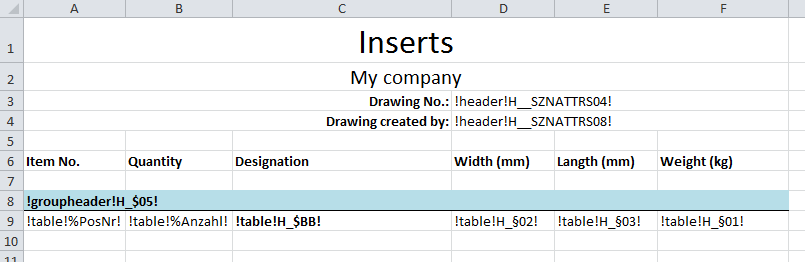
Now we want to adjust the BOMs to our own design. We will edit the table sheet Plates for this purpose and delete the complete previous content.
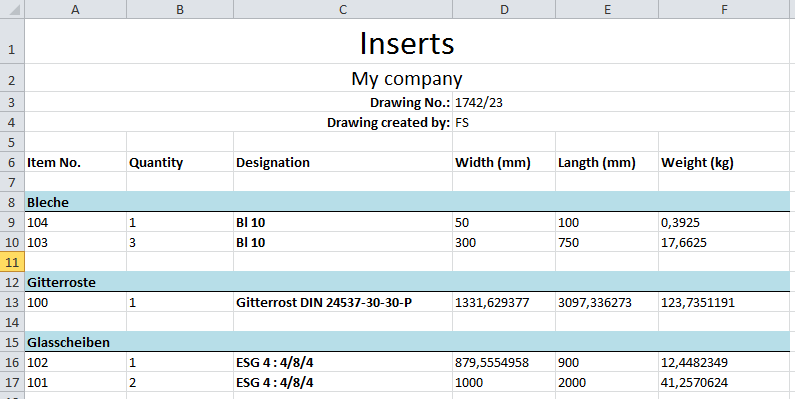
In the header area we will enter the title and the name of our company. These inputs are static values, i.e. they can simply be entered manually there. The drawing number and the name of the drawing creator are to be dynamic values. Since these values are to appear in the header area, we will use the format !header!XYZ - i.e. !header!H__SZNATTRS04! for the drawing number and !header!H__SZNATTRS08! for the drawing creator:

The table header will be a static value again:

The parts in this list are to be sorted by part type (i.e. one block for gratings, one for glazings, one for plates). Therefore, we will insert a groupheader here which is to perform a grouping according to the attribute H_$05: !groupheader!$05!:

Then, we deal with the table itself: The individual fields of the table begin with !table! and refer to the corresponding attributes:

The entire table now looks as follows:
Proceed likewise for the Quantity list.
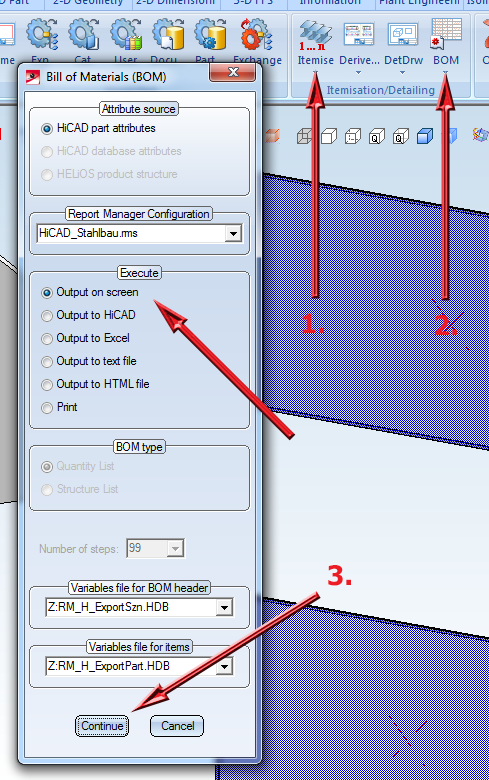
Start HiCAD and open or create a new drawing with a couple of suitable parts. Itemize the parts as usual (1.) and display the BOM in the Report Manager (2., 3.).
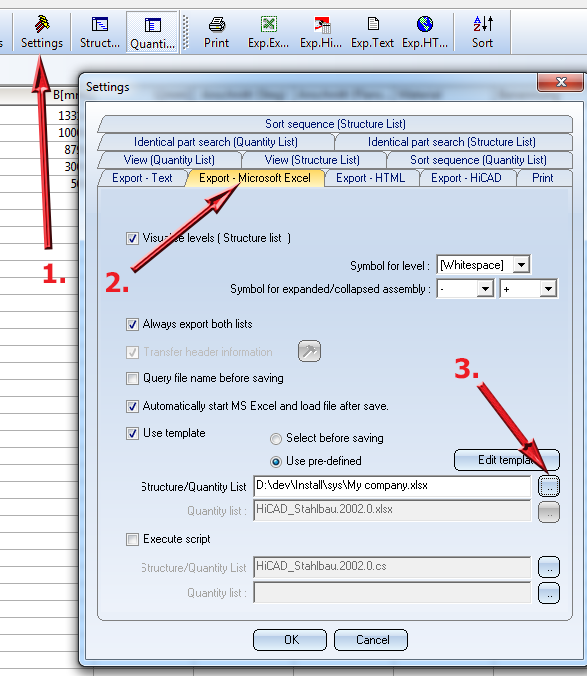
To let the Report Manager use the new BOM template, choose Change settings (1.) in the Report Manager and open the Export - Microsoft Excel (2.) tab. In the Structure/Quantity list (3.) field, choose the new xlsx file (here: My company.xlsx).
Confirm with OK and let the Report Manager export the data to Excel.
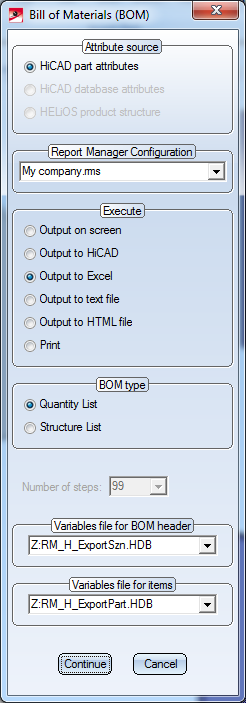
To save these settings, select File > Settings > Save as in the Report Manager and save the settings to the HiCAD sys directory, e.g. as "My company.rms". When you now select Itemisation/Detailing > BOM in HiCAD you can choose the newly generated .rms file beneath Report Manager Configuration in the Bill of Materials (BOM) window, or, if the file is not offered there, just enter the file name manually.
Now you can output BOMs from HiCAd directly into your new, adjusted template.
|
© Copyright 1994-2020, ISD Software und Systeme GmbH |
Data protection • Terms and Conditions • Cookies • Contact • Legal notes and Disclaimer