Print All View Areas
Drawing > Save/Print > List  > Print all view areas
Use this function to print all or several model and sheet views of a drawing in one step. In addition, you can export the views as Postscript files and auto-convert them (with the help of an appropriate interpreter, e.g. Ghostscript) into PDF files or other formats, or combine them in one document.
When you call the function, the Print drawing dialogue window will be displayed. It consists of the following tabs:
On the Model/Sheet area tab you specify the settings for the printed output and determine which views are to be considered. Instead of printing the drawing on a specified printer you can also export views to XPS or Postscript format and then convert them into PDF files or other formats such as TIFF. The desired settings for the conversion can be specified on the PS/XPS Settings tab. Please note however that certain conditions must be fulfilled for this.
AutoRepeat function after output
If this checkbox is active, the dialogue window will remain open with its current settings after execution of the function. Otherwise it will be closed after executing the function.
OK
Starts the function.
Cancel
Cancels the function ad closes the dialogue window.
 Please note that this function is not included in HiCAD's standard range of features, but is only optionally available!

Model/Sheet area
On the Model/Sheet area tab you specify the following settings:
- the views that you want to print,
- the settings for the printed output.
Define colours/Line widths
Click the  icon to open the Printer colours/Line widths dialogue window, where you can assign to the current system colours and drawing colours a printer colour and a particular line width.
Default Settings
Here you specify the default settings for the printed output. First specify, by selection from the  list boxes, the Printing device, the Paper format, the Paper tray, Orientation and the number of Copies.
Then determine, by activating/deactivating the corresponding checkboxes,
- whether you want to print the drawing in colour,
- whether you want the line width to be scaled as well in scaled outputs. If so, the lines will be printed thinner in downsized outputs, and thicker in enlarged outputs, respectively,
- whether you want the output be centred on the sheet.
Specify the Page margins by entering the desired value.
Print only sheet areas
If this checkbox is active, all model views will be deactivated in the Output Settings, i.e. only the sheet views will remain active.
AutoApply Default Settings
If this checkbox is active, all changes to the Default Settings will automatically be applied to the Output Settings for the views. If this checkbox is deactivated, you can use the  switch to manually apply the Default Settings to the Output Settings for the views.
Output Settings
In this area all model views and sheet views of the current drawing are listed. For each of these views you can separately specify the settings for printed outputs and, if desired, exclude views from the printed output.
To exclude views from the printed output, deactivate the checkbox preceding the view designation. Use the  buttons to select or deselect all views.
The settings for printed outputs of the views are specified in the same way as in the Default Settings area. Click the  icon to apply the default settings for the corresponding column.
If the ISD FilePrinter, i.e. the ISD Postscript printer driver has been installed, the output settings for views are preset as follows:
|
Printing device |
ISD FilePrinter PS |
Paper format |
Auto |
|
Scale |
Auto |
Paper tray |
Automatically Select |
|
Orientation |
Auto |
Copies |
1 |
|
Colour output |
yes |
Scale line widths |
no |
|
Centre |
no |
Page margins |
0 |
PS/XPS Settings
Instead of printing the views on a selected printer you can export the views as XPS or Postscript files and auto-convert them into PDF files or other formats, e.g. TIFF.
The following conditions must be fulfilled for this:
- Ther HiCAD Postscript printer driver (ISD File Printer) must be installed. You can find this driver on the HiCAD Installation DVD. Insert the DVD and select the PostScript Printer option under Client Installations.
- A suitable interpreter for XPS, Postscript and PDF is required, e.g. Ghostscript. Please note that this interpreter will not be supplied with HiCAD!
- For XPS files an appropriate printer driver is required, e.g. Microsoft XPS Document Writer. Please note that this driver will not be supplied with HiCAD!
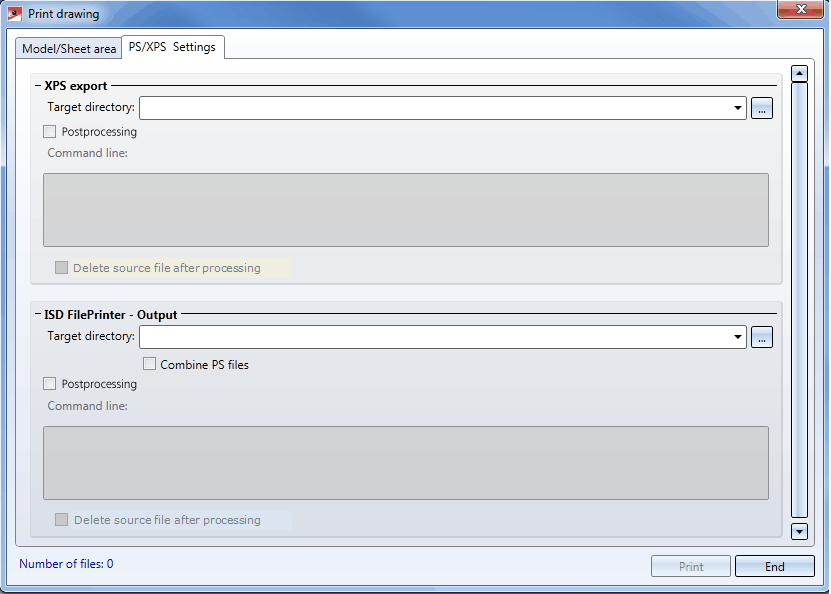
ISD FilePrinter Output
|
Target directory |
Here you select the directory where the Postscript files are to be stored. These files have the name MPLOTn.PLO.PS, with n being a consecutive number.
|
|
Combine PS files |
If this checkbox is active, the Postscript files will be combined within a file called MPLOT.PLO.PS.ALL.PS. If the Postprocessing checkbox is active, only one file will be created. In this way multi-paged PDF and TIF files can be created. |
|
Postprocessing |
If a suitable interpreter, e.g. Ghostscript, is used, you can auto-convert the PostScript files into another format, e.g. PDF or TIF. Activate the Postprocessing checkbox and enter in the corresponding conversion command in the Command line field. |
|
Command line |
If the Postprocessing checkbox is active, enter the corresponding conversion command in this field. Further information can be found in the Help of the corresponding interpreter. Example for Ghostscript:
Right-click to open a context menu that supports you with the entering of the command line. |
|
Delete source file after processing |
If you activate this checkbox, the PS files will be deleted after conversion. |
 Please note:
XPS Export
|
Target directory |
Here you select the directory where the XPS files are to be stored. These files have the name MPLOTn.PLO.XPS, with n being a consecutive number. Caution: If you call the Print all view areas function again, files that already existed in the target directory will be overwritten! |
|
Postprocessing |
If a suitable interpreter is used, you can auto-convert the XPS files into another format, e.g. PDF. Activate the Postprocessing checkbox and enter in the corresponding conversion command in the Command line field. |
|
Command line |
If the Postprocessing checkbox is active, enter the corresponding conversion command in this field. Further information can be found in the Help of the corresponding interpreter. Right-click to open a context menu that supports you with the entering of the command line. |
| Delete source file after processing |
If you activate this checkbox, the XPS files will be deleted after conversion. |
