Crosshairs
3-D Standard > Tools > Crosshairs, Bore/C-edge 
Use the Crosshairs, Bore/C-edge function to create crosshairs by
- specifying one or several boundary edges (depending on bore / C-edge type) and
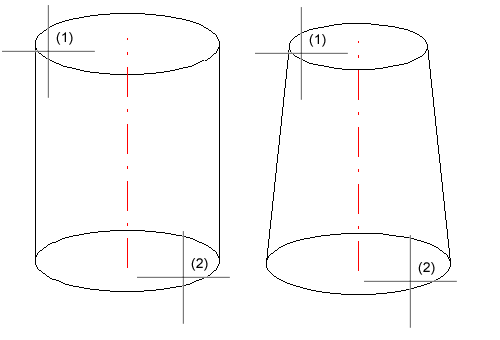
- specifying the start point of the crosshairs (for the size). Press the middle mouse button to apply the point suggested by HiCAD, e.g. the 1st quad point of the circle.
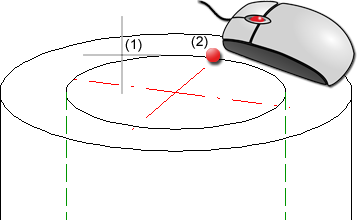
(1) Selected boundary edge, (2) Quad point selected via MMB
Clicking  opens a menu with further functions for the creation, deletion hiding and showing of crosshairs and surface axes for various 3-D elements.
- Crosshairs, Slot
- Crosshairs, Rectangle
- Crosshairs, Hole pattern
- Crosshairs, Sphere/Torus
- Axis, Cylinder surface
- Axis, Via 2 points
- Delete axis
- Hide axis / Show axis
![]() Please note:
Please note:
- The Axis, Cylinder surface function creates the surface axis for a cylinder surface or for the polyhedral facet of a polyhedronized circular hole. It applies similarly to cones, toruses and spheres. The symmetry axes are created for the torus and cone and, for the torus, additionally also the centre circle (large radius).
- For crosshairs and axes, a feature log entry called Crosshairs or Axis will be created. This entry will be assigned to the part to which the surface selected with the corresponding function belongs.
- Each operation has its own UNDO step.
- If an assembly or main assembly is active when you call one of the functions, an insertion of axes will not be possible. In such cases the following message will be displayed:


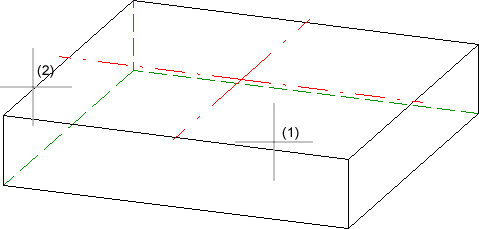
Crosshairs, Slot
Creates the crosshairs by selecting 2 edges of the slot.

(1) 1st boundary edge, (2) 2nd boundary edge
Crosshairs, Rectangle
Creates the crosshairs by selecting 2 edges of the rectangle.
(1) 1st boundary edge, (2) 2nd boundary edge
Crosshairs, Hole pattern
Creates the crosshairs by
- Specifying the centre point of the hole pattern.
- Selecting 2 neighbouring bore circles.
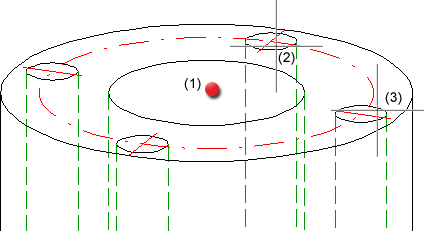
(1) Centre point, (2) Bore circle, (3) Neighbouring bore circle
Crosshairs, Sphere/Torus
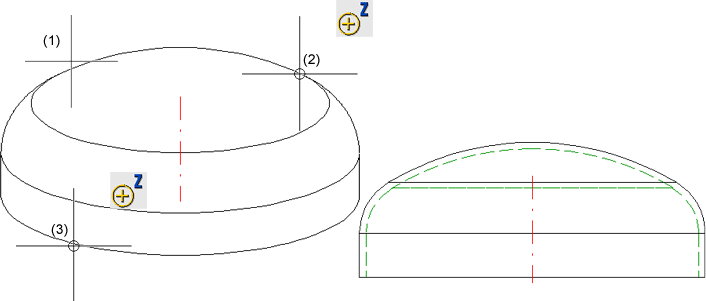
Create the crosshairs as follows:
- Specify the sphere/torus surface by selecting 2 edges.
- Specify the start point of the crosshairs. Alternatively, you can apply the point on the sphere or the torus suggested by HiCAD by pressing the middle mouse button.
- For spheres you need to specify another point.
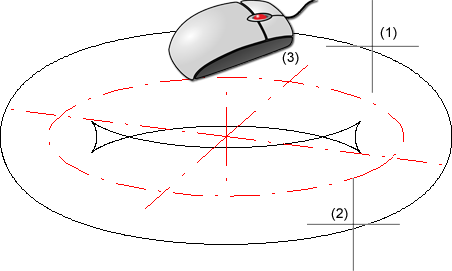
(1) 1st edge, (2) 2nd edge, (3) Point on torus via MMB
Axis, Cylinder surface
Creates an axis by selecting a surface via two edges.
(1) 1st edge, (2) 2nd edge
This function creates the surface axis for a cylinder surface or for the polyhedral facet of a polyhedronized circular hole. It applies similarly to cones, toruses and spheres. The symmetry axes are created for the torus and cone and, for the torus, additionally also the centre circle (large radius).
Axis, Via 2 points
Creates an axis by specifying 2 points.
- Select the body in the drawing, or select the active body via right-click.
- Then, specify the start point and the end point of the axis.
(1) Selected part, (2) Start point, (3) End point
Delete axis
3-D Standard > Tools > Crossh. > Delete axis
|
|
Individual Deletes individual axes. Select the desired axes. |
|
|
Group Deletes a crosshairs group. Select one of the axes. For example, if you have selected one axis of the crosshairs of a sphere, all axes will be deleted. |
|
|
All in active part Deletes all axes/crosshairs of the active part. |


If one of the Delete crosshairs functions is applied to a crosshairs that has been automatically created by a different function, e.g. the insertion of a bore, this deletion will not be entered as a new feature, but as a sub-entry called Delete crosshairs beneath the creation feature:
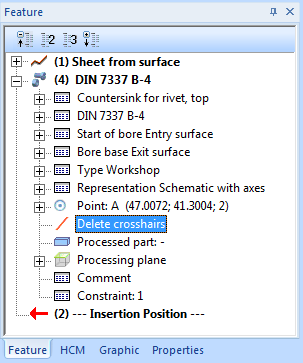
In this way this change will also be preserved in case of a recalculation. To undo this processing later, right-click the Delete crosshairs entry and choose Clear.
Hide axis / Show axis
3-D Standard > Tools > Crossh. > ...
|
|
Hide axis - Individual Hides individual axes. Select the axes you want to hide one by one. |
|
|
Hide axis - Group Hides a complete group of axes that form a crosshairs. For instance, if you select one axis of a crosshairs of a sphere, all axes will be hidden. |
|
|
Hide axis -All in active part Hides all axes / crosshairs of the active part. |
|
|
Show axis - All in active part Shows all axes / crosshairs of the active part again. |


The hiding of the axes is recorded in the Feature log in the form of an entry called Hide crosshairs.
If one of the Hide axis functions is applied to axes which have been automatically generated by a different processing (e.g. after insertion of a bore), this step will not be entered in the Feature log as a new feature, but as a sub-feature of the creation feature. In this way it is ensured that hidden axes will actually remain hidden after feature recalculations.
If you want to redisplay individual axes / crosshairs, right-click the Hide crosshairs entry in the corresponding feature and choose Clear. The corresponding feature entry will then be deleted.
To redisplay all axes / crosshairs of the active part in one step and simultaneously delete the corresponding feature entries, choose the Hide axis - All in active part function.
