Dimensioning Tools - Further Functions
Align in view
3-D Dimensioning + Text > Tools > Extras  > Align
This function automatically corrects – if necessary – the arrangement of 3-D dimensions in the active view, with the aim of avoiding dimension collisions where possible.
Linear dimensions (simple, parallel, reference and chain) and diameter dimensions are re-positioned in the active sheet view.
The dimension lines of the dimensions are moved so that the following holds (where possible):
- Dimension lines, dimension figures (texts) do not overlap.
- Chain and reference dimensions are not separated.
- Projection lines do not run through dimension figures and lines.
- The dimensions are aligned to a uniform grid.
- Individual linear dimensions that directly join one another are combined into dimension chains. In other words, the dimension lines are placed next to one another on a line. In the data store, however, they remain individual dimensions.
- Dimension lines are only moved externally. The direction of the dimension line defined by the user is not modified.
Change dimension assignment
3-D Dimensioning + Text > Tools > Extras  > Change dimension assignment
Dimensionings are assigned to the active part when they are created. However, you can also use the Change dimension assignment functions to subsequently assign dimensions to other parts.
|
|
Individually |
Individual dimensions are assigned to another part. Identify the part to which you want to assign the dimensions. Identify a partial dimension of the desired dimensioning structure. |
|
|
Structure |
All partial dimensions of a dimensioning structure, such as parallel dimensions or chain dimensions, are selected. Identify the part to which you want to assign the dimensions. Identify a partial dimension of the desired dimensioning structure. |
|
|
All in part |
All dimensions of a part are assigned to another part. First identify the part to which the dimensions belong (source), then identify the part to which you want to assign the dimensions (target). |
|
|
All |
All dimensions of the active drawing are selected. Identify the part to which you want to assign the dimensions. |
|
|
Rectangle |
All dimensions in one or several rectangles are assigned to another part (right-click to conclude rectangle creation). |
Transfer dimensions
3-D Dimensioning + Text > Tools > Extras  > Transfer dimensions
Dimensions and their base points can be completely transferred from one part or assembly to another part or assembly.
The following functions for the transferring of dimensions are available:
|
|
Individual dimension or dimension structure |
Transfers individual dimensions or dimension structures to another part or assembly. Identify the part of which you want to transfer the dimensions. Then, select the dimensions you want to transfer. You use the same options as for Change dimension assignment function. After selection of the dimensions, specify the part or assembly to which you want to transfer them. |
|
|
All in part |
Transfers all dimensions of a part / an assembly to another part / assembly. Identify the part or the assembly with the dimensions you want to transfer (source). Then, specify the part to which you want to apply them (target). |
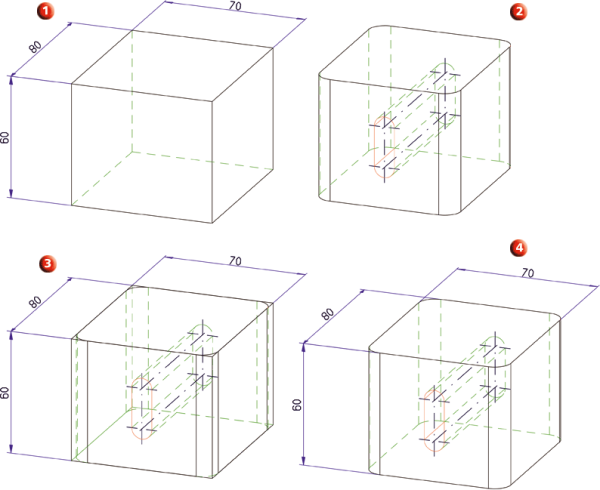
Example:
- Let us assume that you want to replace an existing, dimensioned part of the drawing with a (largely) identical part, and transfer the dimensions to the new part beforehand.
- The position and alignment of the new part are identical.
- The dimensions should be associative after transfer to the target body. If a direct transfer of the base points to the target body is not possible, the dimensions will be reported as non-associative and can be geometrically detected anew or deleted using the standard procedure.
(1) Original part with dimensions, (2) Replacement part (3) Coincident original part and replacement part, (4) Replacement part with transferred dimension
 Important:
- The transfer of dimensions is only possible for geometrically similar parts located at the same position.
- The dimension base points can only be transferred if the corresponding geometry in the new part coindices!
- All dimensions of the selected source (part or assembly) will be transferred to the selected target (part or assembly).
- The assignment of the dimensions to different sub-parts of the assembly will not be taken over!
Version update
3-D Dimensioning + Text > Tools > Extras  > Version update
As of Version 2008, HiCAD supports a completely new data model for dimensioning. When loading drawings from older HiCAD versions (earlier than 2008) with the new version for the first time, you have the option to convert the dimensions in the drawing according into the new data model. Answer Yes to the query Convert all "old" dimensions into "new" dimensions?.
If you answer No, the old dimensions will be retained first. For a subsequent conversion of these dimensions use the functions of the Version update menu.
|
|
Individually |
Individual dimensions are converted. |
|
|
All in part |
All dimensions of a part are converted. |
|
|
All |
All dimensions of the active drawing are converted. |
 It is recommended to convert the dimensions immediately when loading old drawings!

Dimensioning Tools (3-D) • General Notes on Dimensioning (3-D)


