Move and Rotate Sketch Elements
Skietch > Transform > Rotate  > Move+Rotate
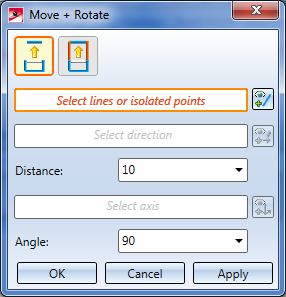
Use this function to move and rotate lines and isolated points of a planar sketch in one step. When you call the function, the Move + Rotate dialogue window will be displayed:

The currently active step will be highlighted with an orange frame in the dialogue window. After calling of the function these steps consist in the selection of lines or points.
Step 1: Select option
Use the symbols at the top of the dialogue window to specify the handling of connected lines during moving + rotating.
|
|
Move + Rotate lines, individually If this option is active, only the actually selected lines (highlighted red) will be moved + rotated. Connected lines will not be adjusted.
|
|
|
Preserve connected lines and adjust length If this option is active, HiCAD will attempt to preserve the position of the connected lines if possible. In the process, the length of the lines to be moved+rotated may be adjusted by means of new intersections. For distances the angle between connected lines will be preserved. If it is not possible to preserve the connected lines, the |
Step 2: Select elements
Select the lines or isolated points that you wish to rotate in the drawing, or use the functions of the context menu that you can open with a right-click during the selection process.

|
Connected lines or edges* Use this function to select all lines or edges that are connected to the next identified edge in one step. The lines and edges will be selected up to a point where a continuation would no longer be unambiguous.
|

|
Tangentially connected lines or edges* Choose this function if you also want to select all tangentially connected lines or edges when identifying the next line or edge. |

|
Lines in rectangle (CTRL+LMB)* Use this function to select lines by means of a selection rectangle. Please note that only lines of the active part will be considered. If the rectangle is drawn from the top left to the bottom right, all lines which are completely located within the rectangle will be selected. If the rectangle is drawn from the top right to the bottom left, lines only portions of which are located within the rectangle (i.e. intersect with the rectangle) will be selected as well. The selected lines will be highlighted in a different colour. You can also call the function via the keyboard. Proceed as follows:
|

|
Cancel (Esc) Cancels the function. |
*Normally, already selected lines and edges will be de-selected if you click them again.
For the above functions marked with an asterisk *, however, the following applies: If you click lines that have already been selected or if already selected lines are located in a selection, they will not be removed from the selection.
The selected elements will be highlighted in the drawing and the number of selected elements will be shown in the dialogue window:

Press the middle mouse button to end the selection. Click the  icon to expand the selection.
Step 3: Select direction
After completion of the line selection, HiCAD automatically switches to the"Select direction" option.
Select the direction of the displacement by
- specifying the start point and the end point of the displacement vector,
- selecting an edge, or
- selecting a plane. In this case, the surface normal will be used as the displacement vector. In the case of planar sketches, the normal will be projected onto the sketch plane.
You have the additional option to right-click and open a context menu with further functions for direction specification.
|
|
Origin
|
|
|
X-axis (only for 3-D sketches) |
|
|
Y-axis (only for 3-D sketches) |
|
|
Z-axis (only for 3-D sketches) |
|
|
Step back
|
|
|
Cancel
|
To change the direction, click the  icon and specify the new direction as described above.
The direction will be automatically visualized in the drawing. At the same time, HiCAD will calculate the length of the displacement vector based on the selected direction, and offers the calculated value for editing in the Distance field.
After completion of the direction specification, HiCAD automatically switches to the specification of the rotation axis.
Step 4: Select rotation axis and rotation angle
Select the rotation axis as follows:
- Planar sketches
Determine the stretching centre via a point specification. If this point is located outside of the sketch, it will be projected onto the sketch plane. - 3-D sketches
Select the rotation axis by - specifying two points,
- selecting an edge, or
- selecting a plane. The rotation axis will be the plane normal.
You have the additional option to right-click and open a context menu with further functions for direction specification.
|
|
Origin
|
|
|
X-axis (only for 3-D sketches) |
|
|
Y-axis (only for 3-D sketches) |
|
|
Z-axis (only for 3-D sketches) |
|
|
Step back
|
|
|
Cancel
|
Enter the rotation angle. Rotation axis and direction will be dynamically visualized in the drawing.
If the selected lines/points are to be rotated - as shown in the preview - click OK or Apply.
When you select Apply, the dialogue window will remain open after performing the rotation. Only the list of the selected elements will be deleted in the process, all other settings will be preserved and cannot be changed. In this way, further elements can be rotated in the same way.
When you select OK, the dialogue window will be closed after the rotation.
When you middle-click in the drawing while the dialogue window is open, the following will happen:
- If enough value inputs have been made, the function will be executed. The dialogue window will remain open (same as with Apply).
- If the value inputs are insufficient, HiCAD will jump to the next required selection. For instance, if you have chosen the line to be moved and rotated and then press the middle mouse button, HiCAD will jump to the selection of the direction.

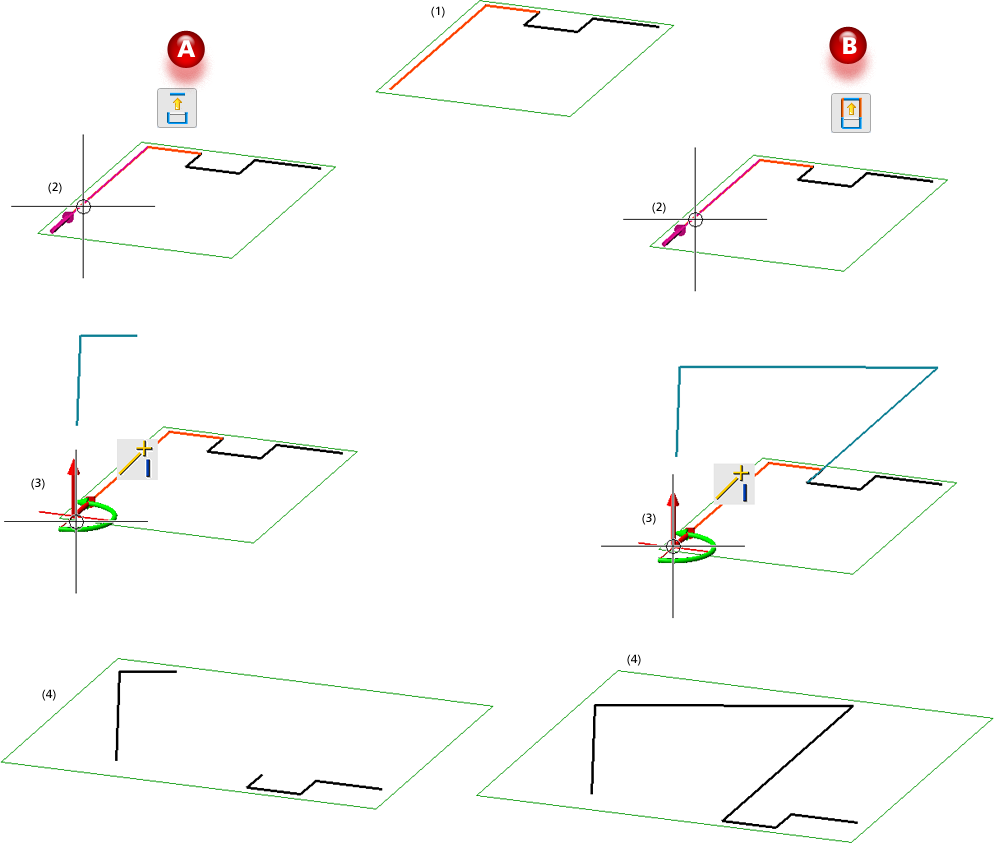
A: Move lines individually, B: Preserve connected lines and adjust length
(1) Selected line elements; (2) Displacement direction, (3) Selection of rotation point, Angle: 20 °; (4) Result
 Please note:
- The Distance input field will be locked as long as no displacement direction has been chosen
- The selected lines and isolated points must belong to the same sketch. Otherwise, a corresponding error message will be displayed.
- HCM constraints will be adjusted if possible. If an adjustment is not possible, they will be removed.
- The function shows the same behaviour as in older HiCAD versions (before HiCAD 2016), if you place the rotation point into the end point of the displacement.
- If, after clicking Apply, a renewed selection of lines / isolated points leads to a conflict with an already selected direction rotation axis, it will be deleted and needs to be selected again.


