Insert Column
In order to insert a new column, you need to:
- Activate the required table.
- Click on the column header with the right mouse button.
- Select the New column function. The appropriate dialogue window will be displayed.
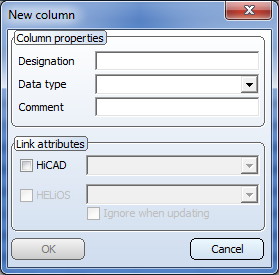
- Under Column properties, enter the following data:
|
Designation |
Caption of column (Column heading) |
|
Data type |
Data type of column content:
|
|
Comment |
Comments can be assigned to each column. These are displayed as explanatory text or help text if you move the cursor over the column heading. |
- If you want to link the column to a HiCAD attribute, activate the HiCAD checkbox and select the required attribute.
- If you want to link the attribute to a HELiOS Part Master Management attribute, activate the HELiOS checkbox and select the required attribute.
For HELiOS attributes the additional Ignore when updating checkbox is available. When creating a HELiOS article master for a standard part sub-type (e.g. a particular bolt/screw DIN.... Dimension...) with the Catalogue Editor, the catalogue attributes that you have assigned to HELiOS attributes within the standard, will also be transferred. If you repeat the transfer, the article master will be updated. In the process, the catalogue attributes will normally be transferred to the HELiOS attributes again . If you do not want this, activate this checkbox. As long as the checkbox is active, the value in HELiOS will be retained during the update.
The new column will be inserted at the end of the table. Columns with an attribute link are identified by the  symbol for HiCAD or the
  symbol for HELiOS, respectively.
![]() You can only add columns to tables
of a factory standard catalogue.
You can only add columns to tables
of a factory standard catalogue.
 If you want to assign the same column to several or all tables of a catalogue, use the New column for several tables function.

