Project: HiCAD 3-D
Example: Flange
This example illustrates the conversion of the two 2-D single part views shown below to a 3-D flange via rotation.
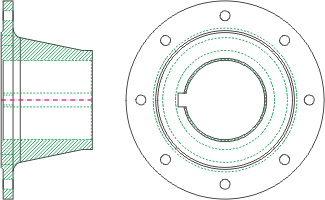
Front view and side view of a flange
Proceed as follows:
Load the REKO_BSP2.SZN file and activate the conversion module (3-D Standard > New > Extruded  > 2-D->3-D Conversion).
The conversion of the 3-D model comprises three steps:
Step 1: Define views
- Select the Views function from the 2-D->3-D Conversion menu.
- Draw a selection box (1), (2) for the front view and specify the end point of the centre line as reference point.
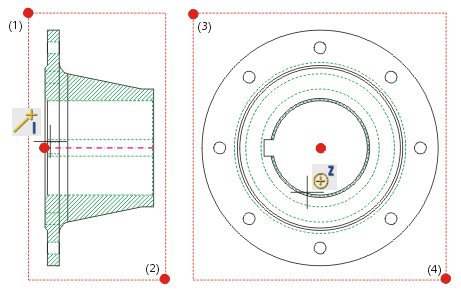
- Draw a selection box (3), (4) for the side view (left) and specify the centre point of the inner circle as reference point.
- As a third view is neither available nor required, select ESC/END to end the view definition. The views are now defined.
Next, the required lines need to be selected.

Step 2: Derive 3-D model
- Select theRevolved Solidsfunction from the 2-D->3-D Conversion menu.
- Identify in the front view the polyline you want to rotate (1).
- Determine the rotation axis (2).
- Specify the start point of the centre line as the reference point for rotation.
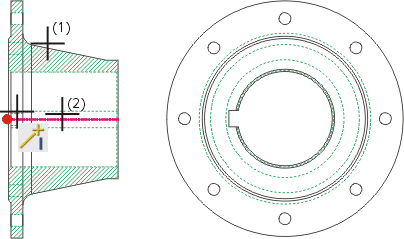
HiCAD will automatically derive the 3-D model. If required, you need to go to another screen area in order to view the 3-D model (e.g. using the Screen  key).
key).
The first step towards the 3-D conversion has now been taken. Next, take over holes and threads.
Step 3: Take over holes and threads
- Select the Holes function from the 2-D->3-D Conversion menu.
- Identify the
3-D part (1).
- Then identify all 2-D polylines for the hole contours (2) - (10).
- Right-click to end the selection.
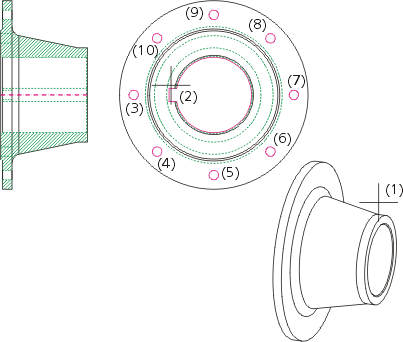
- The 3-D model is now appropriately modified. If you want to rotate the model and see the result, select the Rotate View function from the upper toolbar.
- If you want to shade the 3-D model, select the Shade 3-D
View, with edges or without edges from the Views toolbar.


Example: Cast Part • Example: Bracket
|
© Copyright 1994-2019, ISD Software und Systeme GmbH
Version 2402 - HiCAD 3-D
Date: 06/10/2019
|
> Feedback on this topic
|