 > Contour
Hatching, Define
> Contour
Hatching, Define 
Project: HiCAD 2-D
2-D Part > Hatching > Def. > Contour
Hatching, Define
In contour-based hatching, the interior of closed polylines is hatched; the graphical elements can, however, belong to different parts.
After activating the Contour Hatching, Define function, you can choose between two contour types.


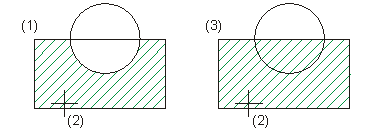
(1) Hatch surface
(2) Contour identification point
(3) Hatch existing contour
This hatching uses the contour determination algorithms for defining the contour to be hatched and does therefore not depend on the existence of internally contiguous polylines in a part.
To define the contour, you need to specify a contour identification point. The identification point determines the contour's initial graphical element.
If there are no other elements in the interior of the contour, you can choose any point in the interior as the contour identification point. Typing in the area to be hatched enables you to obtain the hatching.
The hatching can consist of lines or symbols:
A hatching reference point containing all hatching information is created for each hatching.
In the case of an exclusion, you also need to specify an identification point for the exclusion contour. If there are several exclusion contours, they all need to belong to the same part as the hatching.
In the case of texts and dimensionings, the corresponding hatching exclusion points are automatically placed in the part. You need to place the hatching reference point that belongs to these exclusions in the part containing the text or the dimensioning.
In the case of clonings that affect a hatching element, the corresponding exclusions are handled with the same cloning type. With clonings, it makes sense to place hatching and exclusion elements in the same part.

2-D Part > Hatching > Def. > Define > Hatch contour
The mask containing the hatching parameters appears as for part hatching.
 Please note:
If you activate the Cut surface option in the Hatching Tool dialogue, you are additionally offered a cross-hatching (plastics).
2-D Part > Hatching > Def. > Define > Pattern contour 
The internal surface of the identified contour is assigned a pattern.
2-D Part > Hatching > Def. > Define > > Hatching parameters 
You can specify the various hatching attributes like line type, layer, colour, angle and hatching line spacing separately before selecting the contour.
2-D Part > Hatching > Def. > Define > Patterning parameters
The menu functions enable you to set the pattern parameters of layer, symbol angle, stretching factor, edge spacing and symbol spacing.

Contour Hatching Exclusion (2-D) • Contour Hatching Parameters (2-D) • Change Patterning Parameters (2-D) • Hatching (2-D) • Part Hatching (2-D)
|
© Copyright 1994-2019, ISD Software und Systeme GmbH |