Project: HELiOS
New Workflow
EDBSETUP.EXE > Workflow > Workflow
> New
Workflow objects control the process chain of a particular type of object,
e.g. a HiCAD 3-D drawing. They are either pre-defined or you are enabled to
create them yourself. User permissions (rights) are linked to the object name
and specify if an object may be viewed, created, changed or deleted. Permission
can be specified via the user input box.
Proceed as follows:
Create new Workflow
- Select Workflow from
the menu bar, then select Workflow > New. The Create
workflow object ... window will be displayed.
- Enter a Designation for the
object, e.g. "Steel Engineering".
- Select a Type for
the Workflow to refer to, e.g. 3-D Model Drawing, Project, Article, Folder etc.
If you have created several objects for 3-D Model Drawing, you can call the
HiCAD function New drawing and select one of them.
- If you select a group
in the Groups box, the members of the group will be indicated
in the User box. In this case, if properly logged in, users will work in HiCAD with the
"Steel Engineering" object. This can be deactivated
by clicking a user name.
- First select the group
and then the users. Specific authorisations are listed in the Process input
boxes. These permissions can be granted at a later date.
- Use the Insert
function to take over the settings. The Workflow schema window will
be displayed.
- Enter the Workflow designation. As the process chain influences the entire system you should not
overwrite a standard process, but enter a new name in the Workflow designation
field.
- Assign access
rights for Owners, Group and World. Access authorisations are set in
the Object access box for a document (object) when it is created.
This means that the permissions specified are granted to users for a drawing
created with the New drawing function. When using the World setting,
the system reverts to the access authorisation of the applied user (User
Functions).
- Click the Create
button to draw the Workflow scheme.
- Data has now been
saved, and the Workflow Scheme can now be created by clicking the
appropriate buttons in the Toolbar. The object type, i.e. "Steel Engineering", is automatically recognised as the starting point of the
process plan.

Steel Engineering

Create new Workflow Status
As a "Steel Engineering" Workflow has been specified, and this type of
object is based on a 3-D drawing, it makes sense now to insert the Workflow
Status In Progress now.
- Select the Create new
workflow status
 function from the Toolbar. The Workflow Status
window will be displayed.
function from the Toolbar. The Workflow Status
window will be displayed.
- Mark the Workflow
Status In Progress and select Apply.
- Click the "Steel Engineering" icon in the Workflow schema.
The cursor position determines the start and end point of the connecting
line. The status In Progress will be added to the scheme.
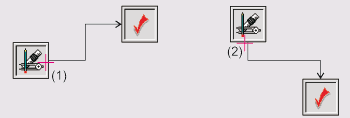
(1), (2) Identification points for the connecting
line
Add test step
- Select the Create
new workflow status function from the Toolbar.
- Mark the status Checkup, then select Apply.
- Click the In
Progress icon. The Workflow
step definition mask will be displayed.
- Enter a comment for
the test step in the Workflow step field, e.g. Request checkup. The comment will
be shown on the connecting line as a process step.
- Activate
Approve. The Checkup icon will be inserted into the
Workflow. The actions necessary to assign inspectors (testers) to test cycles
will be explained in a later chapter.
 In order to delete a listed status, select Delete test status.
Release object
- Select the Create
new workflow status function from the Toolbar.
- Select the status Released, then select Apply.
- Click the Checkup icon in the Workflow scheme.
- Enter a comment in the
Workflow step field, e.g. Execute release, and activate Released.
The Released icon is added to the Workflow.
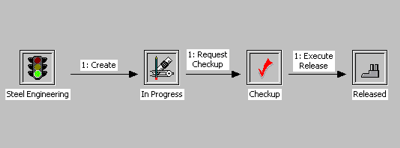
Simple Workflow
sequences
Define Release Status
Now define the Release Status. This needs to be done in order that HELiOS
will recognise this step as an approval.
- Activate the Released icon. The Workflow Step window will be displayed.
- Enter Document
release in the Designation field.
- Confirm your entry
with OK.
Expand test cycle
You can expand the test cycles if you want to modify an object (e.g. a
3-D drawing). Thus an extra exit will be assigned to the status, leading to the
previous status. Usually, a status has a maximum of two exits. In our
example the test status has one entrance (from In Progress) and one exit (to Released). The Expand test cycle function enables you to define another exit.
- Select the Expand
test cycle
 function from the Toolbar.
- Identify the icon of
the status to be exited, e.g. Checkup .
- The identification
point on the icon determines the orientation of the connecting line.
- Identify the status to
which the object is to be returned, e.g. In Progress .
- The Workflow step
definition window will be displayed.
- To return to the
Workflow Status In Progress , you need to reject this test step.
Enter a comment for the control step, e.g. Corrections, and select Reject. When a
rejection procedure is inserted, it does not necessarily have to return the
object to the previous status.
- Select the Expand
test cycle function from the Toolbar.
- First identify the status to be exited, e.g.Released.
- Then activate the status to which the object is to be returned, e.g. In Progress.
- Enter a comment for
the check step, e.g. Withdraw Release, and activate Reject.
- Save the Workflow.
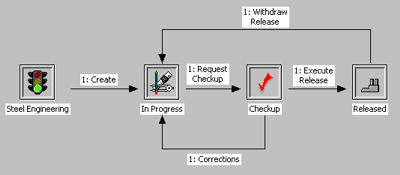
Workflow with correction option
The above figure illustrates the way in which
Checkup and Released objects can be returned for revision. If this
option was not available, HiCAD drawings could not be modified after the start of
a test procedure any more.
Responsible person/team
A responsible team and/or responsible person (inspector) needs to be assigned
to each workflow. This information is essential as no Workflow steps could
be carried out otherwise.
- Activate a Workflow
step, e.g. Request Checkup . The Workflow cycle
window will be
displayed.
- Now you can define a
team or an inspector to check the Workflow step. Mark the required
persons and confirm with OK.
Specific tests can be assigned to individual testers.

Workflow Management
• HELiOS Configuration (EDBSETUP)
• HELiOS Desktop: Workflow
|
© Copyright 1994-2019, ISD Software und Systeme GmbH
Version 2402 - HELiOS
Date: 11/12/2019
|
> Feedback on this topic
|