Axonometric and isometric projections are parallel projections. Here, parallel straight lines are also depicted as such and distorted in the same proportion.
Views > Projections > Standard AXO > Axonometric 
HiCAD makes eight predefined axonometric projections available for selection.
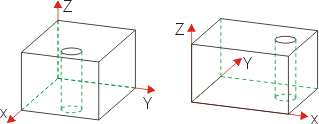
Axonometry 1 provides an unshortened representation of the y- and z-axis and a shortened representation of the x-axis. The x-axis is positioned at an angle of approx. 41°, the y-axis at an angle of approx. 7° to the horizontal of the screen plane. The z-axis stands perpendicular to it. Engineering axonometries 2 to 8 result from corresponding rotation of the axes.
The figure below provides an example of axonometries 1 and 2.

![]() You can also activate the axonometry 2 via Views > Projections
You can also activate the axonometry 2 via Views > Projections  or via the transparent toolbar.
Views > Projections > Standard AXO > Isometric 
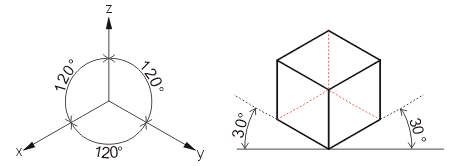
You use this function to select one of the 8 predefined isometric projections. Here, one of the axes, e.g. the z-axis, is perpendicular to the horizontal of the screen plane, while the two other axes each lie at a 30° angle to the horizontal. Isometries are characterized by preservation of length, i.e. the length ratios of the edges are preserved.


Projektion Methods (3-D) • View Functions (3-D) • Central Projection (3-D)
|
© Copyright 1994-2018, ISD Software und Systeme GmbH |