 Important:
 As of version 2008, HiCAD supports a completely new data model for dimensioning.
When loading drawings from older HiCAD versions (2008 or earlier) with the new Version 2009 plus for the first time, you can convert all dimensions of the drawing according into the new data model. Whether this happens automatically depends on the settings specified in the Configuration Editor (ISDConfigEditor.exe) at ... > Compatibility > Annotations > Dimensioning, 3-D.
Convert dimensionings of drawing when loading (no; yes, without query; yes, with query)
Default: yes, with query
Issue message after conversion
Default: No
If you selected the option yes, with query , HiCAD will prompt you to confirm the conversion of "old" drawings. You need to answer Yes to the query Alle "alten" Maße in "neue" Maße umwandeln? [convert all "old" dimensions into "new" dimensions ?].
If you select No, the old dimensions will be retained. For a subsequent conversion of these dimensions please use the functions of the Dimensioning Tools > Update menu.
 Important:
3-D dimensionings are associative. This means that, if the form or the position of the dimensioned part changes, the dimensioning is automatically updated - even in cross-part dimensioning.
![]() Every newly created dimensioning is assigned to the active part, even
if the dimensioned part belongs to another part. As a general rule, therefore,
activate the part that you are currently dimensioning, as it is only
then that the associativity of the dimensioning is guaranteed.
Every newly created dimensioning is assigned to the active part, even
if the dimensioned part belongs to another part. As a general rule, therefore,
activate the part that you are currently dimensioning, as it is only
then that the associativity of the dimensioning is guaranteed.
 When performing a check for non-associative
dimensions, an appropriate information is only issued if the dimensions in question are visible in a view. If this is not the
case, the dimension figure colour is still changed, but no message is issued.
If you work with several drawings, the 3-D dimensions can be hidden or shown selectively in various views. Furthermore, you can apply dimensions in HiCAD view-comprehensively. For instance, it would make sense to dimension in a particularly clearly-structured view (e.g. a list view) when working with rather complex drawings, and apply these dimensions to another view.
 When displaying dimensions in various views, a copy of the dimension is always created. This allows a different positioning of dimensionings in various views; dimension figures and associativity will however be retained
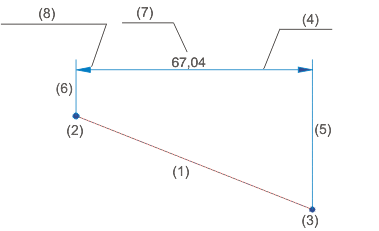
The components of which the dimensioning consists are referred to as dimension elements. These include:

(1) Dimensioned line, (2,3) Dimension base points, (4) Dimension line, (5,6) Projection lines, (7) Dimension figure, (8) Dimension line termination
The settings of the dimension parameters determine how the dimensioning to be created is ultimately structured. The large number of available parameters enables you to structure the layout of the dimensioning individually down to the last detail.
![]() Elements which lie directly behind a dimension figure can be interrupted automatically if required. If such automatic interruptions are applied depends on the current Parameter settings for dimensionings.
Elements which lie directly behind a dimension figure can be interrupted automatically if required. If such automatic interruptions are applied depends on the current Parameter settings for dimensionings.
In addition to individual dimensions, dimensioning structures are frequently used, i.e. dimensions consisting of several dimension geometries and dimension specifications.
|
Chain dimensions |
Dimension group in which two consecutive sub-dimensions have one common dimension point |
|
Parallel dimensions |
Dimension group in which all sub-dimensions have the same start point and the dimension lines of the sub-dimensions a fixed distance from one another. |
|
Running dimensions |
Chain dimensions in which all sub-dimensions refer to the same start point (the reference point). The dimension figures are automatically placed at the end of each dimension unit, perpendicular to the dimension line. |
|
Heights above datum |
Special reference dimensions in steel engineering |
|
Coordinate dimensions |
Special reference dimensions in which the first identified point is interpreted as the reference point. Starting from this point, each absolute dimension between the reference point and the other dimension points is determined. |
|
Half-section dimensions |
Dimensions in which the second dimension point is created by mirroring the first dimension point on a symmetry axis. Half-section dimensions are generally used to represent lengths of symmetrical parts. The representation is made in half-section, i.e. with a projection line and shortened dimension line. |
 Notes:
Use the Parameters, Dimension function to specify settings that apply globally for the current workstation and can be used for all subsequently created dimensions. You can find these settings on the System tab.

Dimensioning (3-D) • Dimensioning - Procedure (3-D)
|
© Copyright 1994-2018, ISD Software und Systeme GmbH |