 Carry out a data backup first
and test the result afterwards!
 This function enables you to transfer data from one attribute to another. It is necessary that both attributes are located in the same object (e.g. in the document). Basically, any data type can be taken over, e.g. from a multi-lingual attribute to a text attribute or vice versa, or from a date, saved as text, to a DateTime attribute.
The data type of an attribute can be changed using an intermediate step, namely by copying the data to a temporary attribute first.
 Carry out a data backup first
and test the result afterwards!
Example:
The Attribute GEPRUFT_DAT is available as a text attribute (VARCHAR). The test date will be entered into this attribute during a test step. This attribute is now to be transferred to a data attribute (DATETIME).
Step 1 • Step 2 • Step 3 • Step 4 • Step 5
The creation of the new attribute is now completed.
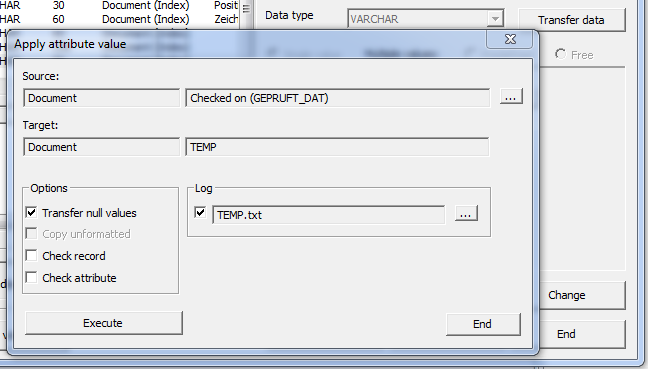
GEPRUFT_DAT will be entered as source attribute. You can now enter the options and the protocol for the planned transfer.

Use the Transfer null values option to transfer non-allocated source values. Source values which have not been allocated are referred to as "null" in the database language, e.g. mask field of null values are empty. If you select this option, the target value will be set to null if the source value is null. This option is useful if the target value does include values, but has to be equalised with the source attribute completely. If this option is not selected, existing values of the destination attribute will not be overwritten with null values of the source attribute. The combination of several attributes is a good example for a useful deactivation.
In our example this option will be deactivated, as the new attribute has null default values. This is always the case if an attribute has been newly created. You only need to take over default values. In some cases the transfer speed will be increased as well.
Two different ways are provided for the data transfer. One way uses the formatting functions of the HELiOS attribute management and will be selected by deactivating the Copy unformatted option. Most data types can be transferred, using the HELiOS formatting function. This way is very complex (longer duration) and prone to errors (complex transformation steps). For most transfers, however, it is the only possibility and offers a greater security as HELiOS checks the values.
If this option is deactivated, the values will be copied on a database level. This process is essentially faster, but requires a deeper internal comprehension concerning the database types used by HELiOS. In order to provide a safe and compatible operation, this option can only be selected if an identical HELiOS data type has been selected for both attributes. In our example, the latter is the case, therefore this option has been chosen.
In this example, specify the settings as follows:
The attribute GEPRUFT_DAT can now be deleted.
Now create a new attribute GEPRUFT_DAT with the data type DATETIME.
The advantage of DATETIME attributes is that the date will be saved independent of the formatting. Therefore, the display format can also be changed subsequently, if there are no reasons not to do so. It is also used for the taking over data for the interpretation of source data. After data transfer the display format can be changed.
Now transfer the data from TEMP to the attribute GEPRUFT_DAT. During this process, the data type will be changed. The display format has been adjusted in Step 3 already.
You can delete the TEMP attribute after successful transfer. As a precaution, however, you should test the result. If required, the protocol showing the source values which have not been transferred may give you a hint.

The Attribute Editor • General Information on HELiOS
|
© Copyright 1994-2018, ISD Software und Systeme GmbH |