Before installing the HELiOS Spooler, please note the followiung:
The installation of the Spooler takes place via the HiCAD or HELiOS installation DVD. In the selection mask you can find the HELiOS Spooler button.
In the following dialogue window, click Next.
Enter a path for the HELiOS Spooler installation. Suggested will be the default path C:\Program Files\HELIOS Spooler. If you want to select a different path, click Change... and enter the desired directory. Then, click Next.
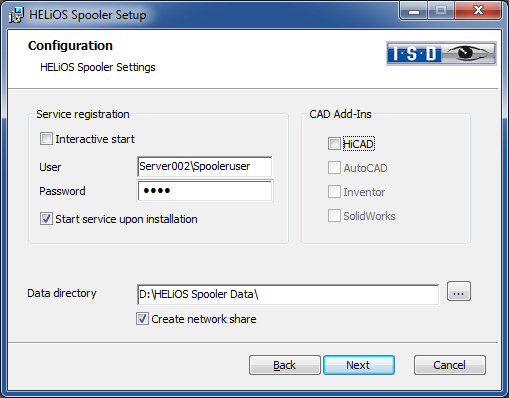
In the following window, specify the Service registration and Data directory.
In the Service registration area you specify the user account under which the Spooler is to run.
Normally, the HELiOS Spooler runs as a Windows Service in the background.
As a system service itself has no access to the list of installed printers, and also for safety reasons, a specific User accountwith the required read and access permissions in the domain must be created for Spooler operation. This takes place via the Windows user management (Start > Control Panel > User Accounts).
In this standard configuration the Spooler process will be started by the operating system in a special session which is not visible for the user. Therefore, the process will even continue running after the Spooler user has logged off from the computer.
When a User (the name is freely selectable) has been chosen to be run as Spooler, the User should have been created in the Windows system beforehand and entered, with a User name and a Password beneath Service registration.
Activate the Interactive start checkbox when you want to install the CAD Add SOLIDWORKS.
When this option has been selected, the Spooler will no longer be set up as a service, but will be started directly in the foreground via the Administration UI. During this type of operation, the Spooler process will appear in the form of a small text window in the window bar (Caution: When you log off from the Server, the Spooler process will also be ended here!).
 Please note:
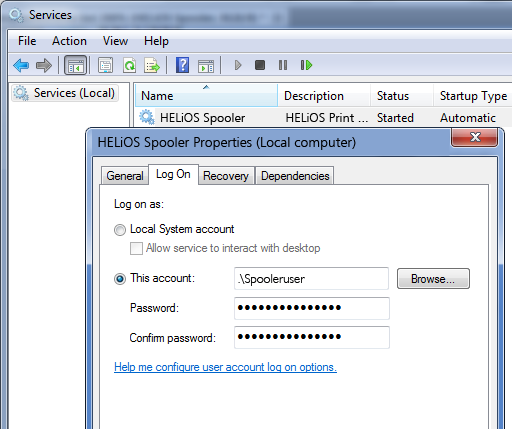
If the password of the HELiOS Spooler should change or expire, click the Start icon on the Windows task bar and select Control Panel > Administrative Tools > Services (or Local Services in other Windows versions). Right-click the HELiOS Spooler service and choose Properties. In the Properties dialogue window, open the Log On tab and enter the new password.
If the Start service upon installation checkbox was active, the Spooler service will not require a manual start after installation.
In the Data directory field you will find a suggested default path for the Spooler that you can change if desired.
Select the data directory. Activate the Create network share checkbox to enable the communication with the PrintClient. If the network share is not created during installation, it must be created manually afterwards. Since special settings will be required here, we recommend contacting our Consulting team.
On the right hand side of the window, beneath CAD Add-Ins, all CAD systems that could be found on the system, are offered for selection. If you want to print with the Spooler via one of these CAD systems, select the desired system.
Click Next. In the following dialogue, click Install. After successful installation, click Finish.
Please note:


HELiOS Print Client • Print Management
|
© Copyright 1994-2018, ISD Software und Systeme GmbH |