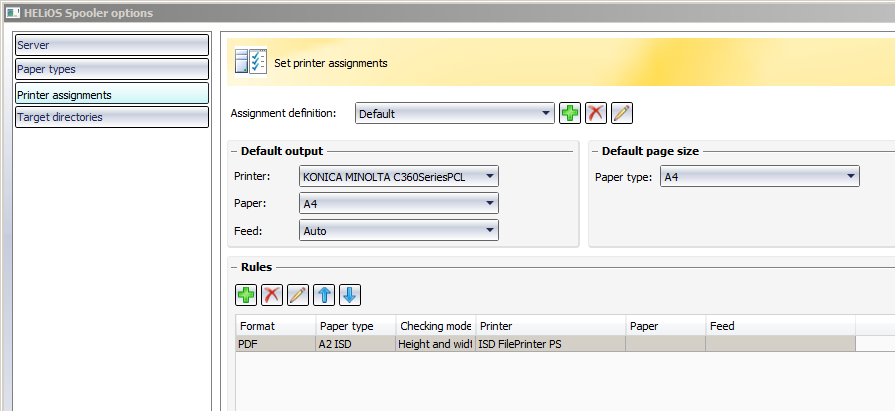
On the Printer assignments tab you can, for example, assign print jobs with particular paper types to particular printers.
Click the  symbol to the right of the Assignment definition input field and enter the names of assignment profiles to be added to the selection list. All further settings (and rules) that you can set in the window will apply to the assignment definition selected in this field.
Beneath Default output you can select a default printer for print jobs with the current assignment. Paper (Format) and Feed are optional fields sind optional. If nothing is selected here, the default settings of the corresponding device will apply.
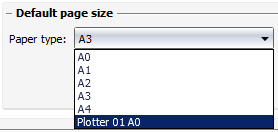
Beneath Default page size you can set for the Spooler a default format for files which are not automatically recognized by the Spooler (e.g. doc). The selection list shows all entered paper types.
Click the  symbol to change the assignment definition, and
  to delete the selected profile from the list.
Beneath Rules you can set additional rules if desired.
Click to open a dialogue for the adding of a rule to the current assignment definition.
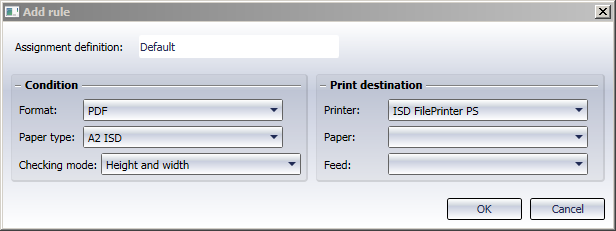
A "Rule" consists of two components: The Condition component and the Print destination component. The Condition determines whether the Rule applies to a concrete print job or not. The Print destination determines the output device (printer) for the printed document.
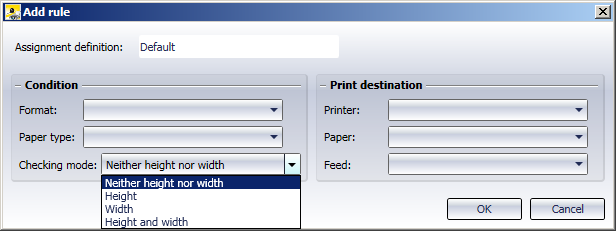
On the left, beneath Condition, the concrete case can be defined to which the rule is to apply.
In the Format field you can enter a file format (e.g. a HiCAD SZA file, various image file formats or Office file formats). In the Paper type field you can enter a paper format (A0, A1, A2, Letter etc.). In the Checking mode field you can specify the checking criteria for the format: Height, Width, Height and Width, or Neither height nor width.
Normally, the Checking mode should be set to Height and width. This will make the Spooler consider the height and the width of a document when deciding whether a currently checked Condition applies. The Checking mode Width allows, for instance, a printing of special formats with various heights, but identical widths on a roll printer. A rule with the Checking mode Neither width nor height applies to all print jobs of the set file format, irrespective of the page size.
On the right, beneath Print destination, you can select the Printer to which the file is to be sent according to this rule. This make sense if, for example, all exceptional formats which are larger than A3 are not to be sent to the default printer specified on the Assignment definition tab (as this printer is not suitable for this paper size) but to a different to a different printer. Paper and Feed depend on the respective printer type and are optional fields (if no selections are made here, the default settings of the output devices will apply).
Click OK to enter the rule into the list.
When sending a print job, the HELiOS Spooler will check whether one of the rules applies (working from the top to the bottom of the list). If this is the case, the print job will be executed.
Click the symbol to edit a marked rule in the list, or to remove it from the list. Use the arrow keys to move a marked rule up or down in the list. If several rules are required for a particular file format, it is recommended to place the "most specific" rules highest to give them a higher priority than the "more general" rules. Normally you would define, for instance, one or several rules with various paper sizes and the checking mode "Height and width" or (only) "Width" and, further down, one rule with the checking mode "Neither height nor width" to cover the remaining cases.
Click Apply to save the changes in the dialogue window. Click OK to save the settings and close the window.
 Please note:
(Note: Currently, only CAD drawings can be re-scaled by the HELiOS Spooler. This functionality is not yet available for Office document formats and PDFs.
A particular page type (here: "A2 ISD") is sent in PDF format to the Plot Server and is to be output via the ISD FilePrinter PS. Here, the Height and Width of the document will be checked. All other print jobs are sent to the default output device specified at Default output.
Click the icon next to the Assignment definition input field. In the dialogue window below, enter a name for the assignment, e.g. "Plotter 01".
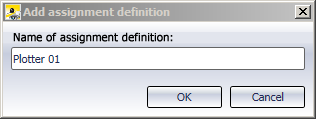
Click OK to add it to the selection list.

On the left, beneath Default output, select the desired printer, which must have a driver installed on the system. For Feed, select Automatic selection to be on the safe side.
On the right, beneath Default page size you could also assign a user-defined special format as default, e.g. a format called "Plotter01 A0", as defined for Paper type in the screenshot below:
You can now assign Rules to this assignment definition.
Example: Let us assume that a drawing in HiCAD format (SZA) in A0 format is to be sent to a different printer, but in the format Plotter01 A0.
An XLS file that could, for example, contain a BOM for the drawing, is to be sent to the ISD FilePrinter.
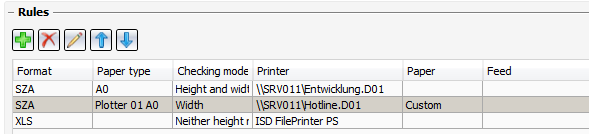
If the print job for an SZA file is sent via the assignment "Plotter 01", it will first be checked, using the checking mode "Height and Width", whether its format is A0. If this is the case, it will be forwarded to the entered printer. If this is not the case, it will be checked, using the checking mode "Width", whether it has the format "Plotter01 A0". If so, the print job will be sent to a different printer.
If none of these rules apply, the default settings defined in the window will be used.
If an XLS file is forwarded to the Spooler due to this assignment definition, it will be processed by the ISD FilePrinter PS. Appropriate conversion options and target directories can be defined on the HELiOS Spooler Options: Target directories tab.


Settings • Output Devices • HEliOS Print Client • Print Management
|
© Copyright 1994-2018, ISD Software und Systeme GmbH |